Showing posts with label Star Wars. Show all posts

Saturday, 11 June 2022

Star Wars 1/12 scale Aratech 74-Z Military Speeder Bike (Completed: fully-painted plus water decals)

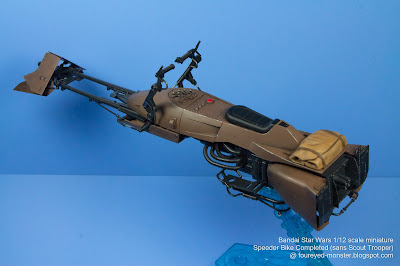
 Even with engagement of hobby activities at an all time high, it still has taken me the better part of the year to complete my first project. Because of how my projects usually stack up, the completion rate tends to rise towards the end of the year. And that's providing no hobby malaise has set in. Taking the Scout Trooper into account, this Star Wars Speeder Bike project actually began two years ago. As such, it's technically a long overdue project that's finally complete. So here then is the fully painted 1/12 scale Aratech 74-Z Military Speeder Bike, inclusive of water decals.


1/12 scale Aratech 74-Z Military Speeder Bike - Completed: fully painted plus water decals

 Prior to work on the Speeder Bike, I had used only one water decal for the Scout Trooper. And although I did use more for the bike, about 13 decals, I also did not use all the available decals for it. On some key areas of the Speeder Bike, for example the red triangular symbols and the large round red button on the center command console, I had painted the details rather than use water decals. As a rule of thumb, if I can paint the details then I usually do not use the water decal equivalents on the model kit. This was the case for the Speeder Bike you see here as well as the Scout Trooper.


Remaining water decals after limited use on the Scout Trooper

Remaining water decals after limited use on the Speeder Bike

 Weathering on the Speeder Bike was kept to a minimum. Most of it comprised scratches on the steering vanes, hull, and, black metal parts as well as some soot and grime on parts of the hull. Adopting this minimalist approach suits what I intend to eventually do with the Speeder Bike. It gives the bike just enough wear and tear to look realistic but not to look decrepit. That makes the bike, in my opinion at least, suitable to be used in a propaganda shot in my Join-the-Empire vignettes


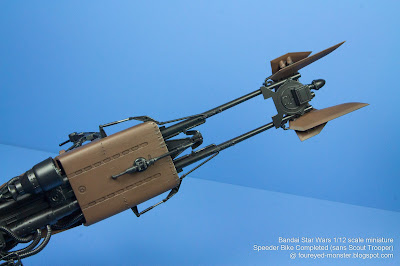
Closeup view of the Speeder Bike's front end, specifically the Steering Vanes

Tiny decals with red letterings reside on both the outrigger and base of the handlebar

Apart from the red lettering decals, there is an equally tiny decal with white letterings (see side of the Speeder Bike's hull, towards the right end of the picture)

Center control panel comprises mainly painted details and a tiny reddish orange decal

 All the water decals that were used on the Speeder Bike consisted of two type. It was either red or white letterings against a black background. There were other type decals such as the triangular and square red shapes, of which I used the latter on the center command console. For the former i.e. the triangular red shaped decals, I decided to paint the parts instead of using decals. 


Towards the rear of the Speeder Bike there are two tiny decals ...

... one on the left side armor, and the other at the back between the two air brakes.

 Some decals had a shiny look to them, especially the tiny one located at the nose section of the Speeder Bike. I am fairly comfortable leaving things alone. But if I were to do something to mitigate the glossy shine of the decals, then I may used flat/matte topcoat over the said decals.


Decals with red letterings are located on the right side of the bike's Repulsor Block ...

... as well as on the Power Cell (the contraption that looks like an engine turbine).

Identical decals are located on the side of the hull and base of the handlebar

A tiny decal (white letters/black background) can be found on the nose of the Speeder Bike

Closeup view of the Speeder Bike's Steering Vanes, this time from the other side

 Do the decals make the Speeder Bike look better? While the answer to that is subjective, I feel that the water decals do make the bike look that little bit better. Enough to make the effort worthwhile.


Star Wars Speeder Bike: Fully painted including water decals (isometric view, front)

Star Wars Speeder Bike: Fully painted including water decals (isometric view, back)

 Below is a YouTube video showcasing the Bandai Star Wars 1/12 scale Aratech 74-Z Military Speeder Bike in all its glory - fully-painted together with most of the water decals applied.


 So as this blog post nears its end, does this means it will be the last you see of the Speeder Bike? Nope. I'm gonna milk it for all its worth. The bike is going to be showcased in two additional blog posts and videos: one together with the Scout Trooper, and another together with both the Scout Trooper and Girl's Rider figurine once she is completed. The latter is part of my Join-the-Empire vignettes. Meanwhile, two other projects are gathering pace i.e. the Space Battleship Yamato as well as the Evangelion Unit-01 Test Type. More on both projects soon, I promise. Until then stay safe and be well.


http://shireworks.blogspot.com/p/custom-painted.html

FourEyedMonster Miniatures YouTube Channel

https://www.facebook.com/FourEyedMonster-313145002078520/

Saturday, 21 May 2022

Star Wars 1/12 scale Aratech 74-Z Military Speeder Bike (sans water decals and sans minor paint details)

 If you have yet to watch the Star Wars Speeder Bike final assembly video, then you might want to check out the following link first: https://www.youtube.com/watch?v=m8YaHpaRTOY. What I've uploaded here are far more detailed closeup photos of the Speeder Bike. And as I mentioned in the previous post, the bike is not entirely finished yet. After final assembly I realized I had completely forgotten about the bike's water decals as well as overlooked some minor paint details. It's very close to being finished though, at about 95% complete. So the finish line is in sight.   


Speeder Bike work-in-progress: 95% complete; still needs decals and minor painted details

 Final assembly of the Speeder Bike was split into two pseudo-phases. Phase one involved the attachment of the Steering Vanes/Outriggers onto the Lower Hull followed by the Upper Hull. While the phase one process seemed fairly straightforward, it was in reality quite nerve-wracking. Having to snap-fit large sub-assemblies comprising fragile parts, I was always fearful of breaking something because considerable force is required to ensure the joints come together as seamlessly as possible.    


From top to bottom: Lower Hull, Upper Hull, and Steering Vanes/Outriggers

Star Wars Speeder Bike, after Phase One of the final assembly ...

... comprising the three aforementioned sub-assemblies all attached together.

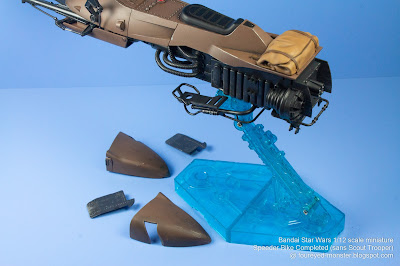
 Meanwhile Phase Two was appreciably easier as it only required the snap-fit of the bike's rear Side Armor/Hull Plates and Air Brakes (see below). There are actually two display options for the Air Brakes i.e. one with the flaps closed over the thrusters, and one with the flaps open. I chose the former as I plan to display the Speeder Bike together with the Scout Trooper and Girl's Rider figurine in a static pose. When you think about it, you can also mix-and-match i.e. have the left flap open and the right one closed if you want to do a vignette of the bike turning right, and vice versa. 


Phase Two of the final assembly focuses on the rear of the Speeder Bike ...

... specifically attachment of the Side Armor/Hull Plates and Air Brakes of which ...

... the former covers up the Thrust Arrays while the latter directs the thrusts generated.

 It was only after I had fully assembled the Speeder Bike did I notice I had forgotten to apply water decals as well as forgotten to paint some minor details on the bike. Only once I have done both will the bike be considered complete. The following is a series of photos of a nearly-complete bike.


A nearly complete Star Wars Speeder Bike, attached to a clear blue display stand

Side profile (viewed from the left) of the Star Wars Speeder Bike

Star Wars Speeder Bike still requires some minor details to be painted ...

... as well as have water decals applied, primarily to the hull.

Side profile (viewed from the right) of the Star Wars Speeder Bike

Scout Trooper (not shown here) will be the final piece that completes this kit

 Of course once the Speeder Bike has had decals applied on it and additional minor details painted, it will be finally ready for a photo shoot with an already completed Scout Trooper. And once that is done, both will be posed with a yet-to-be-finished Girl's Rider figurine. Just to recap if you're wondering what I'm talking about, all three are part of a Join-the-Empire vignette that I am doing.


Bottom view of the Speeder Bike, from the rear and mid-sections ...

... all the way to the Steering Vanes and Outriggers.

Closeup view (front end / bow) of the Star Wars Speeder Bike

Closeup view (mid-section) of the Star Wars Speeder Bike

Closeup view (rear end / stern) of the Star Wars Speeder Bike

 As I type out this last paragraph, I guess it's worth pointing out that I've since went ahead to apply the water decals on the Speeder Bike as well as finish painting the minor details I had overlooked. However, I haven't had time to edit the photos and video I took of the process. So while I do the necessary edits, I may upload some interim posts of another work-in-progress project, specifically the Space Battleship Yamato 2199 (Cosmo Reverse Version). So do look out for that in the future. For now, it's time to end this post. Keep on hobbying, stay safe, and be well.  


https://shireworks.blogspot.com/https://www.facebook.com/shire.works

http://shireworks.blogspot.com/p/custom-painted.html

Friday, 13 May 2022

Star Wars 1/12 scale Aratech 74-Z Military Speeder Bike (Final Assembly Video)

 After a brief reintroduction of my latest addition (i.e. the Evangelion Unit-01) to the worktable, it was back to final stages of the Star Wars Speeder Bike project. And these last few stages began with the final assembly of the bike. This isn't the absolute final stage yet because I had inadvertently left out the water decals as well as some minor paint details. Both tasks will be tackled in the coming days. Until then the Speeder Bike is at least fully assembled and 95% complete.


 Below is the video of the Speeder Bike's final assembly process, which also has been uploaded to YouTube. Remember to choose HD resolution in the settings for a better view.


 In addition to the video above, I have also taken a selection of detailed photos of the bike's final assembly. As I couldn't finish editing the photos in time to post them together with the video you see above, I'll only post them together with a more detailed narrative in the next post. Do wait for that post as it has better closeups of the fully-assembled Speeder Bike. And so this short post comes to an end with my perennial wish that you dear reader, stay safe and be well.


FourEyedMonster Miniatures YouTube Channel

http://shireworks.blogspot.com/p/custom-painted.html

Sunday, 1 May 2022

Star Wars Speeder Bike [Work-in-Progress: Painting & Assembly of the Lower Hull Components]

 Just as it was for the upper section, I had similar misgivings for ignoring the manual's assembly order. Instead I had put together all relevant components onto the Speeder Bike's Lower Hull before combining the upper and lower hulls together. Whether this will adversely affect the final assembly process which for me means snap-fitting large pieces with fragile attachments - the Steering Vanes on Outriggers; the Upper Hull with all its components fully attached; and this the Lower Hull sub-assembly - remains to be seen. For now let's see how the Lower Hull Components was put together.


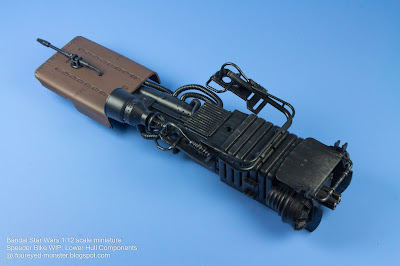
Star Wars Speeder Bike work-in-progress: Lower Hull and its components attached

 In keeping with my modus operandi for all things Bandai, I had painted the individual parts and sub-assemblies first before attaching them to an also fully-painted Pseudo-Metallic Chassis/Main Frame Structure. And of the three Lower Hull Components I painted - i.e. the lower hull armor, blaster cannon, and rocker-pivoted footpad - it's the last piece that's most fragile. As such it's the piece that I was most worried about with further assembly that's required along the line.   


Lower Hull Components: bottom armor plate, rocker-pivoted footpad, and blaster cannon

Speeder Bike's blaster cannon (left) and rocker-pivoted footpad (right)

Speeder Bike Lower Hull Components next to the Main Frame Structure/Chassis

 Despite my heightened apprehension about breaking the rocket-pivoted footpad, the assembly process went off without a hitch. But I'm not counting my chickens just yet as there is a much more difficult assembly process to be tackled i.e. the final assembly process mentioned earlier.   


Star Wars Speeder Bike Lower Hull with a near-full complement of components installed

Speeder Bike's lower hull is at this stage fully painted and weathered 

Components like the Rear Side Hull Plating/Armor and Air Brakes (not shown here) ...

... have yet to be attached to the Speeder Bike Lower Hull because those pieces are best assembled ...

... only once the upper/lower hulls and steering vanes/outriggers and fixed together

 If you have been following along with the Speeder Bike's progress since the beginning you may have noticed that the rear side hull plating/armor and air brakes have not been fixed onto the chassis. There is a reason for that. Before the aforementioned parts are fixed onto the chassis, I fel that I should first put together all the sub-assemblies completed so far i.e. the Steering Vanes/Outriggers; Upper Hull; and Lower Hull (shown in this post). This is just a matter of preference in that I believe it would be easier to handle and fix the Lower Hull onto the Upper Hull sans the said parts.


Fragility of the rocker-pivoted footpad as well as the existence of a myriad of ...

...  other components such as the power cell, blaster cannon, etc. makes the bottom-half ... 

... of the Speeder Bike's surface uneven thus necessitating an elevated base for display.

 As it stands at this point in time, I have in my hands all the full-painted parts and sub-assemblies that I need to proceed with the final assembly process of the Speeder Bike. It has been a long journey, but it'll end soon for this iconic Star Wars vehicle. And this opens up another slot in the hobby worktable, which I intend to fill with a type of model kit I have never attempted to build before. But more on that later. For now, I thank you for taking the time to read this blog. Stay safe, and be well.  


http://shireworks.blogspot.com/p/custom-painted.html

https://shireworks.blogspot.com/https://www.facebook.com/shire.works

Related Posts Plugin for WordPress, Blogger...