Showing posts with label Portraits. Show all posts

Monday, 13 February 2023

More drawing practice as the missus recovers

 With the missus still recovering from surgery, all miniature and scale model kit projects are still in a state of suspended animation i.e. lying dormant. Any tasks that require a prolonged period of focus without break is being put into the back burner while I attend to the missus's post-surgery needs. But that doesn't mean I won't be able to do anything remotely hobby-related in my free time. Compared to the time consuming process of painting a scale model kit/miniature, drawing still allows me the flexibility to instantly stop and start my hobby activities an attend to the missus.


A realistic looking iris was my main goal for this digital practice piece

 Because my long term goal is to be able to draw (and eventually paint) portraits, I decided to practice drawing facial features like the eye, nose, and mouth. It helps that I'm drawing digitally because it means I can just stop what I'm doing instantly sans any cleanups, and return to real world concerns. Below are some pieces I managed to finish using the Procreate app on the iPad Pro.


Portrait facial features practice piece: digital drawing of an eye

Portrait facial features practice piece: digital drawing of a nose

Portrait facial features practice piece: digital drawing of a mouth

 Soon though, a semblance of normality should return to my hobby activities as the missus recovers that little bit more from her surgery. At the very least, I should be able to resume work on my Gundam scale model kit projects soon. Maybe no major airbrushing sessions yet, but I have enough on my plate as it is in assembly and prep work to avoid being too disappointed with the slow restart.


After surgery, the missus now has titanium plating and screws in her foot ...

... as seen here from another angle (i.e. top down view).

 While I don't want to jinx it, the wave of awful luck that is crashing upon the family seems to have abated somewhat. Apart from breaking a glass plate and getting pretty deep cuts on my hands, no other mishap has befallen the family. Long may that continue. So as I get ready to kick start my scale model kit/miniature projects for real - nearly two months into 2023 - I'm hoping lady luck deigns to finally smile on my family and I. And on you and yours too. Until my next post, be well and be happy!


https://shireworks.blogspot.com/https://www.facebook.com/shire.works

https://www.facebook.com/FourEyedMonster-313145002078520/

Monday, 30 January 2023

My First Digital Art | Portrait Drawing Practice #16

 Before I go any further I would like to assure you I'm well aware that the portrait piece posted here isn't very well drawn with the facial proportions being not quite right to put it kindly. (It's suppose to be a portrait of Morfydd Clark who plays Galadriel in Rings of Power, in case you were wondering.) But I'm still posting my portrait practice piece anyway as a means to mark my progress as well as to motivate me to draw better. In my defense, this is my first portrait drawing attempt in more than six years, and my 16th portrait drawing attempt overall. It is also my first ever attempt at digital art.


 What surprised me most in my transition from traditional to digital art is how much my art style remains the same. While I'm still getting used to the Apple Pencil, which I used to draw this portrait using the Procreate app on the iPad Pro, I found it comforting that the digital brushes can mimic a traditional graphite pencil almost perfectly. One thing I don't like is the smooth feeling of the Apple Pencil on the iPad screen. For now I'm not willing to use a paper-like matte screen cover that imitates the feel of graphite pencil on paper because I prefer the screen to maintain its glossy shine.


 Below is an accelerated time-lapse video of my first ever digital art.


 To improve my portrait drawing skills, I have enrolled myself in a few online courses on Udemy. What I hope most to gain is the ability to better gauge a subject matter's facial proportions and transfer them accurately onto the paper/digital screen. One weakness I have is trying to invent details I don't see on a photograph hence making the drawing look unrealistic. For example the reference photo of Morfydd Clark sees her staring off at an angle while I tried to draw her looking straight ahead, resulting in the portrait having wrong facial proportions. Anyway, I'm glad to be drawing again. The important thing is it makes me happy in spite of the latest cringe-worthy portrait drawing results. On that note, may you be well and happy too. And thanks too for taking the time to read my blog!


FourEyedMonster Miniatures YouTube Channel

https://www.facebook.com/FourEyedMonster-313145002078520/

Wednesday, 26 October 2016

Going skin tone crazy in more mediums than one

Westworld has become my favourite ongoing science fiction series and is now tied with fantasy series Game of Thrones as still-in-progress television series that I most like. As with any inspirational shows, I tend to either draw or paint the main characters which in this case are Dolores Abernathy (played by Evan Rachel Wood) and Daenerys Targaryen (by Emilia Clarke). These two actresses are going to make excellent subject matters for my coloured pencil (and probably graphite too) portrait practice sessions. While watching Westworld through a semi-hatchet job by local television censors isn't ideal, it'll have to do until HBO releases the Bluray version of this awesome series.            

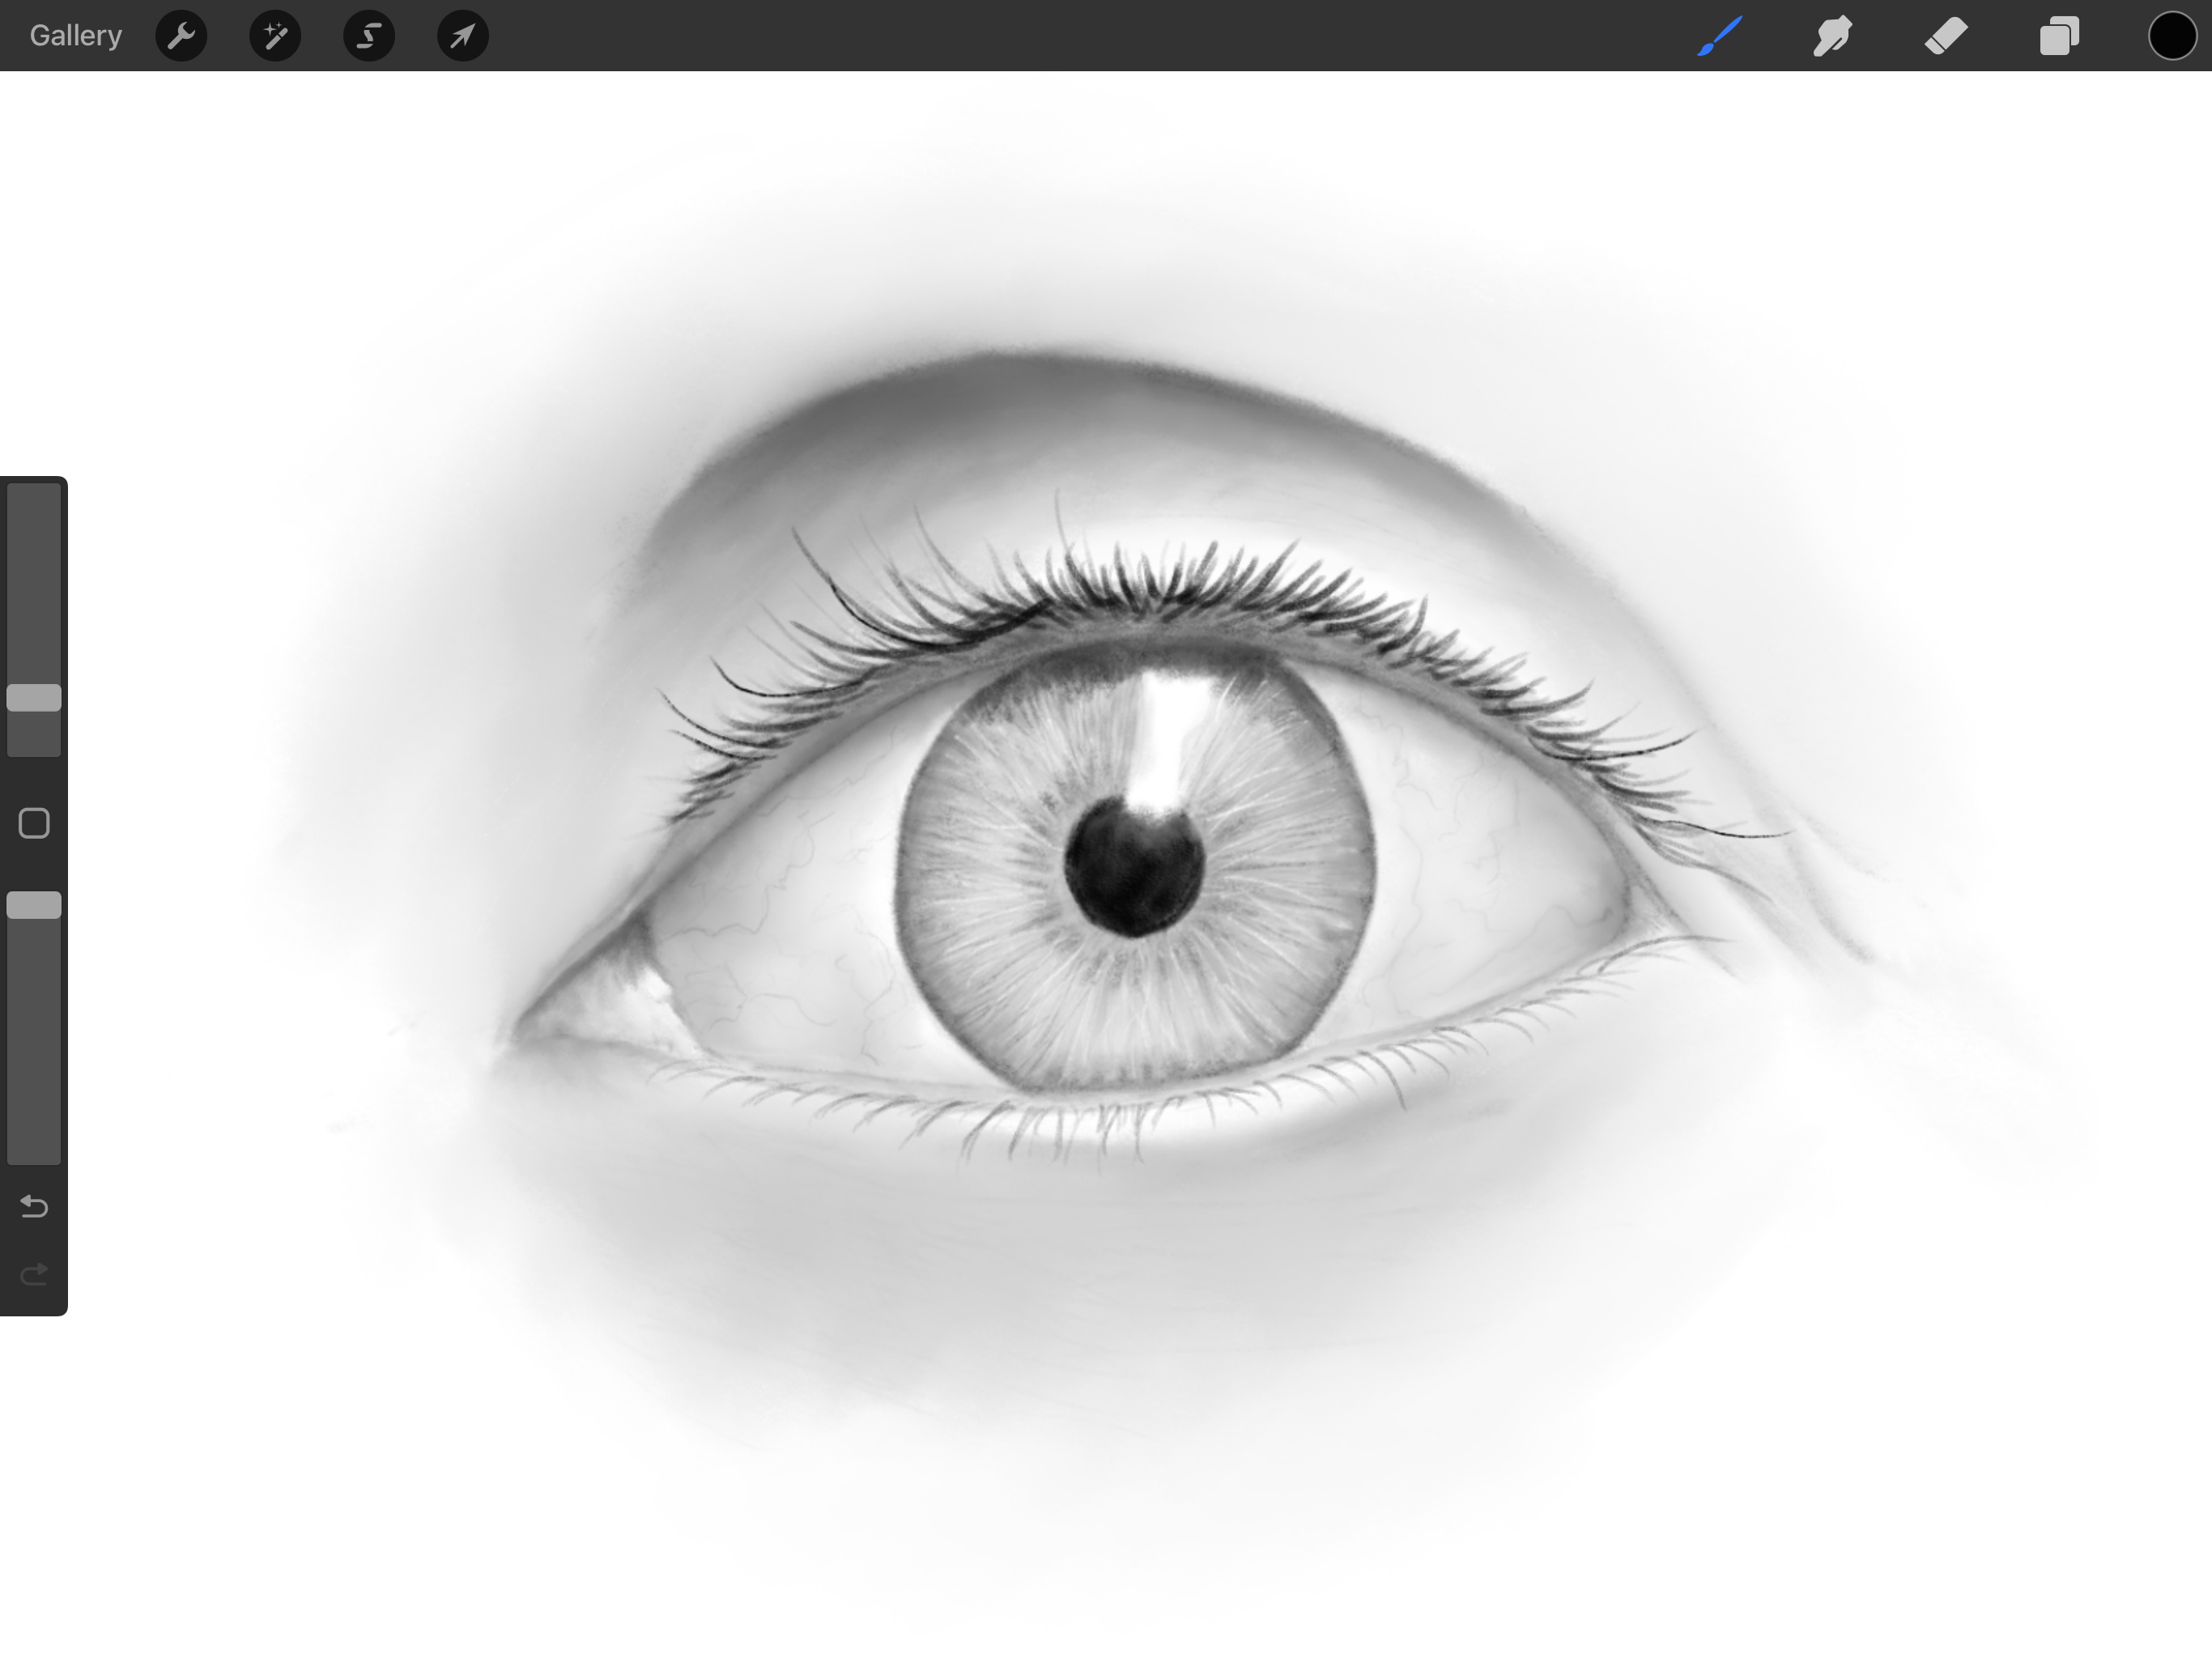
Skin Tone Study 01: Evan Rachel Wood under warm lighting (left) and daylight (right)
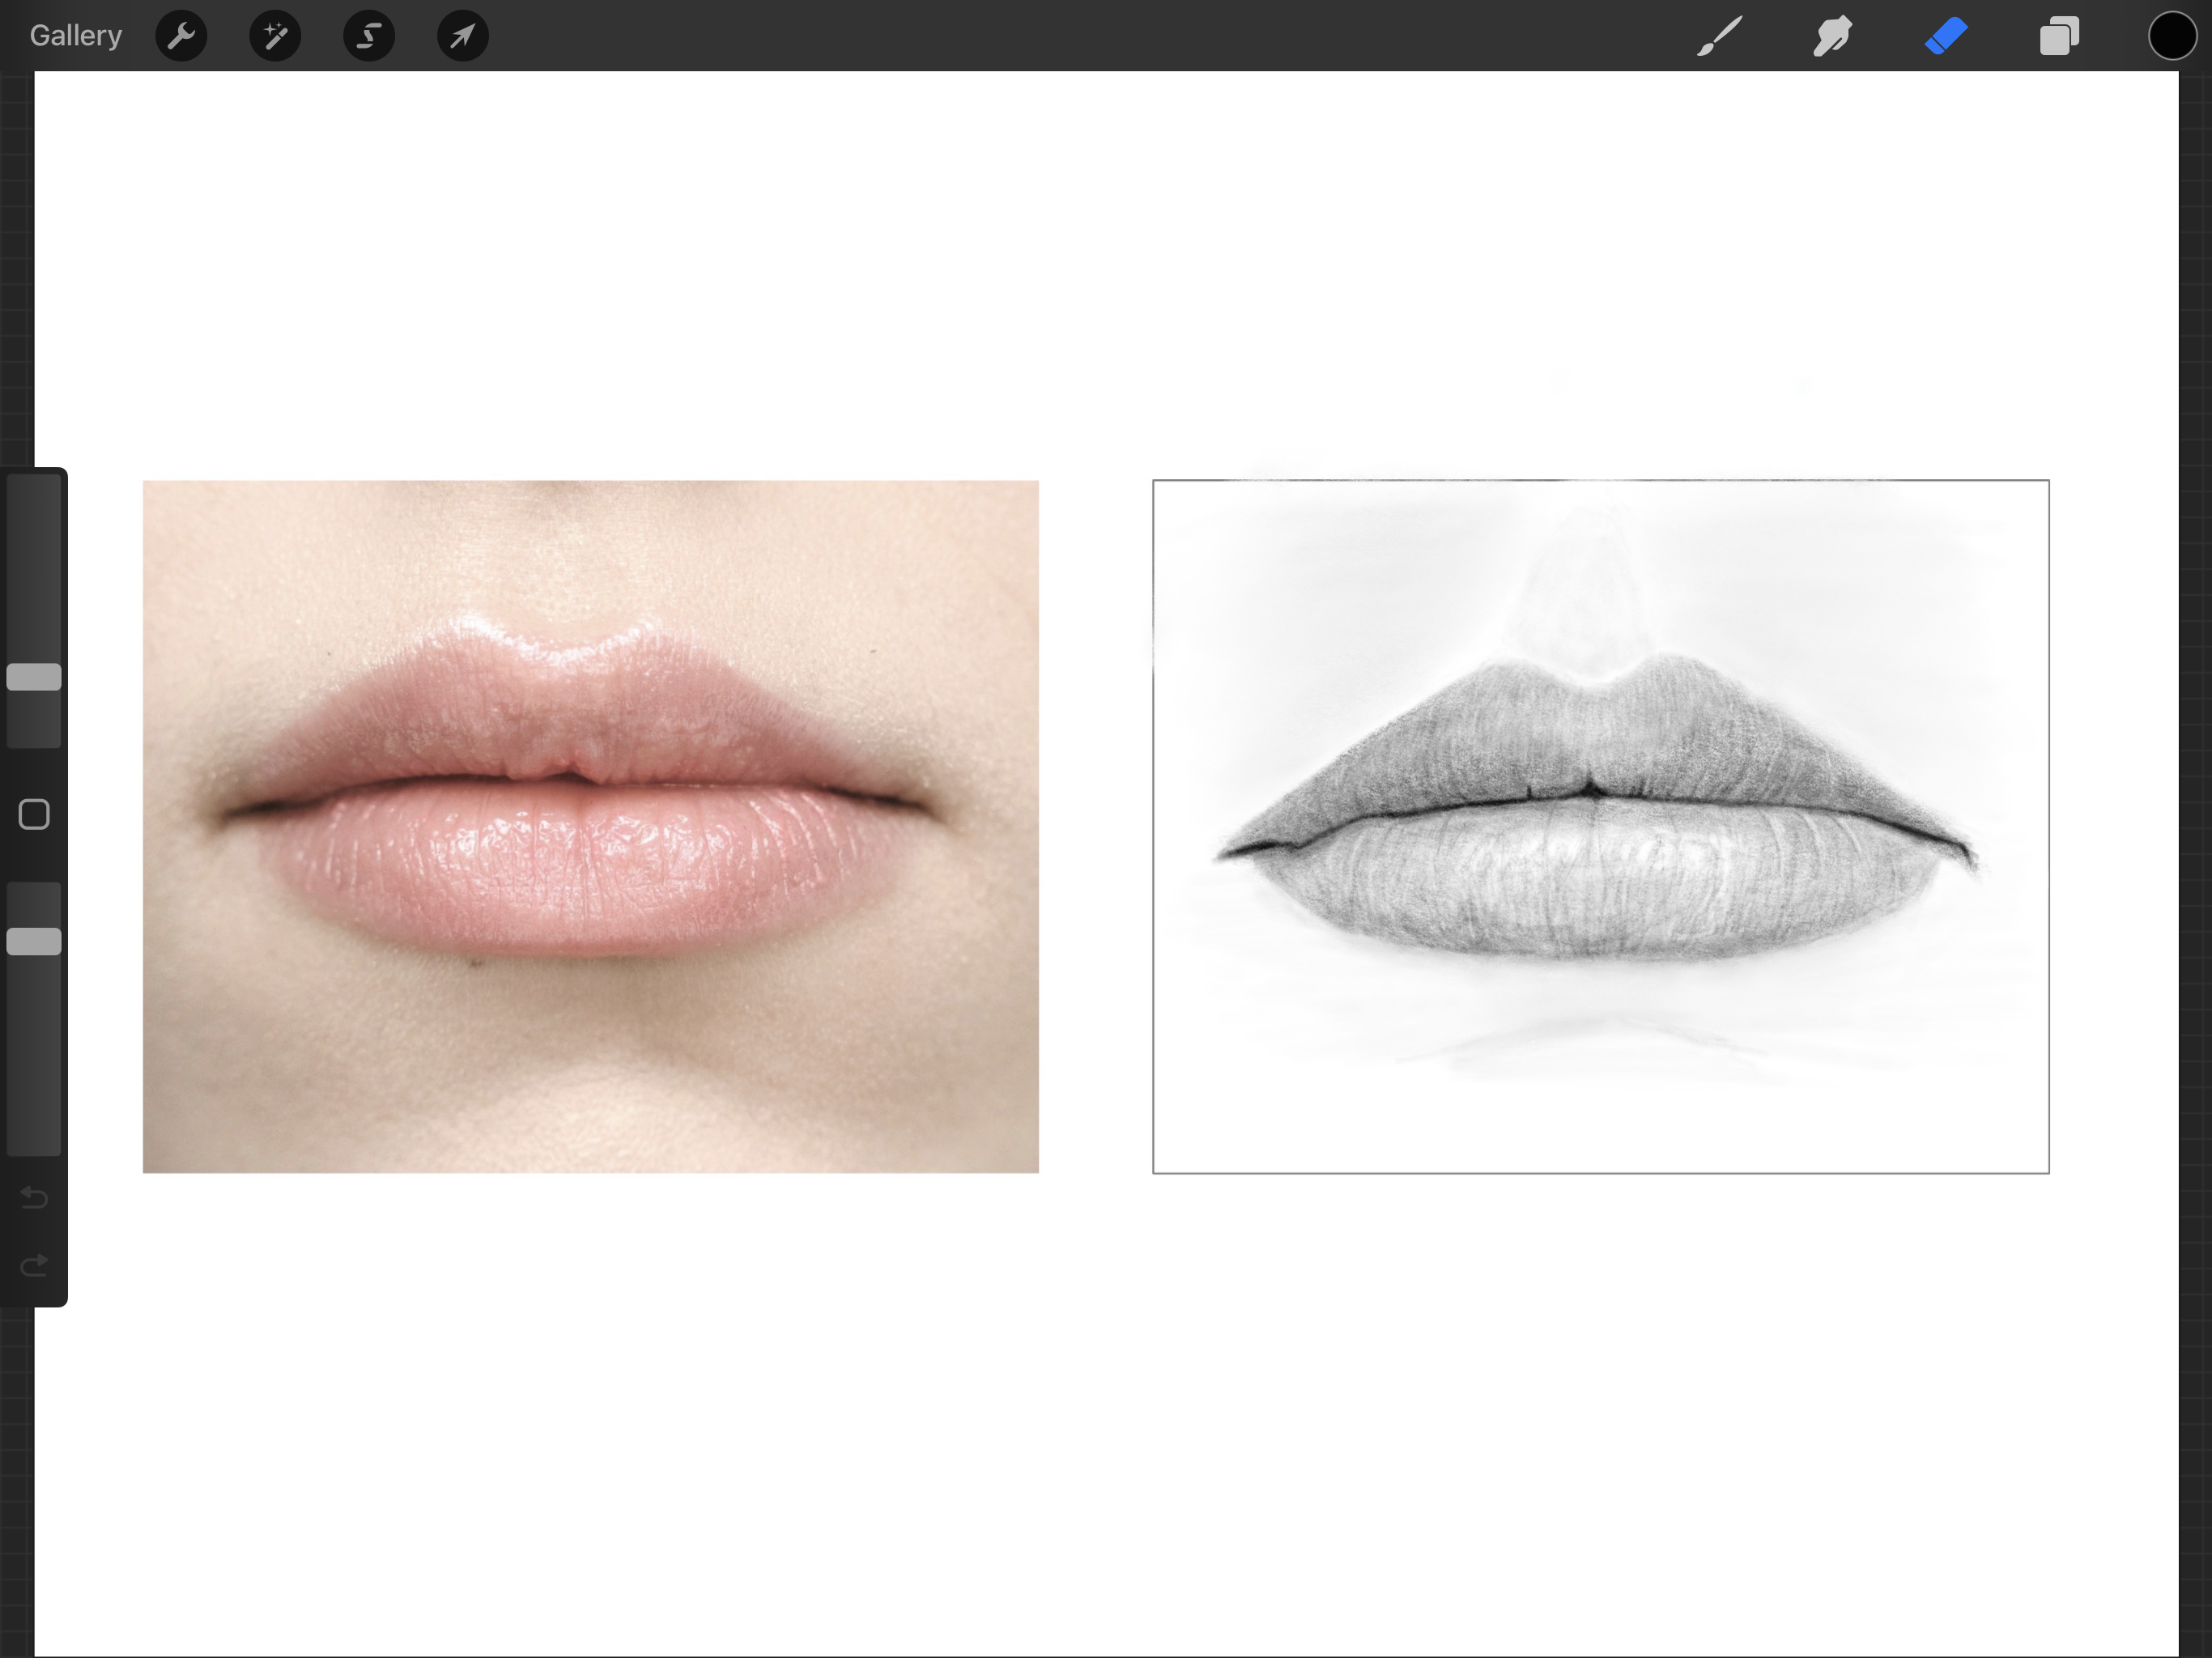
Skin Tone Study 02: Emilia Clarke under overcast lighting (left) and daylight (right)

For my coloured pencil portrait drawings, I'm doing skin tone studies to find out the right mix of hues to achieve the fairly light skin tones that both actresses have. It involves the use of both oil-based and wax-based artist grade coloured pencils namely Faber-Castell Polychromos, Derwent Coloursoft and Prismacolor Premier. For these studies, I've started incorporating green hues into the mix as strong green undertones can be visibly seen in both actresses' facial skin tones. Whether this natural green undertone is more prominent due to specific makeup and set lighting I can't really say. But it's worth noting green foundation has always been used by the old masters to depict realistic skin tones.

Derwent Coloursoft wax-based coloured pencils and Faber-Castell Polychromos oil-based ones
Light skin tone swatches with Coloursoft and Polychromos pencils
Prismacolor Premier wax-based coloured pencils - 24 pieces portrait set
A skin tone bar using Prismacolor Premier pencils (based on a tutorial by artist Ann Kullberg)

For the time being most of my coloured pencil portraits will be drawn on the Strathmore Colored Pencil paper and perhaps the Daler Rowney Fine Grain Heavyweight paper if I decide to use solvents with the oil- and wax-based pencils. Eventually I would want to switch to the Strathmore 400 series Bristol Smooth and Rising Stonehenge papers respectively. Not yet though as both are too expensive for the initial practice sessions. But future graphite portraits will likely be on smooth Bristol paper from now on as I feel I have put enough practice in to earn the right to use higher quality papers.  

For now most of my colour portraits will be drawn on Strathmore's Colored Pencil paper

The close study of skin tones in portrait drawing has re-opened my eyes on how varied the human skin tone actually is. However, it remains to be seen if seeing skin tones from a different perspective will also translate into better skin tones for my miniature painting projects. Based on my experience so far, coloured pencils are a more translucent medium than acrylic paints although similar effects can be gained in the later through glazing. I haven't painted a large enough scale miniature - at least in the amount of surface area dedicated to skin tones ... and the Hulk doesn't count - to warrant doing green acrylic glazes on the skin tones. That remains the case for my two ongoing projects below.  

Skin Tone Study 03: Karen Fukuhara (left) and Jerome Flynn (right)
Nocturna Models resin figurines: Soum 13 Moons (left) and The Crusader (right)

If you've ever wondered why I take so long to finish my miniature painting projects, well, here's one reason amongst the many. I tend to do lots of skin tone swatches to determine the most appropriate skin colour for the miniature project in question. Granted such swatches don't account for the wet blending, feathering and layering effects of acrylic paint on primer but it does provide a fairly accurate guideline on hues that closely resemble the painting's subject matter.

Vallejo Model Color acrylic paints under consideration for a female Japanese skin tone
Skin tone swatches of possible hues to be used as a female Japanese skin tone
Vallejo Model Color acrylic paints under consideration for a male Caucasian/Mediterranean skin tone
Skin tone swatches of possible hues to be used as a male Caucasian/Mediterranean skin tone


Complicating matters is the use of cool or warm shadows which depends on the predominant skin tone hue. At this stage of my research. it's highly likely I'll use cool shadows for both Katana and Bronn (see above) to counter their fairly warm skin tone in general. Regardless on the hues used, one thing for certain is that I will be using Vallejo Model Color paints exclusively to paint their skin.


And in case you were wondering just what is Westworld all about, do check out the trailer above. I leave you with my two favourite lines/phrases from the Westworld series so far, both incidentally uttered by another character Bernard Lowe to Dolores Abernathy i.e. "Step into analysis, please" and "Limit your emotional affect, please". Simple yet meaningful words in globally trying times.


https://www.facebook.com/pages/FourEyedMonster/313145002078520

Monday, 26 September 2016

Portrait Practice #15 on Rey (Star Wars Force Awakens)

A year is a long time without drawing; for me it is anyway. Drawing is akin to riding a bike i.e. a skill you aren't likely to forget just because you haven't been doing it regularly. That being said, realistic portrait drawing is something you get good at only with regular practice. My drawing skills are rusty and it shows. Natural born artists are geniuses and as rare as they come. For the rest of us mere mortals, regular practice is the only thing that can result in better art. And practice I must.  

First graphite portrait in a year ... just glad to be drawing again

But strangely enough, for a piece that's one year too late I'm actually still quite happy with it. Despite over 365 days of neither acquiring any new skills nor honing any existing ones, I didn't wholly lose what I had previously learned. Some mistakes were repeated, some avoided. Inconsistencies abound but thankfully any skill regression was kept to a minimum. That's not saying much since I wasn't starting from a high base but a relief nonetheless for someone looking to progressively improve.  

Portrait Practice #15 on Star Wars The Force Awakens Rey as played by Daisy Ridley

Drawing an accurate and recognisable portrait is said to be one of the hardest things to do. Any little thing can make a portrait drawing look nothing like the subject matter in question. Even knowing that, I had for some unfathomable reason decided to shift the position of Rey's irises to show her gazing directly ahead instead of off into the distance like in the original reference image.  

Adjustments to the portrait meant Rey's eyes now stared directly ahead versus off into the distance 

This was a genuinely idiotic thing to do as it heaped more pressure on me to get the graphite blending/shading of the lights and shadows accurate enough to depict a face/neck that is tilted upwards and off to the side. Specifically to the image in question, the new location of the irises implies that Rey's facial plane was directly parallel to the drawing paper which isn't the case at all. These are some of the little things that make you go ... D'oh! ... Homer Simpson style. 

Portrait was completed with both traditional as well as mechanical pencils

In a way, I'm starting to feel constrained by the student grade papers I draw on. That could mean two things. The good - I'm improving. The bad - it's not the paper its me. A lot of top artists use smooth Bristol paper to draw realistic graphite portraits. Unfortunately, it's still too expensive for me to buy such drawing papers online due to prohibitive shipping costs. Instead, what I could do was source a possible equivalent - the Daler Rowney Smooth Cartridge Pad - locally. Going forward I will use both the existing Daler Rowney Graduate Pad as well as the new drawing pad to draw the portraits.   

Reference image/photo of Rey that was used for this practice session

In addition to my graphite drawing and miniature painting hobbies, I've also been bitten by the colored pencil bug. You heard right ... colored pencils. But not your low pigment school variety. It's the highly pigmented Sanford Prismacolor Premier (wax based), Faber Castell Polychromos (oil based) as well as Derwent Coloursoft (wax based) fine art pencils I'm talking about. There will be the usual bedding in period with a new art medium but it's going be a fun journey to complement what I already enjoy doing now. Life's all about the journey and I can't wait to get started on this one, with continuing progress on my other two hobbies of course. Hopefully, you'll join me for the ride!

Thursday, 15 September 2016

One year is a long time not to draw ... that ends now

Just recently I was asked to share a memory of something I posted one year ago on my Facebook. It was a graphite portrait drawing of Emily Browning as Babydoll in the movie Sucker Punch. Point being I had not drawn anything in an extremely long period. Any skill improvements I had made will likely have atrophied somewhat over the course of 12 months. It could very well be a case of one step forward two steps back though I'm hoping I can just pick up where I left off i.e like riding a bike.  

My last graphite portrait drawing was over a year ago

For my first graphite portrait drawing in aeons, I decided on Rey whom Daisy Ridley plays in Star Wars The Force Awakens. I chose a fairly low resolution photo of Rey which depicted her facial features in more of a no-frills variety akin to a photoshopped image with smooth skin tones. This should make it easier for someone like me who is resuming graphite portrait drawing after such a long time. Higher resolution images would've displayed details such as freckles and skin texture.

Rey (Daisy Ridley) is my first subject matter in my return to portrait drawing

Based on my experience so far, the most important step of the graphite portrait process is the initial faint line drawings. Bungle the line drawing and no amount of shading and blending will be able to create an accurate depiction of the portrait subject matter. And for portrait drawings, the only thing that really matters is the likeness to the subject matter that you're drawing. As such, I tried spending a longer than usual amount of time on the line drawing of Rey. I'm quite happy with it, to be honest.

Progress so far ... faint line drawing of Rey

There is a subtle difference between Rey in the reference photo and Rey in my line drawing. The latter has her centred irises looking straight at the viewer. But in the former, Rey is staring off into the distance (towards the top right corner of the paper). Perhaps in hindsight this wasn't such a smart thing to do as the rest of her facial features are angled upwards to the side. Changing her irises to stare straight ahead may distort proportions and make everything seem off. I'll have to be extra careful at the graphite shading/blending stage. Without the cue of off-centred irises, highlights and shadows on her face will take on greater importance in the portrayal of the tilt in Rey's head.   

Reference photo of Rey in a scene from The Force Awakens

Unfortunately, the JPEG image I used was smaller than I realised. A smaller file size (or lower resolution) equals less facial details. While doing the line drawing I noticed the shadows and highlights on Rey's face weren't clearly defined as I would've liked. This means I'll have to try and find a higher resolution image as reference for the graphite blending/shading process. But I'll be pushing ahead regardless as I aim to finish the portrait before the month is out. A three day stretch of free time coming up means plenty of drawing opportunities for me. Let's hope I put it to good use.

Tuesday, 8 September 2015

Portrait Practice #14 on Babydoll (Sucker Punch)

Making time to draw more regularly can be a big ask especially when there is so much to do in the limited amount of hobby time available to me in any given week. In the one and three quarter years since I started drawing seriously again, I have only completed a measly 14 portrait practice pieces. Constant practice is essential not only to improve but also to retain/remember any aha moments learned along the way. So an immediate challenge for me will be figuring out how to be more productive - ideally one portrait per month. Achieving that will up my productivity by nearly 100%.

Portrait Practice #14 on Sucker Punch's Babydoll as played by Emily Browning

On my 14th try at portrait drawing, I made a conscious attempt to prevent any stark lines from showing up by blending out smoother tonal transitions. In addition, I tried to accurately mimic the textures on Babydoll's face namely her lower eyelids (or eye bags), light blonde hair and lips. Each practice piece has thankfully brought a better understanding on how graphite behaves on paper. 

I can't say it enough ... use of an inclined drawing table has improved the proportions in my portraits

To see whether I had actually made any progress, I compared my two attempts at drawing Babydoll's portrait - both about twelve practice pieces apart. The difference in quality is painfully obvious but more of an eye opener is the fact I was pretty pleased with my first try ... then. This is what makes self teaching highly ineffective at times; an inability to gauge ones own work objectively. What looks perfectly fine today will look terrible later as one's understanding of a particular art from develops.

Twelve practice pieces later and there are (thankfully) clear signs of improvement in my drawing skills

Also for this practice session, I took some photographs of the portrait at various stages of completion. Without the benefit of a scanner, there exists some discrepancies between the photos due to the angle of the shots. However, the series of shots below still manage to convey a sense of evolution of Babydoll's portrait drawing all the way from initial rough outlines to the final completed piece.

Various stages of the Babydoll portrait drawing

Being able to see tangible signs of improvement in my drawing skills, no matter how small, is always a huge confidence booster. It gives me hope I'm moving in the right direction. Steve Jobs once said the only way to do great work is to love what you do. At least I'm already halfway there.

Thursday, 3 September 2015

Babydoll Eyes and Hair [WIP on Portrait Practice #14, drawing blonde hair and eyes with heavy eyelashes]

Babydoll is the protagonist in Sucker Punch, a movie that I like very much despite it being almost universally panned by critics. While it may not have been the director's intention, the story theme that resonated with me most was the fact reality is to a certain extent determined by our own mind. Also Emily Browning played an unforgettably sad character that I have always wanted to portray in drawing. As an added bonus, this piece allowed me to try my hand at drawing light blonde hair.

Baby Doll Portrait Drawing, work-in-progress on blonde hair and eyes
An inclined table is helping me get better proportions when drawing

To source a suitable photo reference of Babydoll, I used the art book of Sucker Punch which had photos of scenes from the movie as well as some concept art. Babydoll's most iconic look is that of her in a sexified Japanese school girl costume. Hence I'm using that look for her portrait drawing.

Sucker Punch film art book
Reference photo of Baby Doll used in Portrait Practice #14

Proper makeup be it eyeliners or mascara coupled with a pair of heavy fake eyelashes (or eyelash extensions) is one way to make one's eyes look bigger. This is evident in Emily's makeup which transforms her into the Babydoll character. To draw heavy lashes and not make it look too fake, I also used other photos (not shown) to view how they interacted with her eyes from different angles e.g. three quarter view, side view, etc. It gave me a better idea how to blend the lashes into her eyelids.

Heavy eyelashes maketh the eyes ... at least in the case of Baby Doll
Emily Browning, before a pair of heavy fake eyelashes/eyelash extensions (left) and after (right)

Another new challenge in this latest Portrait Practice piece was drawing light blonde hair. It's much easier to draw dark as opposed to light hair. To achieve the texture of light blonde hair, I used a higher ratio of hard graphite pencils (2H, H, HB, 2B) as well as a combination of a do-it-yourself (DIY) template containing cutouts of hair-like strands and an electrical eraser to lift graphite out via the template. The latter process simulates strands of blonde hair as can be seen in the photo below.

Drawing the texture of blond hair using graphite pencils, a DIY template and erasers
Cutting out templates of hair strands on a blank transparency

Drawing always comes as a welcome relief in between painting projects. It helps me avoid burnout from painting. But drawing is something I love doing anyway so it's a fun hobby regardless. There are still a few things I need to tackle before Babydoll's portrait is complete. Chief among them is her trademark big pouting lips. Other items my to-do-list include shading of her skin, parts of her dress (the collars in particular) and the rest of her blonde hair. One mistake I constantly make is to increase the pace of my drawing as I near the end. Not anymore. This time I plan to finish at the same pace as I started. If it results in a better end product, progress will be made. That's good enough for me.

Friday, 10 July 2015

Portrait Practice #13 on Park Joo-Mi

On my thirteenth try at portrait drawing I imposed two arbitrary conditions on my subject matter i.e. she must be oriental and be born on the same year as me. With a portrait of the missus still a long way off until my skills are up to par, that meant looking at some Chinese, Korean and Japanese celebrities for inspiration. In the end I settled on 43-year old South Korean actress Park Joo-Mi.    

Portrait Practice #13 on Park Joo-Mi

Yet another self imposed albeit non-arbitrary condition I attach to every practice piece is to, whenever possible, incorporate new techniques or approaches to portrait drawing. In this case, the number of things I did differently from before were threefold:
(a) Using an inclined drawing table - for better facial proportions when drawing;
(b) Using sharpened pencils when shading skin - for better control of tonal transitions; and
(c) Using a combination of camel hair brush, paper stump and soft tissue - for smoother blending.  

Reference photo of Park Joo-Mi

Trying these new approaches has brought me closer to realising my goal of drawing realistic portraits. A small step granted but a step forward nonetheless. Using the inclined drafting table has definitely improved my sense of facial proportions. However, I haven't quite got a handle on getting an accurate likeness. For instance, the margin for error seems awfully small to me. Even slight differences in tonal value - sometimes deviations of just a few millimetres of graphite shading - can cause the portrait to look noticeably distinct from the subject matter that I want to portray through graphite.       

Blending graphite using soft tissue, paper stumps and camel hair
Using an inclined drafting table to obtain better proportions when drawing

Among the things I am happy with are successfully replicating the shirt's chequered texture as well as achieving much smoother skin tone transitions. For the former, I'm glad I didn't chicken out and draw a plain white shirt which was what I initially planned to do. Completing the chequered shirt was a real confidence booster because before the attempt I honestly believed there was no way I could do it. For the latter, I'm slowly approaching a level of smoothness in skin tone that I believe will be the best I can achieve using a 160 g/ student grade paper. Ideally, I would love to work with Bristol paper. From what I understand, certain Bristol papers are good for achieving smooth blends with graphite. 

Portrait Practice #13 (Park Joo Mi) - comparison between reference photo and graphite drawing

Each new drawing I finish always results in cringe-worthy reactions to my previous drawings. But this is a good thing as it means I'm able to spot my previous mistakes; some of them anyway. Hopefully a day will come when I can look at my drawings and be genuinely satisfied with what I put on paper. Chasing the rainbow for the proverbial pot of gold ... who knows, I might just find it. 

Related Posts Plugin for WordPress, Blogger...