Sunday 31 May 2020

Bumblebee, Autobot Transformer in car form [WIP - Volkswagen Beetle Seats & Door Interior]

With a few screen captures of the Bumblebee Volkswagen Beetle interior in hand, I began to delve into little details that would allow me to closely mimic the movie car via paint. But before I even started I had already come to terms with the fact that I'll not be able to recreate a 100% accurate replica of the Transformer Autobot in car form. This was, unfortunately, due to the movie utilizing a 1967 model of the Beetle versus Tamiya's 1966 model I'm using. Sadly I was already mid-way into the project before I found the 1967 model by Hasegawa. In short it was already too late to change.     

Tamiya Volkswagen Beetle Work-in-Progress: Front/Back Seats and Door Interior

As always, before any painting began, I reached for my go-to primer (i.e. the Tamiya Fine Surface Primer) and sprayed on a few layers of the light gray coating. Previously I had tried three different primer colors - white, black and light gray - before settling on the latter most hue. Of all the primer hues I tried out, the light gray one seemed to provide the best foundation for the subsequent paint layer to look most like the Bumblebee yellow that I was aiming to achieve. 

Assembly stage of the Tamiya Volkswagen Beetle Front/Back Seat and Door Interior
My go-to product, the Tamiya Fine Surface Primer, was used to lay a strong foundation for future paint layers

Putting the front/back seats together was easy while the door interiors didn't require any assembly at all. The "issues", if you could call it that, only came into play when I needed to apply masking tape over certain areas of the parts before painting them. It was a cumbersome process. Before layering on the Bumblebee Yellow, I had to painstakingly mask off areas I didn't want to turn yellow. While I could've left everything unmasked, and then painted over the yellow later on, it wasn't an ideal thing to do. Why? Well, experience has made me wary of putting too many layers of paint onto a part. Over-painting almost always results in weak paint adhesion which may lead to peeling eventually.

Backseat, door interiors were masked with tape prior to layering on the iconic Bumblebee Yellow
As determined previously, Mr.Color Chiara Yellow was a close substitute for Bumblebee Yellow
Volkswagen Beetle seats, door interiors, etc. after being airbrushed with the yellow lacquer paint
Volkswagen Beetle seats, door interiors, etc. with the masking tape removed

A clear semi-gloss top coat was then sprayed over the yellow paint in order to serve as a protective layer. Following that, the masking tape was removed. After being left overnight to dry, it was on to yet more masking! This time it was the turn of the yellow sections to be masked. Then Tamiya X-57 Buff was airbrushed onto the seats and door interiors followed by another similar protective topcoat before being left to dry overnight. To create depth, both general weathering (on yellow sections) and panel lining (on seats) was applied using the same product i.e. Mr Weathering Color Ground Brown

More masking, this time involving the parts recently painted with Bumblebee Yellow
Tamiya XF-57 Buff was the color of choice for the Volkswagen Beetle's Seats and Door Interior 
Buff hue was matte in nature which was actually accurate in terms of the material it was replicating ...
... however a semi--gloss clear coat was applied after panel lining into to make the colors more vibrant
Seats and Door Interiors after the buff basecoat, dark brown panel lining and a semi-gloss clear coat

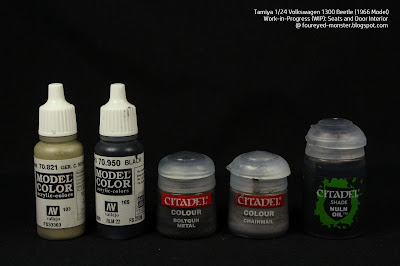
When it comes to painting small details by hand, I tend to revert back to using acrylic paint. Both the Vallejo Model Color and Citadel paints were used on the door handles and a pouch located on one of the door interiors. The black sections that you can make out in the photos below were actually a result of using a combination of Mr. Finishing Surfacer 1500 (Black) and Tamiya Weathering Master sets. Unfortunately I set the lighting conditions were too bright so the details on these black section aren't too clear in the photos below. In future post I hope to adjust the contrast to better show off its details. 

Some of the acrylic paints and washes used to bring out the details of the Seats and Door Interiors
Back seat and rear interior sections of the Volkswagen Beetle, after painting but before assembly
Tamiya parts rarely snap-fit together so the top half of the backseat and rear interior section had to be glued on
Back seat and rear interior section of the Volkswagen Beetle (front view)
Black sections actually have weathered effects on them but that did not show up under the bright lights
Front Seats of the Volkswagen 1300 Beetle (back view)
Front Seats of the Volkswagen 1300 Beetle (front view)
Interior section of both Front Doors of the Volkswagen 1300 Beetle
Left Front Door Interior of the Volkswagen 1300 Beetle (closeup view)
Right Front Door Interior of the Volkswagen 1300 Beetle (closeup view)

Next up is the Front Interior comprising the dashboard, radio, glove compartment, steering wheel, as well as the Boot Interior. These parts require more finesse as the molded details are extremely tiny to the point it's almost indiscernible. Painting such parts are never much fun but the end results, if they turn out well, always makes the effort worth it. I'll leave you with a quote reflecting a recent injustice in my country where, for the same crime, a single mum is given a jail sentence while children of political bigwigs are given a discounted fine ... In theory we are all equal before the law. In practice, there are overwhelming privileges that come with winning the birth lottery. - Arianna Huffington.

https://shireworks.blogspot.com/https://www.facebook.com/shire.works

Sunday 24 May 2020

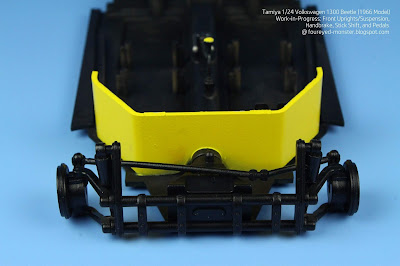
Bumblebee in Volkswagen Beetle form [WIP - Front Uprights/Suspension, Handbrake, Stick Shift & Pedals]

This extended stay-at-home period has allowed me to sustain a level of focus on my scale modeling and miniature painting activities that I would otherwise never been able to achieve prior to the ongoing global pandemic. It has given me precious opportunity to clear my backlog of stalled projects. Not all of it though, as some projects retain a higher on-the-shelf-gathering-dust inertia than others. One project with new life breathed into it is the Tamiya 1/24 scale Volkswagen 1300 Beetle (1966 Model) which acts as a proxy for the Transformer Autobot Bumblebee in vehicle configuration.

Tamiya VW Beetle Work-in-Progress: Front Uprights/Suspension, Handbrake, Pedals & Shift Stick

So far I've been following the recommended order of assembly which in this case involved Steps Five through Seven (see instructions below). In this series of steps, the Front Uprights, Handbrake, Front Suspension, Stick Shift and Pedals (see above) were put together and painted. In terms of difficulty, the only real one I faced was the fragility of the Stick Shift. I went through hell twice with this tiniest of parts, which I'll elaborate on later in the post. Everything else was quite straightforward. 

Steps Five through Seven of the Tamiya 1/24 scale Volkswagen 1300 Beetle (1966 Model)
Front Uprights/Suspension, Handbrake, Stick Shift and Pedals prior to being fixed to the WIP Chassis
Front Uprights/Suspension, Handbrake, Stick Shift and Pedals after being fixed to the WIP Chassis

Just from looking at the state of the Front Uprights and Front Suspensions as they are right now, I have an inclination to weather them extensively in dirt and dark rust colors. And in a normal vehicle I would've already done so. However, this Volkswagen Beetle is supposed to be the vehicular form of Bumblebee. As such one could logically conclude that his insides won't be rusted, unless for disguise purposes. At the end of the day, it's all make believe so for now I'll leave it in its all-black color scheme. The blacks are differentiated only by glossiness and semi-glossiness of its surfaces. 

Volkswagen 1300 Beetle (1966 Model) Front Uprights/Suspension (isometric view, left side)
Volkswagen 1300 Beetle (1966 Model) Front Uprights/Suspension (isometric view, front)
Volkswagen 1300 Beetle (1966 Model) Front Uprights/Suspension (isometric view, right side)

Apart form the Front Uprights/Suspension sub-assembly, this stage of the assembly process also required a few key items of the interior to be installed. This as I mentioned earlier comprised the Stick Shift, Handbrake and Clutch/Brake/Accelerator Pedals (see below). 

Volkswagen Beetle's interior will soon receive its seats as well as the dashboard while ...
... its engine (lower left corner) can only be called complete when its Air Cleaner System (not shown) is fixed
First closeup view of the Handbrake, Stick Shift and Pedals in the currently bare interior of the Beetle

One issue, partly self-inflicted through clumsiness and partly due to a design induced flimsiness, had caused me a bit of a hiccup during assembly. To my horror, the Stick Shift had snapped into two even though I was consciously aware of its weak design and was being extra careful. Worse still, it broke not once but twice. Putting such a tiny part back together again would've been impossible if it wasn't for the Mr.Hobby Mr.Cement S low viscosity plastic glue. Luckily for me the Stick Shift was a plastic part. If it had been a resin or photo-etched part, I couldn't have used that life saving glue on it.    

Use of a paperclip and a five sen coin as scale comparison for the Tamiya Beetle

While the Front Uprights/Suspension has been left in its pure all-black state, the case was marginally different for the Handbrake, Stick Shift and Pedals. These were painted, then fixed onto the interior before being weathered with Dark Rust and Dirt pastels of the Tamiya Weathering Master kit.

At this early stage, the Beetle interior is still extremely bare safe for the Pedals, Stick Shift and Handbrake
Volkswagen 1300 Beetle with Clutch/Brake/Accelerator Pedals, Stick Shift and Handbrake attached
Volkswagen 1300 Beetle's Clutch, Brake and Accelerator Pedals (closeup view)

In the last two photos of this blog (the one above and below this paragraph), I used my DSLR camera with a dedicated macro lens to allow me to capture an extremely closeup view of the Clutch/Brake/Accelerator Pedals, Handbrake and Stick Shift. It's only with these macro shots that the texture of the Pedals, for instance, become visible to the naked eye. Equally pleasing was the fact that my Stick Shift repair job seems to be largely invisible unless you look very carefully. Unfortunately, the extreme closeups also laid bare my incompetent job during the prep stage. In these same photos you can easily spot the injector pin marks that I forgot to sand away before priming and painting.   

Volkswagen 1300 Beetle's Stick Shift and Handbrake (closeup view)

Going forward things will hopefully be more aesthetically pleasing for my Bumblebee Beetle project. Next on the to-do-list are the more interesting bits of the Beetle's interior such as the front/rear seats, doors, dashboard, steering, etc.  Lots to do, lots to look forward to. And with that I leave you with a quote from the Bumblebee movie's main protagonist Charlie Watson ... "People can be terrible about things they don't understand." It's my one-fingered salute to online social media idiots who've spread life-threatening misinformation during the pandemic. As always, stay safe dear readers.

https://shireworks.blogspot.com/https://www.facebook.com/shire.works

FourEyedMonster Miniatures YouTube Channel

Tuesday 12 May 2020

Star Wars Millennium Falcon (The Force Awakens) - Bandai 1/144 Scale Plastic Model Kit [Completed]
And so another journey ends. Having begun more than four years ago, the project initially gathered momentum; then faltered; inevitably got shelved; and like a shy phoenix it was tentatively resurrected before the current stay-at-home exile saw the 1/144 scale Millennium Falcon finally completed. A replica of the iconic spaceship as seen in Star Wars: The Force Awakens, the Bandai plastic model kit is chock-full of movie accurate details fantastically rendered even at this scale. Let's have a look then my take on the Falcon with its water decals, paint job, panel lining, and weathering effects.      

Bandai 1/144 scale Millennium Falcon from Star Wars: The Force Awakens [completed, top view]
Bandai 1/144 scale Millennium Falcon from Star Wars: The Force Awakens [completed, bottom view]

Although I had painted the entire cast of 1/144 scale figures, in the end I only used Rey, BB-8 and Finn for the final photo shoot. Even then, only Rey is visible as BB-8 is mostly hidden in the cockpit while Finn sits obscured behind the Lower Hull Turret. I'm saving the Han Solo and Chewbacca miniature figures for a landed version of the Falcon which I hope to work on eventually. My plan for this future version is expected to involve a different basecoat hue, an installed LED lighting system as well as airbrushed paints instead of water decals for the colored panels. That's the plan anyway. 

At this angle, Rey can be seen through the cockpit while BB-8 is hidden from view

From the get-go I had had my reservations about the small size of the Desert Display Base provided by Bandai. To me, the base does nothing to suspend disbelief and increase realism in the Millennium Falcon vignette piece. In fact, it does the exact opposite and makes the entire vignette look toy-like. The base feels like an afterthought. Both incomplete and underwhelming. That's one of the reasons motivating me to work on another version to make it into a more realistic diorama.  

Bandai Star Wars 1/144 scale Millennium Falcon and its Desert Base Display
A key gripe for me is that the Desert Base Display is smaller than the Millennium Falcon
Millennium Falcon 'floats' above its Desert Base Display courtesy of a rigid stand (hidden)

Being the "unlighted Sublight Drive Engine" yet "in mid-flight" version of the Millennium Falcon, this particular representation of the iconic ship was intended to mimic a scene in The Force Awakens in which Rey shuts down the Falcon's engines and let it free fall in order to evade a First Order TIE Fighter. At the same time, Finn is seated behind a Quad Laser Cannon in the Lower Hull, fingers poised at the trigger, ready to blast the TIE Fighter to smithereens. If only I had a 1/144 scale TIE Fighter, this vignette would've been complete. Alas I do not, so just imagine it ... pew pew pew.

Angled side view (port side) of the Bandai Star Wars 1/144 scale Millennium Falcon
Weathering effects were done using Tamiya Weathering Master pastel-like applicator sets
Rear Exhaust Vents had long streaks of soot trailing towards the Sublight Drive Exhaust
Weathering effects were kept as subtle as possible to prevent it from overwhelming painted details
Angled side view (starboard side) of the Bandai Star Wars 1/144 scale Millennium Falcon

Apart from the overly small size of the rectangular base, I also had issues with the display stand that supported the Millennium Falcon in its 'flying' pose. It's understandable that Bandai made the girth of the stand thick in order to support the weight of the Falcon. However, the least they could've done was supply a clear display stand to give viewers the illusion of a ship in mid-flight.   

Starboard side of the Millennium Falcon, which rests atop the Desert Display Base
Most prominent structure on the rear of the Millennium Falcon is its Sublight Drive Exhaust
Sublight Drive Engines within the exhaust is not lighted up as there isn't any LED system installed
Port side of the Millennium Falcon, which rests atop the Desert Display Base
Thickness and solidity of the Display Stand takes away from the illusion of a spaceship in mid-flight
Front end of the Millennium Falcon as seen in a head-on closeup view

While I was tempted to include a video to showcase a wider gamut of angles of the fully completed Millennium Falcon kit, I decided to hold off for now. I feel that I still need more time with the Vegas Pro 15 Edit video production software before I can make a video about this Star Wars project that isn't a complete snooze-fest. Until then, these set of photos you see here will have to suffice.

Forward Mandibles and Nose Section (containing concussion missles) of the Millennium Falcon
Square Radar Dish marks this Millennium Falcon as a the one from The Force Awakens
Rear Exhaust Vents had long streaks of soot trailing towards the Sublight Drive Exhaust
Closeup view of the Starboard Escape Pod (round structure)
Cockpit section of the Millennium Falcon, with Rey and BB-8 seated inside

That's yet another tick off my hobby checklist. It feels good. Really good. And thankfully there isn't any sign of a hobby burnout despite the longer than usual hours spend on the hobby during this past few weeks. Surprisingly I actually feel more invigorated to tackle more projects, both new and old. With the Falcon now finished, my focus will shift onto the other Sci-Fi ship project on my worktable. It's a somewhat less neglected project but one that has yet to really take off. I'm speaking of the Space Battleship Yamato 2199 (Cosmo Reverse Version). Assembly on the Yamato should start soon. 

https://shireworks.blogspot.com/https://www.facebook.com/shire.works

As always it seems I will end my blog post with yet another quote. As we live in such surreal times whereby the whole world seems to have come to a standstill, I find this recurring quote in the TV series Westworld most apt ... Have you ever questioned the nature of your reality? Well have you?

http://shireworks.blogspot.com/p/custom-painted.html
Related Posts Plugin for WordPress, Blogger...