Showing posts with label Pinup White Speaker. Show all posts

Friday, 18 October 2013

Understanding White Balance in miniature photography

Chances are, at one time or another, you would have been hugely frustrated by a lack of colour accuracy in the digital photos of your miniatures. Unlike the human eye which can instantly adjust to changes in light and see objects in the colours it was meant to be seen, the digital camera doesn't always capture colours properly. After all the hard work put into getting just the right shade or hue of colour in your painting, nothing is worse than to have all that spoiled by a photo with a yellowish or bluish tint. Understanding the basics of White Balance can help you increase colour accuracy.   

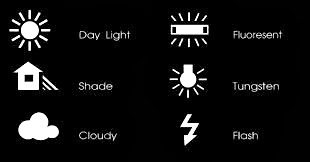
White balance options that are available in most DSLR cameras

Relationship between White Balance and Colour Temperature
Why then do you sometimes get a bluish or yellowish tint to the digital images of your miniatures? It all relates to the lighting environment (or colour temperature if you will) in which the photographs were taken. Learning about colour temperature, which is a characteristic of visible light, can go a long way in getting a basic understanding of why certain White Balance settings are chosen.  

A detailed look at colour temperature
Colour temperature is measured in the Kelvin temperature scale. Cool temperatures are located higher on the Kelvin scale - meaning a light with a higher colour temperature or a larger Kelvin (K) value will have more blue light. Looking at some common lighting situations from cool to warm, Shade comes in at about 7000K, Cloudy is approximately 6000K, Day Light (~5200K), Flourescent Light (~4000K) and Tungsten Light (~3200K). Most Digital Single-Lens Reflex (DSLR) cameras has White Balance settings that you can set for just such conditions. As to what each settings do, read on.

Lighting environment in which my photos were shot
At my workstation is a simple photography setup comprising two lamps, each with a 24W (roughly 125W equivalent) energy saving 6500K cool daylight lights bulbs, which are covered with white diaphanous material to diffuse light, thus reducing glare and harsh shadows. The surrounding area was relatively closed off to outside light with the curtains drawn, although some leakage does occur as the curtains aren't thick enough to completely engulf the room in darkness. This gives you a rough idea of the lighting environment my miniatures were exposed to when their photos were taken. 

Two lamp setup at FourEyedMonster's miniature painting workstation

What does adjusting the White Balance do?
In essence, adjusting a camera's White Balance settings allows you to either add warmth (yellowish tint) or coolness (bluish tint) to the digital photo in order to compensate for the lighting environment. In general, fluorescent lighting adds a bluish cast to digital images while tungsten (incandescent) light bulbs add a yellowish tinge to the photos, if nothing is done with the White Balance to compensate.

For example, if you are taking photos under fluorescent lighting (a cool temperature), you would want to add warmness (yellowish tint) to your digital images by selecting either the 'Shade', 'Cloudy', 'Daylight' or 'Fluorescent' White Balance settings which are ideal for a cool colour temperature range between 7000K and 4000K. In the end, if you have adjusted the White Balance correctly, the colours of your miniature will look close to or be exactly what you see with your naked eye. 

Digital photos of a miniature shown at different White Balance settings

On the above photo montage, I took some photos of the Kingdom Death Pinup Speaker miniature against a black background under different White Balance settings. From left to right, these settings were Auto White Balance (AWB), Shade, Cloudy, Daylight, Fluorescent and Tungsten. I did not use the White Balance settings for Flash Photography as I almost never take photos of my miniatures using the camera flash. Based observations with the naked eye, the setting that displayed the most accurate colours was 'Shade' or the second picture from the left of the above photo montage.

Digital images using the Shade, Cloudy and Daylight White Balance settings

As the lighting environment in which I was working in can be termed as very cool, it stands to reason that I had to select White Balance settings that introduced warmth into my digital images. Based on the series of photos above, warmth was introduced at a decreasing amount from left to right (Shade to Cloudy to Daylight settings). As mentioned earlier, the 'Shade' settings gave me the best colour accuracy for the lighting environment that I was working in. Sometimes, just selecting the 'Auto White Balance' or 'AWB' settings would be good enough but that was not the case here (see below).     

Auto White Balance (AWB) does work on occasion but not this time

As an example how bad your digital images would look like at the wrong White Balance settings, I also took some photos at two extreme settings in my case study (see below). Firstly, while the 'Fluorescent' setting was supposed to introduce warmth to photos, it however, no longer did so under the cooler lighting environment I was working in. Secondly, the 'Tungsten' setting which is supposed to add coolness (or bluish tint) to images taken in warm environment just made things worse.

Fluorescent (left) and Tungsten (right) White Balance settings

So what happens when the custom White Balance settings do not work. Well, for starters you can try manipulating the lighting environment you work in e.g. move the lamps to a different distance from your miniatures etc. You can also either resort to setting a custom White Balance setting or use other advanced hardware functions that modern DSLRs have nowadays. If all else fails, the most efficient method would be to correct the White Balance of digital images using computer software, which I do resort to on occasion if it gives me the colour accuracy that I am looking for.


Now I do not profess a mastery of White Balance adjustments in digital photography as I still struggle to get good colour accuracy especially when using white backgrounds. What I hoped to achieve with this blog post was to share with you my experiences when dealing with White Balance issues and perhaps give you a basic understanding of what White Balance is all about and take the mystery out of that bluish (or yellowish) tinted digital photo of your miniature. Thanks for reading and please do share in the comments below if you have your own solutions to White Balance issues.


Wednesday, 24 July 2013

Kingdom Death Pinup Savior [sans cloak]

Excluding the Pinup Savior's peacock feathered cloak, painting on my second Kingdom Death miniature is essentially complete. It was a joy to paint the Pinup Savior's hair because it was wonderfully sculpted to the extent that individual strands were visible. I went with a dirty blond hair look as I felt it was better suited to the overall colour scheme of the miniature. Additionally, her sword scabbard was painted up to match her vest while the staff had a very simple object source lighting (OSL) effect from the lamp attached to it. Other work comprised her "scarf" and necklace.     

Kingdom Death Pinup Savior sans cloak
OSL effect of the lamp on her staff was kept to an absolute minimum
Sword scabbard was painted in a similar colour to the Pinup Savior's clothes
Staff was painted grey as I felt it was a better fit to the overall colour scheme
Where possible, I painted each individual strand of the Pinup Savior's hair
Hair on the Pinup Savior was beautifully sculpted, in my opinion
From the side, you can see she is leaning slightly backwards, likely due to the absent cloak's weight
A nice angle that accentuates the Pinup Savior's curves

Painting the two Kingdom Death miniatures has given me the confidence to tackle more miniatures of a similar nature. While I am generally pleased with the Pinup Savior's final paint job, there is definitely room for improvement especially on the skin tone transition from shadows to highlights as well as on the eyes. With more minis in the pipeline, there will be ample opportunities to practise.

And then there were two - Pinup White Speaker (left), Pinup Savior (right)

One reason for not painting the Pinup Savior's cloak was the time and effort that it would have required. With the amount of detail in the cloak (see below), it would have taken me a very long time to finish painting. When my brush control improves to a higher level, I might consider painting the cloak. But for now I am happy with the Pinup Savior without her cloak.

Very detailed cloak showing peacock feathers

Originally, the Kingdom Death Pinup Savior was depicted as a redhead in brown-red garments. Although I do like the original colour scheme, I decided to mix it up a little by going blonde/blue.

Pinup Savior in her original brown-red colour scheme; notice her peacock feathered cloak on her back

Without a doubt, I need loads more practice before I can paint better skin tones and eyes. One thing I could try is to strike better balance between thinning a paint versus the resulting chalkiness that arises from being diluted with too much water. Some added flow improver/enhancer could be the solution. Certainly wouldn't hurt for me to try it out in my next miniature. Till the next post, thanks for reading!

Tuesday, 14 May 2013

Kingdom Death Pinup White Speaker [Completed]

After nearly two years since I first started painting miniatures, I finally plucked up enough courage to finish painting the Kingdom Death Pinup White Speaker miniature which also doubles up as a proxy for a Horus Heresy Word Bearers character called Cyrene Valantion. This miniature marks my second attempt at painting a female figure and its a small step towards emulating a painter whose work I really like: Jen Haley. I am still a long way off from such standards but I am determined to get there.

Kingdom Death Pinup White Speaker aka Cyrene Valantion
Didn't really get the belly dancer getup near her loin cloth but oh well
Does her attire qualify as a +5 armour?
Kingdom Death Pinup White Speaker (side view, right)
View of the Pinup White Speaker minus her fur cloak
If you could kindly take your eyes off her rear assets, you will notice that grass is dying along her wake
The devil wears Prada ... would you just look at those high heels!
Kingdom Death Pinup White Speaker (side view, left)

Bad undercoat means this model wasn't all she could be
This miniature didn't really get off to the best of starts because my lack of experience in using the Citadel Skull White spray resulted in the initial undercoat being powdery and chalky. Sadly enough, the same occurred for the Kingdom Death Pinup Saviour model that I am painting for my diorama. Since then, I have gotten some info on how best to use the Skull White spray so hopefully future minis won't get off to an inauspicious start. An alternative would be to use the Tamiya primer but the only Tamiya shop in the country didn't have any in stock which sucked.

Pinup White Speaker with her fur cloak
The Kingdom Death Pinup White Speaker actually had a fur cloak which attached to her back. But as I am still undecided as to whether to glue it on, I put some blue tack on the collar, stuck it on the miniature and took some pictures to show how she looks with the cloak on her back.

Applied some wet blending techniques on the inside of the cloak
Did some dry brushing on the outside of her cloak, a painting technique which for some reason I almost never use

Getting inspiration to paint her red hair
Now, natural red hair isn't a shocking Blood Red colour, rather it's more of a ginger hue. I checked out some famous Hollywood actresses sporting red hair (whether natural or not) in order to get some inspiration for painting a more natural looking red hair.

Clockwise from the upper left hand corner - Amy Adams, Scarlett Johansson, Christina Hendricks and Emma Stone
Close-up of the Pinup White Speaker's hair

Burning black smoke
Meanwhile for the burning black smoke on the miniature's left hand, I used this beautiful photograph (see below) taken by a photographer and posted on this site. While I may have overdone the burning part when I should be emphasising the black smoke, I decided to leave it be for now.

Black smoke resulting from burning tyres
Close-up of the burning black smoke on the Pinup White Speaker's hand

Thanks for checking out my finished Kingdom Death mini. Please feel free to comment if you think there are parts of the mini that need improving. Any advice for this noob painter is most welcome.


Friday, 10 May 2013

Seeking inspiration from Hollywood and Mother Nature's palette

After spending months working my Black Legion / Word Bearers army (with not much progress to boot), I am literally running on empty and have been left hankering for more variety in my miniature painting projects. Having always fancied a go at painting fantasy-based miniatures, I decided the time was right for me to start painting my diorama involving the Lord of the Rings Dragon and the Kingdom Death Pinup Saviour miniatures - that has a working title of "A Marilyn Monroe Moment".

Marilyn in the iconic white dress from the film 'Seven Year Itch', 1955
An iconic Hollywood image - re-envisioned in a fantasy setting

Work on the Kingdom Death Pinup Saviour is still in the very early stages and all I have done is to begin work on the skin tone. Painting on the miniature has gotten off to a rough start because priming it with Skull White spray caused a powdery (as opposed to a smooth) layer to adhere to the mini. I will need to shop for a Tamiya Gray Primer as it should be better for minis with more flesh showing.

Very early stages on the skin tone

Work on the Dragon is even further back in the progress timeline with its basecoat yet to be finished. While it might seem silly to seek a different challenge in my projects and still paint red - more so when I have just finished painting some Word Bearers - the reds for the dragon will eventually be much brighter and warmer than the dull-red of Lorgar's warriors.   

Work on the dragon's basecoat is ongoing

While trying to find the best possible colour scheme for the red dragon, I decided to see what Mother Nature had to offer. In particular, two animals caught my eye namely the Scleropages legendrei (red arowana fish) and the naja pallida (red spitting cobra). Both their red scales looked very beautiful and will be the inspirational foundation from which to paint the dragon.

Scleropages legendrei
Naja pallida

Meanwhile, I decided to also continue working on the Word Bearers without neglecting the creative diversity that I sought. That meant resuming work on Cyrene Valantion which is actually a Kingdom Death White Speaker Pinup miniature. One of the reasons I stopped was because I unhappy with way the mini was turning out. But I decided to suck it up and proceeded to repaint the skin and fix my earlier mistakes. While it still needs more shadows and highlights, the skin tone is now looking much better than my earlier attempt. Other parts of this mini is still at the basecoat stage.

WIP - Kingdom Death White Speaker Pinup, my proxy for Cyrene

My approach to both the Pinup Saviour and Dragon will be to start with the mid-tones first and then work towards shadows and highlights from there. It is a bit different than the usual base-to-midtones-then-to-highlights approach that is usually recommended by Games Workshop for beginners. Starting with the mid-tone actually lets me have more control over the application of shadows and highlights. Thanks for checking out my progress on the diorama and I hope to post more updates soon, especially pictures of a completed Cyrene Valantion.

Monday, 28 January 2013

Building a Word Bearers Anointed Terminator Squad

After nearly two months of inactivity, getting back on the proverbial hobby horse was a challenge but a welcome one. Taking a break from the hobby kinda recharged me and I was psyched up to resume work on my Word Bearers army. So much so that I finished assembling a whole terminator squad in just half-a-day which is a record for me. So now, despite the Skyrim arrow still being firmly lodged in my knee, I am now at least back to hobbying again.

Why did the Anointed cross the road? To wipe the smirk off a warrior of Guilliman. What up!
Word Bearers Anointed - ready for paint work to start
A more detailed look at the Anointed
Termie (right) has a mutated arm cause I haven't figured what weapon to choose ... so it's a proxy for something or other

Other Word Bearers stuff
Other Word Bearers army related work that I manage to work on was to paint on the Scab Red basecoat for parts of the cultists. I tried to vary the placing of the red colour scheme so as to not overwhelm the minis with too much red as well as to imbue them with some variety.

Word Bearers Cultists with autoguns

Meanwhile, work on Cyrene Valantion has stalled a bit as I am a bit scared to embark on the next stage of the painting i.e. the mid-tones. Thus far, Cyrene has only been basecoated and given a wash. Still working up the courage to attempt the mid-tones for fear of messing up.

Work in progress for the Blessed Lady
Hopefully I will have more progress pictures in the coming weeks. Thanks for reading!

Monday, 12 November 2012

First Word Bearer Chaos Cultist ... and a lady in waiting

Well, I am off the starting blocks. Just recently finished my first Word Bearer chaos cultist. Previously I would have been really proud of my achievement. But after seeing the Iron Painters finish 30 over models each over a 24-hour period during MaGaCon 2012, I am setting the bar higher i.e. I hope to finish between 5 to 9 cultists over this week. It will my little mini-Iron Painter. ^^

My ongoing experiment with painting flesh tones
Papa Nurgle seems to have taken a liking to this guy's back
This time round I completely changed the way I take pictures of my miniatures. I mounted a DSLR on a tripod; used only lighting from lamps i.e. no flashes; and set the shutter speed to a slow 1/60 which meant I couldn't hold the camera while taking it without getting blurry pics hence the tripod.

Lady in waiting ... Cyrene Valantion (Work-In-Progress)
I also managed to get some work done on the Kingdom Death model that I am using to represent the reincarnation of Cyrene Valantion of the Word Bearers. Nothing too fancy as I just managed to finish the basecoats. Next will be the washes followed by the midtones and then the highlights.

Front View - Reincarnation of Cyrene Valantion WIP (aka Kisya of Kingdom Death)
Back View - Reincarnation of Cyrene Valantion WIP (aka Kisya of Kingdom Death)

Word Bearer Inspired Books
Obviously Cyrene was inspired by Aaron Dembski-Bowden's The First Heretic. Meanwhile, I just finished reading Dark Apostle and have started on Dark Disciple by Anthony Reynolds. The former book gives some insight into Chaos Cultists while the series as a whole will make good background reading and inspiration before I attempt work on the Dark Apostle miniature.


Ahhh ... religious fanatics ... you can't help but love 'em. Heh heh.  

Related Posts Plugin for WordPress, Blogger...