Showing posts with label Test Type. Show all posts

Monday, 25 July 2022

Custom Candy Coated Evangelion Unit-01 Test Type [Assembly Part 5 of 5: Final Assembly]

 Candy Metallic Finish on a mecha model kit ... check! That's one more tick on my must-do-bucket-list. More than that though, I've learned a technique that I plan use again on future mecha projects. In fact, it's likely I'll use a candy metallic finish on another Evangelion project namely the EVA Unit-02, which has red as its predominant color. That, however, is still something too far into the future to worry about. For now, let's concentrate on the here and now, and on what has actually been completed which is the Bandai Limited High Grade (LM-HG) Evangelion Unit-01 Test Type.  


Bandai LM-HG Evangelion Unit-01 Test Type custom paint job (candy metallic finish)

 After assembly of the various sub-sections like the head, torso, and limbs, all that remained to be done was put the separate sub-assemblies together into a recognizable EVA unit. The final assembly process itself was fairly straightforward with the hard work done during the assembly of the sub-assemblies. Everything slotted in as expected with the end results you see below.


Fully-painted individual parts/sub-assemblies of the EVA-01 Test Type, prior to final assembly

Bandai LM-HG Evangelion Unit-01 Test Type completed (front view)

Bandai LM-HG Evangelion Unit-01 Test Type completed (back view)

 Against my usual go-to black background, a lot of the EVA-01 Test Type details were obscured. This was because the candy metallic finish tended to mirror its dark surroundings thus accentuating the overall dimness of an object that's photographed in a dark environment. As such I had to instead carry out the photo shoot with the Evangelion posed against a white background. With the EVA unit placed in brighter surroundings, I found its details to be significantly more visible in the photos. Of course it helped that the candy metallic finish now reflected/mirrored its brighter surroundings.


Evangelion Unit-01 Test Type posed in a squat (front view)

Evangelion Unit-01 Test Type posed in a squat (back view)

A white background was chosen as the primary background because ...


... when a black background was used to shoot photos of the EVA-01 Test Type ...

... I found that the candy metallic finish will partly reflect/mirror its dark surroundings ...

... thus accentuating the overall dimness of the surroundings the EVA-01 was posed in ...

... this was especially true if the candy metallic hues were the darker purples and blues ...

... and do here you see the EVA-01 Test Type against a black background followed by ...

... a white one, which partly reflects its brighter surroundings thus showcasing its details more clearly.

 Although I had an inkling of how cool candy metallic finishes could and did look, I was still relieved to find that the Evangelion Unit-01 Test Type did not look out of place with a candy coating. While most mecha-type kits will look good in a candy metallic finish, I believe this is not a given as I've seem some mechas look terrible when saddled with candy hues on its outer armor.


Evangelion Unit-01 Test Type (isometric view, front left)

Evangelion Unit-01 Test Type (back view)

Evangelion Unit-01 Test Type (isometric view, rear left)

 Rough handling on my part has resulted in the paint chipping on the Evangelion's thighs. That won't be a problem though as the chips look natural i.e. how it would look like if candy metallic surfaces were scratched. Paint chips can also be partly blamed on the fact that I didn't apply a protective clear topcoat on top of the candy metallic finish. That I did not do out of choice because I liked how the candy coating looked as is, and did not want to alter the finish anymore.   


Evangelion Unit-01 Test Type (isometric view, rear right)

Evangelion Unit-01 Test Type (isometric view, right)

 If there is one gripe I have of the fully-assembled model kit is that the joints in its spinal column seem a tad loose in that the upper body tends to sag downwards/forwards on more than one occasion. I guess it's not all bad when you consider that the Evangelion's default pose is one of it hunched forwards. So in essence the kit is just fulfilling its core aesthetic quality. The joints on the limbs seem fairly robust for now, and the EVA Unit can indeed stand on its own two feet. However a Bandai Action Base will be needed to pull off more dynamic poses other than it just standing still.  


Evangelion Unit-01 Test Type (isometric view, front right)

Evangelion Unit-01 Test Type (isometric view, left)

 It's obvious from the photos above that the Evangelion is still sorely lacking in the weapons department. While I've assembled the EVA Unit's weapons, I've yet to paint them. Once those are completed, I plan to pair the EVA-01 Test Type with an Action Base in order to shoot photos of some dynamic poses. However there is a high possibility that other projects will be completed first before I eventually come around to working on the weapons. So there won't be any updates for this project anytime soon. Anyway, that's it for this post. Until the next, please stay safe and be well.  


https://shireworks.blogspot.com/https://www.facebook.com/shire.works

 Important Note: Videos showcasing a more in depth view of the Evangelion Unit-01 Test Type assembly process, of which there are five parts, have been released simultaneously on my YouTube channel FourEyedMonster Miniatures. If you are the type who prefers watching instead of reading, then the videos will be more to your liking. Be sure to check those videos out. To access my YouTube Channel, you can also click on the banner promoting the channel directly below this paragraph.


FourEyedMonster Miniatures YouTube Channel

https://www.facebook.com/FourEyedMonster-313145002078520/

Sunday, 17 July 2022

Custom Candy Coated Evangelion Unit-01 Test Type [Assembly Part 4 of 5: Head]

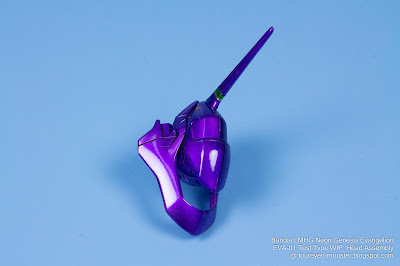
 Least straightforward of all the Evangelion Unit-01 (EVA-01) Test Type sections was the head. Not the assembly process mind you but in the painting of it, reason being the head was the only section that involved the use of two different types of paint i.e. lacquer and acrylics. Masking was needed to paint in the green stripe on the Evangelion's horn, but nothing too intricate. And with lacquer paints being more 'aggressive' than acrylics, the former was airbrushed on before the latter was applied onto the parts. Below are work-in-progress as well as completed photos of the EVA-01's head.  


Evangelion Unit-01 Test Type work-in-progress: Head (custom painted with lacquer and acrylics) 

 For the head, the assembly process was significantly easier than the painting process. While the upper- and mid-sections of the head were first put together into sub-assemblies, the upper and lower jaws of the EVA-01 remained as individual parts prior to painting and assembly. In the end there were four fully painted sub-assemblies/individual parts laid out for final assembly of the head (see below).


(A) Laying out individual fully-painted parts/sub-assemblies of the head, prior to assembly

(B) Custom painted head of the EVA-01 Test Type, after assembly

 Although decals were provided for the eyes, I couldn't bring myself to use it. I felt it was 'cheating' to do so. Of course that doesn't mean I'll never use decals on the eyes of figurine/mecha model kits if they were provided together with the kit. It just means if I think I can pull off painting the eyes, I'll not use the decals. In the case of EVA-01, I felt I could do a fairly good job of painting the eyes despite the need to paint in a white diamond/rhombus shape within another diamond/rhombus shape that is black. Based on a close up macro shot of the head, the white eye pupils admittedly look bit rough on the edges. But thankfully none of this is significantly noticeable to the naked eye.


While assembly of the head of Evangelion Unit-01 Test Type was relatively straightforward ...

... the painting of it was more complicated as it involved use of a combination of paint types ...

... such as acrylics for the matt red tongue and inner teeth as well as black and white for the eyes ...

... and lacquer for the candy metallic finish of the purple, blue, and greens ...

... with candy metallic purple being the dominant hue of the Evangelion head.

 Apart from the airbrushed candy metallic coats of purple, green, and blue, there were the hand-brushed acrylics of red for the inner teeth and tongue as well as black and white for the eyes. Vallejo Model Color paints comprising Carmine Red (70.908) for the inner teeth and tongue, Black (70.950) and White (70.951) for the eyes. To get a smoother consistency, I mainly used Vallejo Airbrush Thinner instead of water to dilute the acrylic paints. Although I still mixed in the occasional drops of water when needed, my main solvent was the airbrush thinner.


Having a candy metallic finish for the Evangelion head involved ...

... airbrushing a purple hue on the majority of the head's surface area ...

... with stripes of green on the 'horn' and chin as well as swathes of blue on the mouth (or outer teeth) ...

... acrylic paint (Vallejo Carmine Red) was used on the inner teeth and tongue ...

... while Vallejo Black and White was used on Evangelion's eyes.

 And so here we are. Critical components of the EVA Unit-01 have been fully painted and put together into their respective main sub-assemblies such as the head that you see here, the torso, and limbs. What remains to be done is to put all these main sub-assemblies together and see if the candy metallic finish works as a whole. Aesthetics of the final assembly will determine if I'll continue with this technique for future projects. Signs are good but you never actually know until you see it with your own eyes. Thank you dear readers for following along with the assembly process so far. I hope the payoff will be worth it in the coming weeks. As always, until my next post, stay safe and be well.   


https://www.facebook.com/FourEyedMonster-313145002078520/

  Reminder: Videos showcasing a more in depth view of the Evangelion Unit-01 Test Type assembly process, of which there will also be five parts, will all be released simultaneously after all (or most) of the blog post updates have been uploaded. If you are the type who prefers watching instead of reading, then the videos will be more to your liking. Be sure to stay tuned for that.

https://shireworks.blogspot.com/https://www.facebook.com/shire.works

Saturday, 9 July 2022

Custom Candy Coated Evangelion Unit-01 Test Type [Assembly Part 3 of 5: Torso]

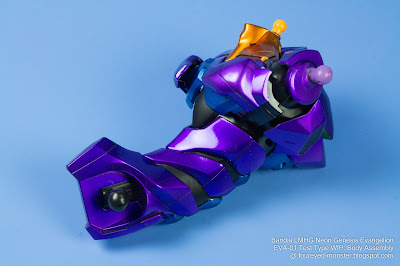
 With extremities of the Evangelion Unit-01 (EVA-01) Test Type completed, it was time to focus inwards. What this entailed was assembly of the Evangelion's custom painted neck, chest, back, spine, and lumber sections. Notwithstanding a slight misstep caused by a lack of mindfulness, the entire torso assembly process was pretty uneventful, which I'll elaborate on later.


Evangelion Unit-01 Test Type work-in-progress: Candy Metallic Torso (isometric view, front)

While the joints weren't painted, in hindsight they should've been to create a tighter fit between parts

 For the first time a candy metallic color other than purple, orange, and green were evident in the Evangelion's overall color scheme. Initially I had intended to airbrush on a less saturated shade of candy blue onto the torso to approximate the original molded azure-like hue . But because the purples were already significantly saturated, I went for a more consistent look, which translated into a more saturated candy metallic blue. So technically it's not 100% true to the original EVA-01 Test Type color scheme. However in this case, a consistent look trumps color scheme accuracy.


In a color scheme tweak, the EVA's torso has candy metallic blue on the chest and along the spine

Evangelion Unit-01 Test Type work-in-progress: Candy Metallic Torso (isometric view, back)

Apart from the addition of candy blue, the rest of the color scheme is similar to the legs and arms

 Assembly of the Evangelion's neck, body, back, spine, and lumbar was a straightforward event except for a slight hiccup in the form of a missed step. Soon after I thought I had completed the torso assembly process, I noticed a gaping hole at the Evangelion's back (see Step E). This has never happened to me before. I blame it on the fact I was trying to take a video of the assembly process which required me to assemble the parts at an odd angle that deviated from my usual vantage point. 


(A) Arranging and sorting out individual parts/sub-assemblies of the neck, chest, and back sections

(B) Custom painted neck, chest, and back of the EVA-01 Test Type, after assembly

(C) Arranging and sorting out individual parts/sub-assemblies of the spine and lumbar sections

(D) Custom painted torso of the EVA-01 Test Type, front end assembly completed

 Unfortunately I couldn't just slot the forgotten piece right onto the Evangelion's back. I had to first disassemble the back section, put the missing piece in, and then reassemble the back section again. The problem with this process was that it was quite difficult to disassemble the back section as I had to be careful not to chip the paint. Eventually it got done, and the torso was finally completed.  


(E) A piece of the EVA-01's custom painted torso was inadvertently left out of the assembly process

(F) Custom painted torso of the EVA-01 Test Type, fully-assembled

  As it stands, there is only one other section of the EVA-01 Test Type left to assemble namely its head. I have already finished the paint job of the Evangelion's head so all that remains to be done is to assemble the head. Once that's done, the final assembly process of the Evangelion can begin. I leave you with a quote from a Neon Genesis Evangelion character named Ryoji Kaji ... "If you know pain and hardship, it’s easier to be kind to others". On that note, I wish you well and hope you are staying safe amidst a seeming resurgence of a new pandemic variant. 

  Important Note: Videos showcasing a more in depth view of the Evangelion Unit-01 Test Type assembly process, of which there will also be five parts, will all be released simultaneously after all (or most) of the blog post updates have been uploaded. If you are the type who prefers watching instead of reading, then the videos will be more to your liking. Be sure to stay tuned for that.


https://shireworks.blogspot.com/https://www.facebook.com/shire.works

https://www.facebook.com/FourEyedMonster-313145002078520/

Related Posts Plugin for WordPress, Blogger...