Showing posts with label 1/1000. Show all posts

Monday, 8 August 2022

Space Battleship Yamato 2199, Cosmo Reverse Ver. [WIP - First Bridge & Missile Launch Tower]

 With water decals application on the hull and deck of the 1/1000 scale Space Battleship Yamato 2199 (Cosmo Reverse Version) now complete, it's time for the next stage. Among others, this involved the assembly as well as the final stage of painting of selected details for the First Bridge (the structure with the clear green piece atop it) and Missile Launch Tower (the red funnel-like structure behind the First Bridge).  This was followed by the application of a water decal on the tower. Both were then attached onto the deck of the space battleship via a snap-fit assembly process.


Space Battleship Yamato 2199 (Cosmo Reverse Ver.) work-in-progress: First Bridge & Missile Launch Tower

Additional painted details are the clear green 'windows' of the admiral's private quarters ...

... and the opaque greens of the what seems like spotlights at the base of the Missile Launch Tower.

 As to what details were painted, let's just say only one color was involved but with one being opaque and the other clear. Previously the First Bridge had its hull basecoated in the space battleship's iconic grey, and its bridge windows painted a clear green, while the Missile Launch Tower was basecoated in grey and red. Both were then panel-lined with black. 

 On this particular step of the build, the windows of the admiral's private quarters (located at the very top of the First Bridge) was painted clear light green. Additionally, the Missile Launch Tower openings was painted in a gun metallic hue while a series of spotlights at the base of the tower were painted in an opaque light green hue. Once the part details were painted, it was time for the assembly process.


Apart from the continuation of the assembly process and added painted details ...

... the other piece of work done at this stage was the 'square-dash' decal on the Missile Launch Tower ...

... however still missing from space battleship's deck are its primary/secondary guns ...

... as well as four more anti-aircraft (AA) guns on each side of the hull ...

... and these will be located relatively lower than all the existing AA-guns.

 While assembly of the First Bridge already completed prior to painting the admiral's room windows, the Missile Launch Tower was still mostly in its component parts or minor sub-assemblies. Putting the launch tower together was a straightforward task without any complications (see below). 


First Bridge, plus base structure of Missile Launch Tower and pieces of the tower itself

Base structure that holds the Missile Launch Tower, which at this stage, is in three separate pieces

Yet to be assembled pieces of the space battleship's Missile Launch Tower

Missile Launch Tower of the Space Battleship Yamato 2199 after it has been assembled

Base structure that holds the Missile Launch Tower and the tower itself

Missile Launch Tower, after it has been attached to the base supporting structure

Missile Launch Tower with water decals applied, attached to its base supporting structure

First Bridge of the Space Battleship Yamato 2199, with all its 'windows' painted clear green

First Bridge (left) and the Missile Launch Tower atop its supporting structure (right)

 Once these two main sub-assemblies i.e. the First Bridge and Missile Launch Tower were fully-assembled, it was then time to snap-fit them onto the space battleship's deck. If my memory serves me, this process was a bit nerve wracking because (a) the fit was quite tight even though I had placed masking tape over the connecting holes to prevent paint from clogging them up; and (b) there were a lot of thin, fragile parts sticking out from both main sub-assemblies thus exposing them to potential breakage during the assembly process. This scenario tends to happen to me a lot mainly because I like to paint the individual parts or sub-assemblies before assembling them. 


Before attaching the First Bridge and Missile Launch Tower onto the space battleship's deck ...

... the Hangar Bay with its docked space fighter aircraft was moved out of the way, and then ...

... the holes onto which the bridge and tower fit into were exposed by removing the masking tape (note: tape's function is to prevent paint from getting into the holes and making the fitting too tight) ...

... before the Missile Launch Tower and its base structure was attached onto the space battleship's deck ...

... followed by the First Bridge; the assembly process was tricky with so many fragile parts sticking out, and with the fitting still being quite tight even without having paint clogging the aforementioned holes.

First Bridge and Missile Launch Tower after being attached onto the space battleship's deck

 At this stage of the build, there are still large chunks of empty space on the deck and hull. So essentially there is a ways to go before the Space Battleship Yamato (Cosmo Reverse Version) can be considered complete. For one thing the photos on this post show a ship that's missing her Primary/Secondary Deck Guns, Rocket Anchors, Spacecraft Catapults, Stabilizing Fins, and the Third Bridge. Most of these structures have been painted with the exception of the ship's main stabilizing fins. Moreover, there is also the matter of applying decals onto the deck guns.  


Space Battleship Yamato 2199 (Cosmo Reverse Ver.) work-in-progress: fully-painted First Bridge and Missile Launch Tower with its base supporting structure attached onto the deck (side view, from left)

Space Battleship Yamato 2199 (Cosmo Reverse Ver.) work-in-progress: fully-painted First Bridge and Missile Launch Tower with its base supporting structure attached onto the deck (side view, from right)

 Other than the items mentioned in the preceding paragraph, there is also the matter of the base itself and the accessories for the base. The base itself needs to be painted, and the appropriate description sticker applied to its side. Meanwhile the base accessories consists of tiny 1/1000 scale miniatures of various types of spacecraft that appeared in the anime.


Shown here is an isometric view of the Space Battleship Yamato 2199 (Cosmo Reverse Ver.) ...

... and from this zoomed-out isometric view we can see that the space battleship is still ...

... missing its deck guns, anti-aircraft guns, fins, third bridge, catapults, rocket anchors, ...

... and the tiny individual spacecrafts (excluding ones in the hangar bay) for placement on the base.

 If my experience with the hangar bay fighters is any indication, then I have a feeling this project will hit a speed-bump when the time comes to paint the aforementioned tiny spacecraft. I didn't particularly enjoy painting those tiny fighters in the hangar bay so it stands to reason that I won't like it any better painting different types of spacecraft. Who knows, if there is less repetition involved then maybe I won't hate it as much. Anyway, up to now at least, the project seems to be progressing along at a steady pace. I'll deal with the potential speed-bump when I get to it. So here's to small victories in our hobby projects. Cheers, and see you soon in my next post!   


https://shireworks.blogspot.com/https://www.facebook.com/shire.works

https://www.facebook.com/FourEyedMonster-313145002078520/

Sunday, 31 July 2022

Space Battleship Yamato 2199, Cosmo Reverse Ver. [WIP - Water Decals on the Hull & Deck]

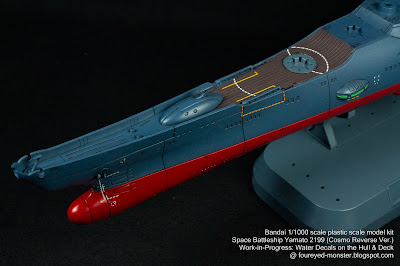
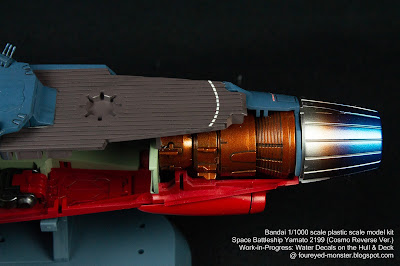
 Before any further work can be done on the 1/1000 scale Space Battleship Yamato 2199 (Cosmo Reverse Version) model kit - be it continuation of the assembly process or painting of the few pieces I had inadvertently left unpainted - first, the ship's hull and deck needed to have the water decals applied on them. Below are the results of my attempt at detailing the ship's hull and deck with decals.


Space Battleship Yamato 2199 (Cosmo Reverse Ver.) work-in-progress: water decals (side view, left)

Space Battleship Yamato 2199 (Cosmo Reverse Ver.) work-in-progress: water decals (side view, right)

 Above are photos of the battleship's hull while the two photos immediately below this paragraph are photos of its deck, after water decals had been applied. These first four photos showcase a zoomed out view, which allows you to see all the decals that had been applied on the hull and deck.


Space Battleship Yamato 2199 (Cosmo Reverse Ver.) work-in-progress: water decals (top view)

Positioning of decals on the deck meant the deck guns will sit above them in most cases

 Luckily for me this kit came with its own water decals. Bandai's water decals are usually of very high quality. With them in hand the chance for a successful decal application increases dramatically. This is of course in comparison with third party water decals which vary in quality. Sometimes they can be pretty bad, and are a nightmare to work with. That being said, some third party decals have reasonably good quality. At least good enough to work with without pulling your hair out.


Water decals that came with the Space Battleship Yamato 2199 (Cosmo Reverse Version) kit

 Unfortunately not all water decals were applied onto the space battleship without incident. While most of the decals went onto the hull and deck almost flawlessly, there was one in particular that gave me some problems (see photo immediately below). On the lower rear section of the right side of the hull, the decal became crooked while being applied. Worse still the decal actually folded in on itself at one point, the fact that I managed to salvage as much as I did is testament to the decal's quality. End result is a misshapen decal, but better that than it becoming a complete write-off. 


A rare instance where the water decals were damaged while being applied (see lower left section)

In most cases though, the water decals were applied as intended, in a near flawless manner

At the battleship's bow, there is a host of dash line decals that were fragile and difficult to apply

 Whenever the option to do so is available, I always try to use original Bandai water decals because as I mentioned earlier, their quality is extremely good. This allows me to manipulate the water decals for longer periods when trying to get them in place. Moreover, the chances of the decals tearing or folding in on themselves are lower, though not completely eliminated.   


Water decals on the deck were sturdier and easier to apply compared with the ones on the hull

Deck guns (not shown here) that will be placed onto the deck will have their own decals

Apart from the deck, the rear left section had no decals due to an absence of the hull plating

 Without a doubt, the battleship looks much better with water decals than without. If you're going to make the effort to paint your kit, then by all means get some water decals on the painted kit. The only time I would use alternatives such as dry transfer decals or stickers is if the kit didn't come with water decals and I was unable to source some good quality water decals for the kit in question. 


 Despite the abundance of decals you see applied here, there are actually more decals that I haven't applied yet. These are to be applied onto the missile launcher and deck guns, and will be done later just prior to them being attached to the battleship's deck. So there is much more to come for the 1/1000 scale Space Battleship Yamato 2199 (Cosmo Reverse Version) model kit. Until my next hobby blog update, thank you for reading, and as always stay safe and be well.


https://www.facebook.com/FourEyedMonster-313145002078520/

https://shireworks.blogspot.com/https://www.facebook.com/shire.works

Sunday, 5 June 2022

Space Battleship Yamato 2199, Cosmo Reverse Ver. [WIP - Guns and Catapults: Basecoats & Panel Lines]

 Continuing with the progress for my 1/1000 scale Space Battleship Yamato 2199 (Cosmo Reverse Version) project, this post takes a quick look at the ship's main guns and secondary armament as well as its catapults aka fighter launchers. Even at this scale, the ship's deck guns still manage to look mightily impressive. While the secondary armament and catapults can be considered finished, the same cannot be said for the main deck guns. The latter still requires application of water decals.


Space Battleship Yamato 2199 (Cosmo Reverse Ver.) work-in-progress: Base-coating and Panel-lining of the Main/Secondary Deck Guns and Catapults

 Position of the main guns, secondary armament, and catapults in relation to the greater whole (i.e. the space battleship itself) is shown in the diagram below. Originally in Japanese, the words in the diagram has been translated using the Google Translate app for Apple iOS. Also below are photos of the parts after assembly but prior to being sprayed with a primer coat.


Diagrammatic representation of the parts worked on in this session

Main deck guns of the Space Battleship Yamato assembled and prepped for priming

Secondary deck guns of the Space Battleship Yamato assembled and prepped for priming

Catapults (aka fighter launchers) of the Space Battleship Yamato assembled and prepped for priming

 Priming of the parts were carried out using the Tamiya Fine Surface Primer (Light Gray) spray can. This is my go-to primer of choice in most situations. I'll only countenance the use of alternate primer products either when I don't have any at hand or if I need a black primer color. To my knowledge, black is a hue that Tamiya doesn't have in its line of primer products.


Space Battleship Yamato 2199 (Cosmo Reverse Ver.): Priming the Main/Secondary Deck Guns, and Catapults with the Tamiya Fine Surface Primer (Light Gray)

 Main deck guns were base-coated with a custom grey mix using Mr.Color lacquer paints, then panel-lined using Mr.Weathering Color Multi Black (see below). However, the main guns aren't actually finished yet. They still require some water decals to be applied on the rear section. This I will do just prior to attaching/assembling them on to the ship's upper hull later.


Main Deck Guns of the Space Battleship Yamato: Base-coat and panel-lines completed

Main Deck Gun base-coated and panel-lined (isometric closeup view, front)

Main Deck Gun base-coated and panel-lined (isometric closeup view, back)

 Secondary armament were similarly base-coated and panel-lined using the same products as with the main guns. Below are closeup photos of the secondary deck guns as well as a photo displaying their size comparison versus the main deck guns.


Secondary Deck Guns base-coated and panel-lined (isometric closeup view, front)

Secondary Deck Guns base-coated and panel-lined (isometric closeup view, back)

Size comparison between the secondary (left) and main (right) deck guns

 Meanwhile the catapults (aka fighter launchers i.e. the contraptions that launch the ship's fighters quickly from its hangar) were also painted the custom grey and given a black wash instead of panel-line. The catapult pieces are relatively small, and are able to pivot around the base it's attached to. 


Catapults aka fighter launchers base-coated and panel-lined (isometric closeup view)

 Even with the completion of the guns and catapults, much more remains to be painted. There are the pair of main stabilization wings; the host anti-aircraft guns; and a myriad of tiny space fighters. Of the trio, I will definitely paint the first two, while I'm not to keen to work on the small fighters. For the latter I can perhaps work on them on and off amidst other projects until I completed the whole set. But up next is not the painting of said parts. Instead it'll be the application of water decals onto the ship's hull, missile launcher, and main deck guns. Once that is done I can then undertake a major assembly process before reverting back to the painting process. Phew, a lot of work lies ahead. That's for later. For now, dear readers, please stay safe and be well.      


https://shireworks.blogspot.com/https://www.facebook.com/shire.works

https://www.facebook.com/FourEyedMonster-313145002078520/

Related Posts Plugin for WordPress, Blogger...