Showing posts with label Airbrush. Show all posts

Saturday, 11 August 2018

Mr. Hobby Procon Boy FWA Platinum 0.2 mm Double Action Airbrush [Unboxing and Review]

Finally the last hurdle to regular airbrushing sessions with miniature figurines has been overcome. Needing more control in how paint was being dispensed from an airbrush, I now have it with the Mr Hobby Procon Boy FWA Platinum 0.2 Double Action airbrush by GSI Creos. While it may not be the flagship airbrush in Mr Hobby's line of products - that title belongs to the Mr Airbrush Custom 0.18 - the Platinum 0.2 is a good enough mid-range airbrush that's well suited to my current needs. Here then is a short unboxing and review post on Mr.Hobby's Platinum 0.2 airbrush.  

Mr. Hobby Procon Boy FWA Double Action Platinum 0.2 Airbrush

This airbrush usually retails for about ¥13,300 but I bought it online from HobbyLink Japan for a good price of ¥10,640. When I last checked it was selling for ¥11,970 at the site. For this price, the Mr Hobby Procon Boy FWA Platinum 0.2 Double Action airbrush comes with a Micro Air Control (MAC) air valve below a 10 cc. capacity paint cup. Allowing for better control, the MAC air valve alters paint velocity, changes how paint atomizes and fine tunes spray patterns. Even more control is to be had via the needle stopper at the end of the airbrush that determines the amount of paint flowing out the tip. Essentially a quality airbrush allows one to work slowly with more accuracy.

Detailed description of the airbrush listed at the back of the box is all in Japanese
Tools and accessories included are shown in the side box art
A clear plastic sheet helps prevent scratches to the airbrush container

GSI Creos provides two different sets of instructions for the airbrush. One is a dual language (English/Japanese) guide describing installation, operating and maintenance steps (bottom, left). The other is a Japanese language only troubleshooting guide listing common problems faced by modellers when using the airbrush and the corresponding fix to the problem (bottom, right). Both the airbrush and its accessories are housed within a sturdy plastic casing with extra foam protection inside. 

While a set of English instructions is provided, the more detailed troubleshooting guide is in Japanese only
The Procon Boy FWA Double Action Platinum 0.2 mm airbrush is encased in a solid plastic container
An angled view of the airbrush and its accessories inside the soild plastic container

The airbrush sports a nice chrome finish and has a nice heft to it. In addition to the airbrush, GSI Creos also includes accessories comprising a nozzle wrench, a 1/8" hose and joints, a 1/8" hose connector and an air adjustment valve for use with air cans. The tip of the airbrush has a crown-type needle cap and that can be closed off by a clear rubber-like cap during storage. Meanwhile, the 10 cc. paint cup mentioned earlier comes with a lid containing a bleed hole in the center.

Inside, the airbrush and its accessories were held securely in place by a rigid foam material
Mr. Hobby Procon Boy FWA Double Action Platinum 0.2 Airbrush and its accessories

Straight out of the box, the 1/8" airbrush hose male connector provided isn't of much use to me because my air compressor has a 1/4" hose female connector. So I replaced it with a Quick Release Disconnect Coupler containing both male and female hose connections in 1/4". I wholly recommend getting disconnect couplers with a quick release mechanism for it makes for a much more efficient way to detach an airbrush from the connecting hose. This will translate into less mini-accidents on the worktable e.g. spillage from the paint cup, etc. especially for someone as clumsy as me.  

Tip of the airbrush comes with a protective plastic cover that can be used during storage
Mr.Hobby's Platinum 0.2 airbrush needle cap is of the crown type
Closeup view of the delicate 0.2 mm airbrush needle

Performance-wise, the airbrush worked like a charm. It afforded me enough control to airbrush thin lines and small areas quite easily. Trigger tension felt comfortable as did the balanced weighty feel of the airbrush as a whole. This coupled with the MAC valve and the needle stopper provides modellers with a high level of control to dispense paint slowly and accurately. Of course it goes without saying that more trial and error is required before optimal airbrush/pressure settings can be established and requisite muscle memories can be built in order to achieve a specific desired result.

Airbrush offers a high level of control to allow one to paint slowly and accurately
This airbrush is capable of very fine lines for precision work

That's it then. No more pussyfooting around. No more excuses that allows me to procrastinate airbrushing an actual miniature figurine. No more airbrushing just plastic spoons. It's time to airbrush flesh colors on the atelier iT HQ12-02 Race Queen miniature resin figurine. For now though I'll take my leave of you, my dear readers, with this quote from oil painter extraordinaire Bob Ross ... "Talent is a pursued interest. Anything that you're willing to practice, you can do."

https://shireworks.blogspot.com/https://www.facebook.com/shire.works

Friday, 3 August 2018

Setting up an Airbrush Spray Booth for a Test Run

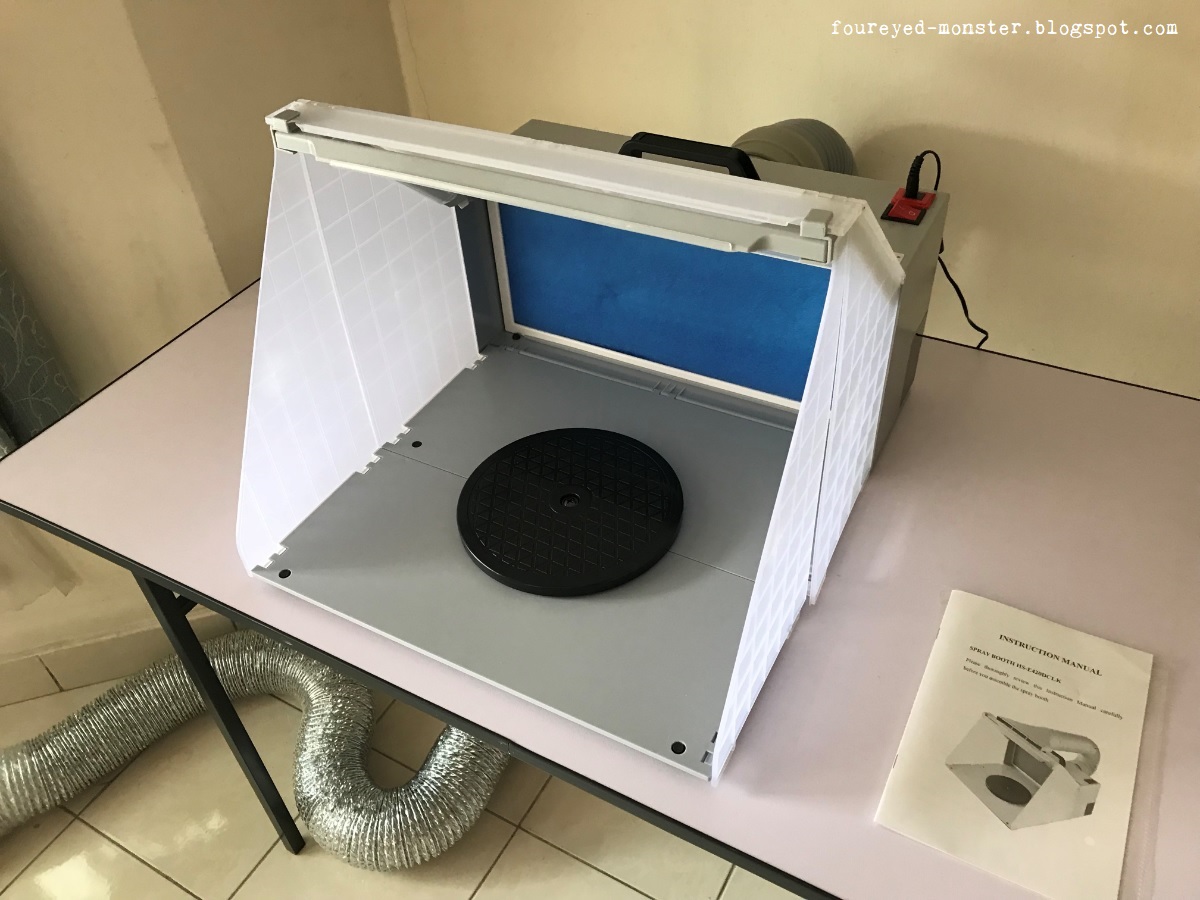
So when am I going to airbrush something other than a plastic spoon? Forgive this old dog and his new tricks but I'm getting there, slowly. In fact, I've taken a big step by setting up an airbrush spray booth to ensure a less toxic painting environment. Retailing for RM420, the HSeng Spray Booth with LED Light (Model: HS-E420DCLK) isn't overly expensive but it's still a big investment for most modellers to make. Having bided my time in order to secure the best possible deal, I finally took the plunge and bought one at a local hobby store sale for 20% off. So starting now, a huge obstacle to regular airbrushing sessions -  i.e. overexposure to paint/thinner fumes - have been overcome.    

An airbrush spray booth at last ... yet another item ticked off in my things-to-get-before-airbrushing-actual models  
HSeng Spray Booth with LED Light (model HS-E420DCLK) obtained during a recent sale at my local hobby shop

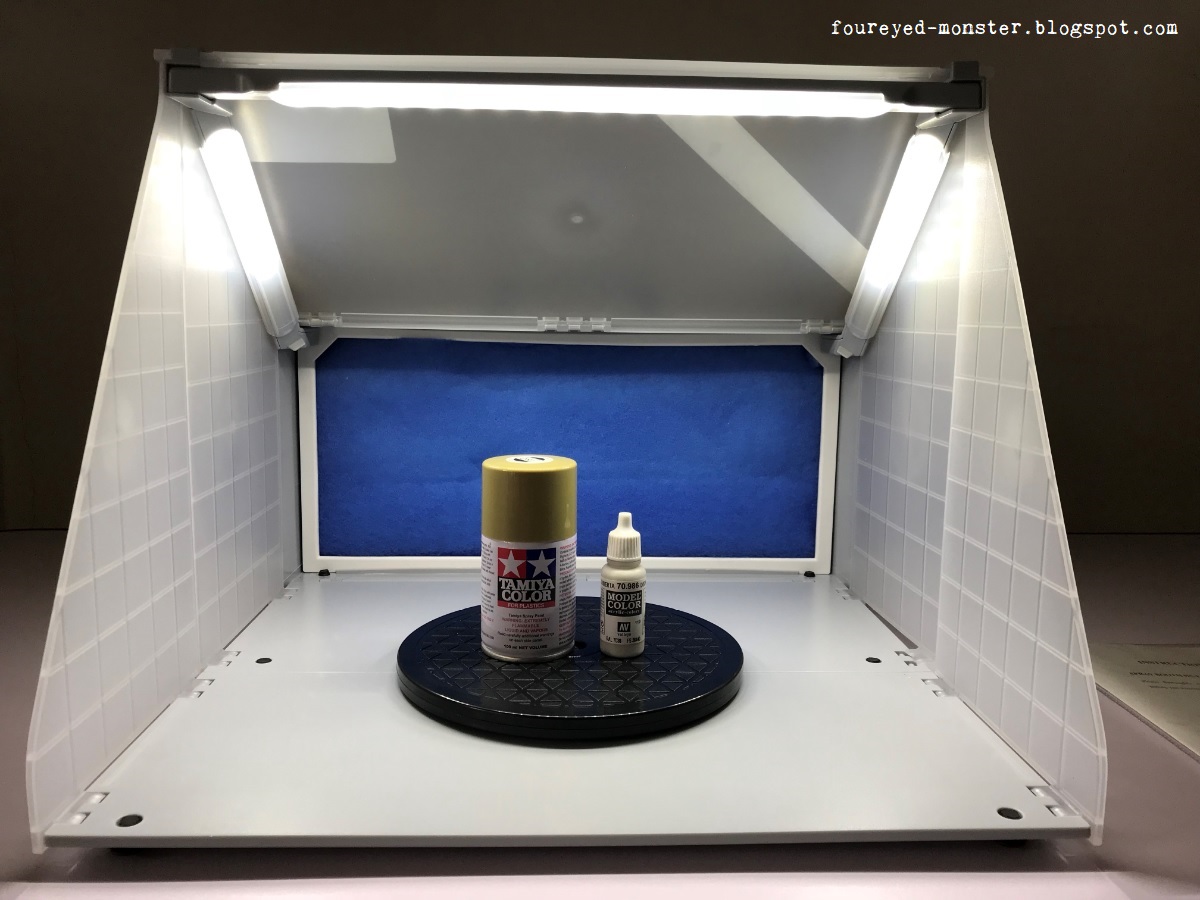
This particular spray booth model conveniently comes with its own LED lights. While it's possible to set up a separate lighting system using IKEA work lamps, the existence of internal LED strip lights allows for a less cluttered work environment. And because the spray booth is designed to be portable, the LED strip lights can actually be detached and disassembled into three separate pieces. Apart from portability, this just means you can choose to disable the internal lighting if you so choose.

My airbrush spray booth setup inclusive of a cheap do-it-yourself exhaust hose extension
When the airbrush spray booth is switched on, both the LED lights and suction fans will come online together

Also included in this spray booth model is an exhaust duct system that serves to channel air - that is being sucked from the spray booth - away from the immediate area. There was, however, one DIY modification I had to make before the system could be of any use to me. The issue stemmed from the length of plastic hose provided which wasn't long enough for my purpose. To rectify this, I purchased a flexible aluminium foil hose from the local hardware shop in order to extend the overall length of the exhaust duct system. The ends where aluminium foil met plastic was secured using cling wrap. 

Gray plastic exhaust hose came with the booth while the shiny aluminum foil extension was obtained separately

In yet another nice touch, this spray booth model came with a round black plastic turntable roughly 192 mm in diameter. This should be useful especially when priming or when painting large surface areas in a single color as each part of the model kit can be exposed to paint just by spinning the turntable. In keeping with the booth's portable design, the turntable isn't fixed rigidly to it. Instead, the turntable is a separate piece that sits securely in place thanks to rubber-like tabs underneath it.

A small black turntable is included as an accessory to the spray booth
Spray booth with all three of its LED lighting bars swtiched on
A 100 ml Tamiya spray can and a 17 ml Vallejo Model Color paint bottle are used as a scale comparison

To keep things tidy and clean, I layered the spray booth's lower section with some plain white A3 paper. Disposable and easily replaced, the papers help to collect most of the paint overspray as well as prevent heavy buildup of paint on the inner walls of the spray booth.  

Pieces of white paper form disposable protective layers to prevent buildup of paint on the spray booth

Noise level specified in the instruction booklet at maxing at 47 dB, supposedly similar to the sound level generated by the air compressor. But this can't be right because the noise generated by the spray booth is rather loud and easily drowned out the noise emitting from the air compressor. Below is a quick one minute YouTube video showing the noise level generated by the spray booth. 


In a quick test run, black primer - in this case Mr Hobby Mr Finishing Surfacer 1500 Black diluted with Mr Color Leveling Thinner in a 50:50 ratio - was used to prime and preshade some plastic spoons. Thankfully, the spray booth worked like a charm with paint overspray effectively eliminated by the filter and suction fans. All in all I was very please with the performance of this spray booth. In fact, the only negative I can think of is the noise generated by the booth. While barely noticing the sound when I was deeply focused on airbrushing, it's still loud enough to be irritating to some. 

Airbrush spray booth worked like a charm when a test run involving black primer was carried out

With the spray booth having passed the test run with relatively flying colors, the path to more regular airbrushing sessions is now open. Actually not quite. With my existing equipment, airbrushing AFV or Sci-fi kits shouldn't be much of an issue going forward. But that's not the case for resin miniature figurines. These require a finesse in paint application that my cheap low-end airbrushes can't provide. So I got myself a mid-range airbrush, for use especially when painting skin tones. I'll do a review of the said airbrush and then the pandora box of airbrushing will finally be opened for good.

https://shireworks.blogspot.com/https://www.facebook.com/shire.works

Tuesday, 20 March 2018

Toyo Safety Gas Respirator [Unboxing and Review]

Airbrushing lacquer paints can be a nasty experience. Lacquer thinners used to dilute the paint not only smell bad but aren't good for your health if inhaled frequently and in large quantities. Because I don't have a portable airbrush spray booth - the ones that come with a filter and hose/suction fan combo - the overspray tends to linger around for awhile even in a well ventilated room. So to make the painting session bearable, not to mention safer, I opted for a gas respirator/mask.   

Guess I'm as prepared for the eventual zombie virus contagion as I will ever be

After some research I eventually bought a Toyo Safety Gas Respirator/Mask from Japan. What attracted me to this product was its claim to effectively protect against lacquer thinner components such as toluene. While not carcinogenic, toluene is nevertheless hazardous to your health. Prior to taking up biochemistry in my undergraduate studies I had worked as a lab assistant. One day, I had accidentally dropped a 2.5 liter glass bottle of benzene to the floor (toluene is a derivative of the much deadlier benzene). Long story short - I've been careful with organic chemicals ever since.

Toyo Safety Gas Respirator/Mask
Made in Japan as the packaging obviously shows
Gas respirator comes in a few separate parts that need to be assembled
Instructions are entirely in Japanese thus making it difficult to figure out how to put it all together

Because the instructions are solely in Japanese I had a hard time figuring out how to assemble the gas respirator/mask. However, using a combination of the Google Translate mobile app as well as diagrams in the instruction, I managed to slowly piece everything together. Parts were assembled in the following order: filter cap, dust filter, absorption cartridge, and last but not least the respirator (with an absorbent strip inside). I'm pretty sure there is a lot of information I'm missing out on as the Japanese instructions are so detailed. But at least the gas respirator/mask works. 

Most visible and prominent part was the antidust filter
Here the antidust filter is placed inside the filter cap
Absorption cartridge which I assume filters out the toxic vapours
Closeup of the absorption cartridge when removed from its packaging

Initially I was mystified as to the purpose of a black colored round flat disc which was included in the set (see below). It turned out to be a fit checker whose purpose was to test if the gas respirator/mask is sized and donned correctly. Essentially when I wore the respirator/mask with the fit checker on and tried to draw breath, I couldn't. This showed that the respirator/mask was air tight and there were no leaks occurring. While it was a bit disconcerting to not draw breath, this is a necessary safety check. 

A fit checker (round black disc) is provided as a tool to test the fit of the mask
Fit checker should fit snugly over the opening before the gas mask/respirator is tested

A pair of what I assume to be moisture absorbing strips were provided as accessory parts to the gas respirator/mask. I placed one inside the fold on the bottom of the respirator/mask. I believe they are meant to capture moisture from your breath as you are breathing through the respirator/mask.

Absorbent strips whose objective I presume is to absorb water vapors from your breath
Placement of the absorbent strip on the lower innards of the gas respirator/mask

So this is how it all looked prior to being put together (see below). Not that complicated really with just three main parts to it i.e. the filter cap and accompanying antidust filter; the absorption cartridge and the breathing apparatus itself. I guess the detailed instructions made the whole assembly process look much more complicated than it actually was. 

Toyo Safety Gas Respirator No.1880 with its main parts laid out

With the exception of the fit checker, I placed all the parts in the order that I mentioned earlier. It was done using the diagram below as a guide. In a moment of sheer stupidity I nearly pulled out both air valves from the gas respirator/mask because I thought the instructions required me to do it. D'oh! Luckily after a few tentative half-hearted pulls at the valves, I decided to leave them alone. A clear plastic drawstring bag is even provided for easy storage of the gas respirator/mask.

Gas respirator/mask was put together with the help of the diagram above and Google Translate
Toyo Safety Gas Respirator No.1880 after being fully assembled
A clear plastic carry bag is also provided to store the gas respirator/mask

Toyo Safety Gas Respirator No.1880 is available from Japan-based online retailers such Hobby Search and HobbyLink Japan. Both are my primary go-to online sources for Japan-made hobby products. I had bought mine from the former as the latter didn't have stock at the time of my purchase. So far it works like a charm whenever I use it. It fits snugly and I can't smell the paint and thinner overspray at all during my practice airbrushing sessions. It takes a bit getting used to but soon you won't even notice you're wearing one. I for one am glad I invested in the respirator/mask. Better safe than sorry ... especially if you frequently work with toxic materials and/or chemicals.    

https://www.facebook.com/FourEyedMonster-313145002078520/

Sunday, 11 March 2018

Airbrush Setup and First Use

Few of the reasons I'm adding airbrushing skills to my painting repertoire is to acquire the ability to paint smoother transitions as well as paint faster and more efficiently. This skill set is especially crucial when working with larger scale sci-fi/military scale model kits and garage kit figurines. And if you are serious about this hobby, then after a while an airbrush setup becomes a necessity rather than a luxury. Moreover, learning new painting techniques with new paint products should keep things fresh for a miniature hobbyist previously limited to only the good old hand brush and spray paint can.

HSeng AF186 Mini Air Compressor, piston type with an air tank and regulator
Getting an air compressor with a tank is the better option in the long run

With this being my initial investment in an airbrush setup, I had to forgo the expensive branded stuff. Getting tools and accessories to use superseded any personal wish for top of the range equipment. So with the perennial issue of a tight budget up front and center in my thoughts, I bought the affordable Haosheng (HSeng) airbrush setup during a store sale for a further discount. This made-in-China ensemble seems functional enough. But I honestly have no idea how good the setup actually is as I don't have a better system to compare it to. For now though, it will have to suffice.

Made in China Haoseng airbrushes of the 0.3 and 0.2 mm variety
Cheap, no-brand 0.3 mm airbrush - a no-frills basic tool for beginners
Similarly priced, the 0.2 mm version is slightly better as it comes with a needle stopper and an air adjuster

This being a cheap, no-brand airbrush meant imperfections were to be expected in the build quality (see immediate photo below). In addition, the various screw joints seem a bit rough on the edges (not shown) but thus far it hasn't been to the extent that performance of the airbrush is compromised. Meanwhile, the air compressor works like a charm. It's fairly quiet even when the motor kicks in to fill up the tank with air. Getting an air compressor with a tank is recommended as you will be able to work without the incessant sound of motors compressing air. You would also get to airbrush for longer periods simply because there is not need for the motors to run continuously thus overheat.

Imperfections in the metal are evident as can be seen inside the paint cup of the 0.3 mm airbrush
 
To make the airbrushing process a little bit more hassle-free, I bought a pair of quick release valve couplings (one of which is shown in the photo below). This piece of accessory makes is easier and quicker to disconnect an airbrush from the hose that itself is connected to the air compressor. I'm certainly game for anything that makes for a less stressful painting experience. I'm extremely clumsy as it is, so not having to fumble with unscrewing an airbrush from the hose in the middle of a painting session is most welcome. An airbrush would be disconnected from its hose for a variety of reasons e.g. for a quick clean in between colors; to switch between different sized airbrushes; etc.   

Generic no-brand airbrush quick release (disconnect) valve coupling: top and bottom connectors
Airbrushes with top connector of the quick release valve attached (bottom connector is fixed to the hose; not shown)

My first airbrush spray test was with a mixture of Tamiya Acrylic Paints. This particular paint mix comprised equal portions of XF-58 Olive Green and XF-4 Yellow Green resulting in one of the many types of Russian green evident on their tanks during World War II. Initial results were terrible due to a combination of paint not thinned enough coupled with a ceiling fan being switched on during the airbrushing session. And the fact that it was also a hot day that day meant the paint dried well before it hit the primed plastic spoon. But after a bit of trial and error I managed to better results.       

Mixing a form of Russian Green for initial test sprays with the 0.3 mm airbrush
Adjustments to air pressure, working conditions, paint mix ratio, etc. eventually yielded a smooth coat

After getting used to mixing the correct ratio of paint-to-thinner-to-retarder as well as mitigating windy (i.e. quick drying) conditions, other variables then came into play in my search for a smooth airbrush application of paint on a primed subject matter. These include distance of airbrush from the subject matter and level of pressure/pull-back applied to the airbrush trigger. The latter is based on the fact that both airbrushes are double action types i.e. pressing down on the trigger controls air flow while pulling back on the trigger determines amount of paint flowing into the air stream.    

Mixing a darker hue for testing out the fine line capabilities of a 0.2 mm airbrush
Squiggles and fine lines achieved with the generic 0.2 mm airbrush
After awhile I had gotten the hang of layering a smooth coat of paint with the 0.3 mm airbrush. I then proceeded to paint fine lines with the 0.2 mm airbrush using a darker hue (Tamiya XF-65 Field Grey). I loved that the 0.2 mm airbrush had a needle stopper that determines how far back you can pull the trigger. This in turn controls how much paint is released and makes painting fine lines easier. So far I've only toyed with Tamiya Acrylic Paints which are easy to work with and forgiving to beginners. Going forward, more practice is in store with lacquer paints as well as water-based acrylics.   

https://www.facebook.com/FourEyedMonster-313145002078520/

I'm itching to start painting figurines and model kits with the airbrush but I can't, not yet. It's doubly hard to continue practicing especially when the stuff being sprayed on are just plastic spoons, pieces of Tamiya Pla Plate or plain paper. However patience is key so I'm going to have to soldier on with the practice sessions until I'm fairly comfortable using the airbrush with different types of paint. It's better to bungle a paint job of a spoon than an expensive figurine/kit. Well, I had better get to it then.

Related Posts Plugin for WordPress, Blogger...