Showing posts with label AT-ST. Show all posts

Thursday, 3 January 2019

A Look Back At 2018

Ever since I began my journey in this hobby, I've never had as lean a year as 2018 in terms of miniatures or scale models completed. Two was the measly number of projects I had managed to see over the finish line. There were mitigating factors but it's all still a pretty sad state of affairs.

Nocturna Models 70 mm resin figurine Soum 13 Moons, painted as DC Suicide Squad's Katana

What I did complete, I was fairly proud of. Firstly, there is the 70 mm resin figurine from Nocturna Models namely Soum 13 Moons which I painted as DC Suicide Squad's Katana (see above). And then there is the Bandai Star Wars 1/48 scale model of an Imperial AT-ST Walker (see below).

Bandai Star Wars 1/48 scale Imperial AT-ST Walker

Surely I can do no worse this year than what I had done in 2018. That's the plan anyway and we all know no plan ever survives contact with real life. But I'm going to try and that in a nutshell is my simple 2019 resolution for the hobby. With that, here's wishing a great year ahead!

https://shireworks.blogspot.com/https://www.facebook.com/shire.works

Thursday, 5 July 2018

Star Wars Imperial AT-ST Walker - Bandai 1/48 Scale Plastic Model Kit [Completed]

It's done! Yet another iconic sci-fi vehicle checked off my ever expanding list of must-do hobby projects. Even as this little vignette of Imperial presence in the land of Ewoks sees completion, more then one new project is rushing to fill what is already an extremely cluttered worktable. Akin to a magpie (read hobbyist) who's attracted to that new shiny thing (an erroneous folklore ... for the bird, not the hobbyist and his new kit), I'm adding more stuff onto the worktable than I can get off it. But I digress. Here then are photos of the recently completed Imperial All Terrain Scout Transport Walker.

Bandai 1/48 scale Star Wars Imperial AT-ST Walker [Completed]
Pilots and cockpit interior are fully painted; just not visible from here
Opened entry hatch improves lighting hence visibility of the cockpit interior  

This version of the Imperial AT-ST Walker actually has a fully painted cockpit interior as well as pilots. One of the reasons I glued the entry hatch and both command view ports in a permanently open position was to allow more light inside hence increasing visibility of the interior and pilots. To a certain extent this works, especially when the AT-ST is viewed with the naked eye. But neither the interior nor pilots are visible under diffused photography lighting as you can see in the shots here.

AT-ST hull has subtle chromatic variations created using oil dot filters
Every edge on the AT-ST is defined via panel lining and washes
Back view of the Imperial AT-ST walker

Weathering has been central to this project and it was applied onto a hull that had received a light grey basecoat as well as panel lining on its nook and crannies. Techniques used in the weathering process include oil dot filters, washes and micro paint chipping. For a better appreciation of the resulting subtle chromatic variations in predominantly light grey hues, please check out work-in-progress closeup shots in a previous post. In addition, mud weathering with enamel paints was carried out on the Imperial scout walker's footpads and the base it stands on. 

Footpads on the base have been 'muddied' with enamel paint
Plain vanilla version on show here; variants will come in the future
Imperial AT-ST Walker on a clearing in the Forest Moon of Endor

Color scheme is largely influenced by (but not an exact copy of) a version of the AT-ST found in the Star Wars Battlefront video game (see below), specifically the first iteration of that franchise's recent rebirth in eighth generation consoles such as the PS4. Personally I don't believe there should be a 'one true color' for the AT-ST. This is because the light grey hull will inevitably reflect the color of the surrounding environment that the scout walker is operating in. This in turn allows the artist creative freedom to add chromatic variations to the hull, within reasonable parameters of course. 


As I was saying at the beginning of this post, the fact that my existing project pipeline is already close to bursting doesn't seem to be deterring me from adding more complex builds to the worktable (i.e. paint many individual parts separately before assembling kind of project - suffice to say it will be Gundams other than grandpa RX-78-2). But as I'm already at the early stages of assembling the King Tiger and still working up the nerve to airbrush flesh paint on the Race Queen, I'm in need of a quick-to-build and little-to-paint project. A sort of calm before the storm if you will. That will come in the form of my to-be-revealed next Star Wars project. Until then, be happy and be well. 

http://shireworks.blogspot.com/p/custom-painted.html

Friday, 22 June 2018

Star Wars AT-ST [WIP - Base depicting a clearing in Forest Moon of Endor & Weathering the Footpads]

In this final Star Wars AT-ST work-in-progress post, two significant processes are dealt with namely creation/painting of the base and weathering fresh mud effects on the scout walker's footpads. Completion of both means the walker is essentially completed and ready for its unveiling. But before the AT-ST is seen in its finished state, here's a look at how a base depicting a clearing in the Forest Moon of Endor was created and how its footpads were weathered to blend into the base.

Bandai Star Wars AT-ST work-in-progress: Base and Final Phase of Weathering

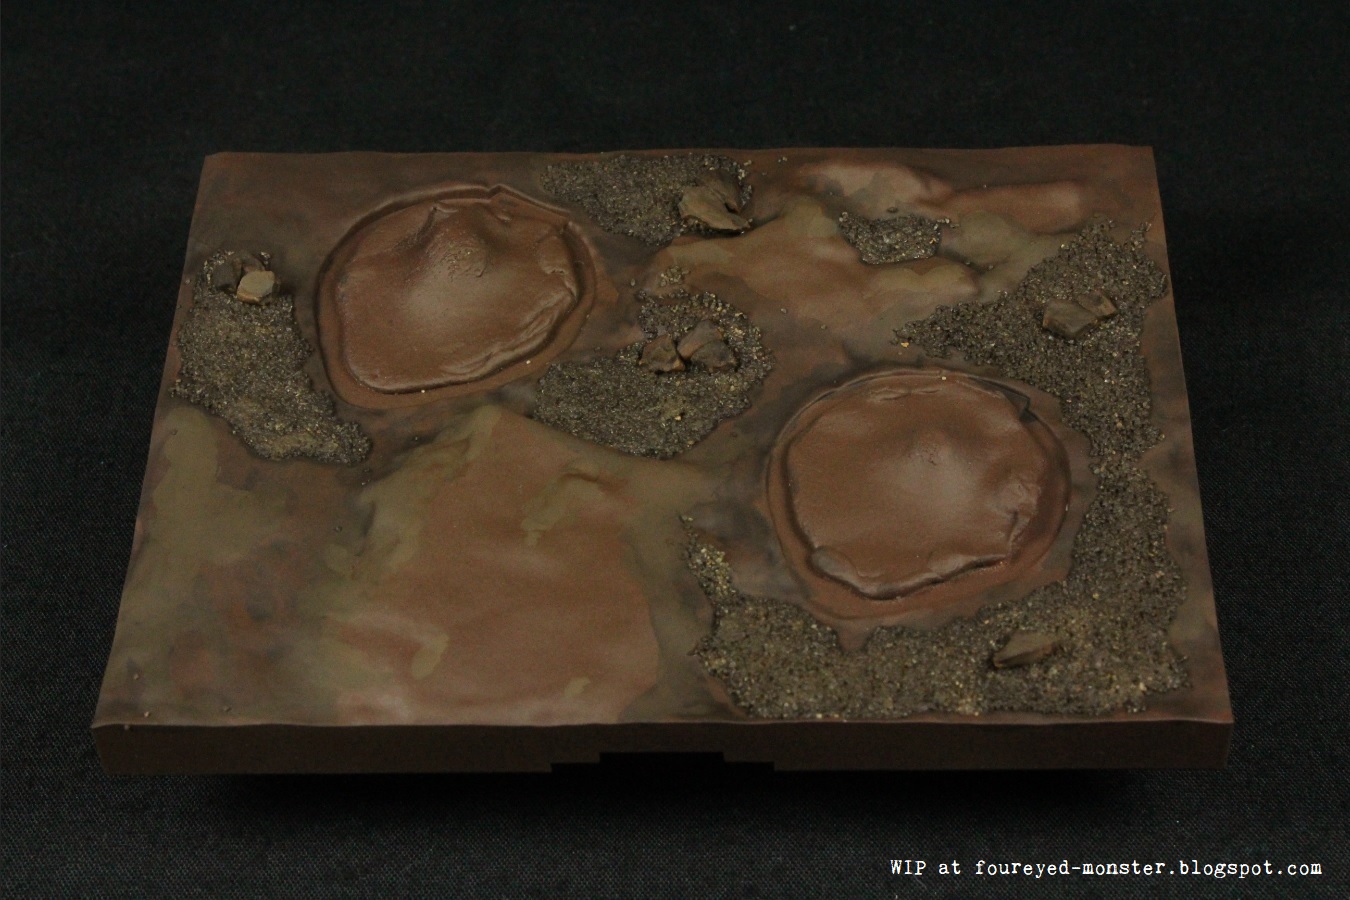
To recreate conditions approximating how a clearing in the Forest Moon of Endor might look like prior to having its soil turned into fresh mud, I used common basing materials such as modelling sand and stone, generic all purpose (or white craft) glue as well as two tones of spray paint i.e. Tamiya TS-1 Red Brown and TS-69 Linoleum Deck Brown. Below is a step-by-step process of how the base came together to reach a completed 'dry state' before it was given an additional mud weathering step.

Materials used to create foundation of the base: sand, stones, wood glue and two tones of spray paint
Base after sand and stones are glued onto base with two dark brownish hues of spray paint
Greater tonal variation on base is achieved using Vallejo Model Color acrylic paint
Base after layering in Vallejo Model Color colors of Black Brown, Burnt Umber and US Field Drab
Bright green 'grass' was glued onto the base using wood glue
Closeup of the base prior to the final mud weathering

With the 'dry state' of the base completed, all that was left to do was to remove the adhesive tacks placed onto the male joint connectors. These sticky tacks help protect the joints from being coated with paint which in turn prevents any eventual fitting issues when the AT-ST's legs are fixed onto the unmasked areas. As you can see below, the chicken legs were seamlessly attached to the joints.

Removal of the adhesive tack covering the joints onto which the footpads will eventually connect
Footpads of the AT-ST after they had been connected securely to the base

Why did I choose to depict a clearing in the Forest Moon of Endor? Primarily it was because I didn't have the basing materials needed for a proper recreation of the flora in Endor or what is actually the giant redwood forests of northern California. But luckily for me, the clearing located outside the shield generator bunker - as seen in Return of the Jedi (see below) - looked very similar to a generic grass and soil combo. So much so that I could use the materials I had at hand to recreate it.  

Clearing near the Imperial Army's shield generator bunker on the Forest Moon of Endor
Ground flora on the Forest Moon of Endor comprised largely fern-like vegetation

Meanwhile, further work on the base in its 'dry state' involved the application of an enamel-based weathering product i.e. AK Interactive Fresh Mud. The method of application involved spraying bursts of air at a hand brush loaded with the enamel paint thus causing the 'fresh mud' to splatter onto the footpads. White spirit was used to clean up excess 'mud' to prevent over-weathering. Results of this final (fifth) phase of weathering can be seen in the last three photographs below. 

Materials used in the final phase of weathering for the AT-ST
Footpads of the AT-ST and the base, after mud weathering
Mud weathering was applied by blowing air (via airbrush) at a paint brush loaded with enamel paint
Enamel 'mud' paint was also applied onto the base to achieve overall uniformity
Color used in weathering the footpads are akin to fresh mud hence the darker brownish hue

Soon enough the Bandai 1/48 scale AT-ST project will conclude. And while I contemplate what my next Star Wars project is going to be, I plan to keep busy with the MENG King Tiger assembly as well as take tentative steps in airbrushing skin tones with a better airbrush. In the meantime, I hope you enjoy a productive weekend ahead hobby-wise. Cheers and see you next week!

http://shireworks.blogspot.com/p/custom-painted.html

Saturday, 9 June 2018

Star Wars AT-ST [WIP - Chicken Legs]

As the AT-ST's iconic 'chicken legs' underwent the same weathering process as its upper hull and mid-section, I saw no point in chronicling each every phase again in a series of posts. So without further delay, the following are photographs of the scout walker's legs after panel lining, washes, oil dot filters and micro paint chips had been applied on a light grey basecoat.  

Bandai Star Wars AT-ST work-in-progress: Weathering on 'chicken legs', Phases One through Four
Phases One through Four entails panel lining, washes, oil dot filters and micro paint chips
AT-ST walker's footpad still awaits additional mud weathering

Because the 'chicken legs' have tons of detail that caught the washes and panel lining, they already display a significant amount of depth and contrast prior to the micro paint chipping step. What this entails technique-wise is a more economical and judicious application of micro paint chips. Too much and it would, I feel, overload the senses. So in the end, chipped paint was placed strategically in places few and far between. That in itself was a mind-numbing series of patient and careful work. 

Lower portion of the legs will receive some mud weathering too, just not as much as the footpads
Micro paint chipping was kept minimal seeing this section will receive further mud weathering

Having previously done paint chipping using both the salt technique as well as a chipping medium, I found that actually painting in the micro paint chips with a brush to be just as effective as the first two. Each technique has its place in a modeller's repertoire. In the case of the AT-ST neither of the first two techniques were applicable for two reasons. Firstly, the resulting paint chips would've likely been too big. But more importantly neither technique was practical for a model with so many fragile parts attached to it. That left only one viable paint chipping technique i.e. micro paint chipping.   

Work-in-progress view of both the AT-ST walker's legs
Next for the legs is to attach them to the hull, plonk them onto the base and apply mud weathering

Weathering for the AT-ST's 'chicken legs' isn't actually complete yet though. There's still some mud weathering to be done on both footpads as well as on the lower portion of the legs. That will be done together with the base, which itself will need a fair bit of work to transform it into a clearing in the Forest Moon of Endor. Until then thanks for reading and have yourself a great weekend!

http://shireworks.blogspot.com/p/custom-painted.html

Thursday, 31 May 2018

Star Wars AT-ST [WIP - Phase Four: Mid-section Metallics, Weapons & Assembly sans legs]

Phase Four of the AT-ST weathering process is straightforward as it only involves applying 'soot' on the weapons and metallic paint on the mid-section's flexible steel pipes. Then it was a case of putting it all together and touching up the paint and weathering, where required (see photos below). 

Star Wars AT-ST work-in-progress: Main hull, gyro system, drive engine and weapons completed
Bandai Star Wars AT-ST: side view (left) of main hull, gyro system, drive engine and weapons

Thankfully there wasn't much touching up to do after the AT-ST (sans legs and base) was assembled. Enough attention and care had been given to the individual sections prior to assembly that almost no extra work was required. Sure there were places I had missed - e.g. sections where I had inexplicably forgot to even basecoat - but nothing overly major that it couldn't be finished in a day or so. 

Rust stains and oil dot filters provide chromatic variation to an otherwise monotone light grey hue
Panel lining is essential in defining depth on the Imperial AT-ST walker
Micro paint chips all over the AT-ST walker also ups the level of realism

A key issue of painting parts separately before assembly is to run the risk of breaking fragile parts. As paint will inevitably get into certain joints, the act of putting parts together becomes unnecessarily difficult. And having to use extra force on snap-fit parts with fragile parts in close proximity is akin to walking on egg shells. Unfortunately this is the price you have to pay if you go down this route.

Bandai Star Wars AT-ST: side view (right) of main hull, gyro system, drive engine and weapons
Command viewports and entry hatch are in the open position to allow visual access of the pilots/interior
Weapons on the AT-ST walker's left (your right) is angled wrongly and will need correcting

Apart from assembly of the AT-ST hull, gyro system and drive system, this phase involved the painting of metallic colors and 'soot' weathering to make details stand out further (see below).

Flexible steel pipes in the mid-section were painted in metallic silver and given a black wash
Bottom section of the AT-ST walker's main hull also contained some flexible steel pipes
Tips of the AT-ST walker's guns received pastel weathering to simulate soot or weapon discharge residue

Without interior LED lighting it's difficult to make out the details in the cockpit interior as well as the pilots, especially from the photos. Moreover, the naked eye is infinitely better at adjusting for low light than a camera can ever hope to do. In short, it's much easier to make out the cockpit interior and AT-ST pilots when viewing them with our own eyes rather than through a camera lens.

An opened entry hatch allows light into the cockpit interior hence better visibility of the pilots
Photography lighting resulted in the interior becoming relatively darker

What's left to be done on the Bandai Star Wars AT-ST kit are its infamous chicken legs and the base. The legs will undergo the same weathering process but with the addition of mud weathering on the footpads. As for the base, I'm thinking of replicating the ground conditions found on the Imperial bunker on Endor, you know the one where Han Solo and Leia gets caught in a trap during Return of the Jedi. So there's a fair bit still to do. Better get right to it. Cheers, and have a good weekend!


Related Posts Plugin for WordPress, Blogger...