Showing posts with label MG. Show all posts

Thursday, 9 March 2023

MS-09R Rick Dom | 1/100 scale Master Grade Zeon Mobile Suit [Completed]

 Every time a Gunpla project is completed, there is a sense of relief that goes along with the natural feeling of accomplishment. Relief that the Gundam model kit's lengthy top-coating and painting process is finally over. Relief at having an end result to display after having to deal with numerous complicated parts. And most of all, relief that all that planning - namely which parts to paint, which to topcoat; how to paint them i.e. individually or as a sub-assembly; what colors to use; how to secure the numerous tiny pieces for painting; etc. - actually came to fruition rather than fail horribly. This then is my take of the Bandai 1/100 scale Master Grade MS-09R Rick Dom model kit.


Bandai 1/100 scale Master Grade Zeon Mobile Suit: MS-09R Rick Dom [Completed]

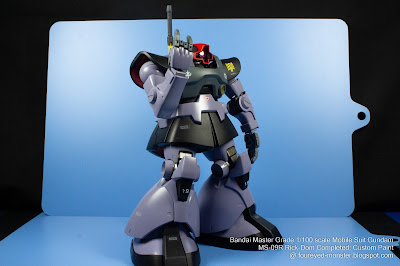
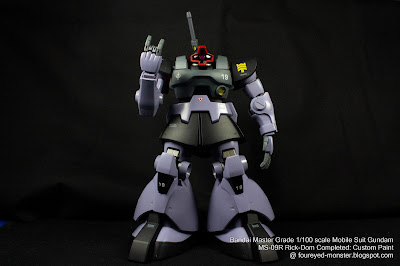
 Although the Rick Dom isn't fully-painted in the sense that some of its parts were top-coated with a clear matte coat in lieu of being airbrushed with colored paints, the end results still looks like a fully-painted scale model kit. At least it does to me. Shown below is the Rick Dom posed against an azure background, mimicking the mobile suit when it's being deployed planetside as opposed to in space.


MS-09R Rick Dom placed here against an azure background made out of two cutting mats (front view)

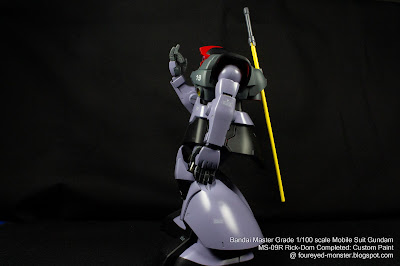
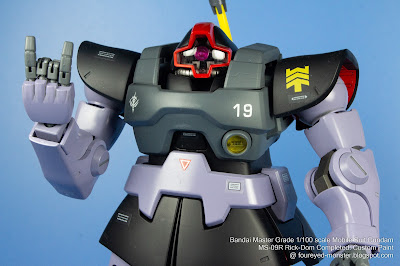
Because its fingers can be individually manipulated, the Rick Dom is able to make a hand-horns or 'rock-on' gesture ...

... although admittedly the hand itself should've been facing the other way for the gesture to be correct.

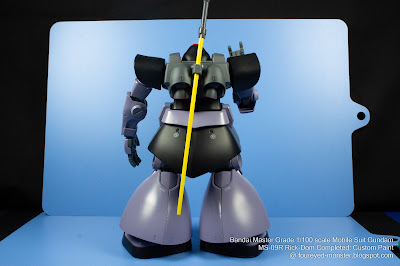
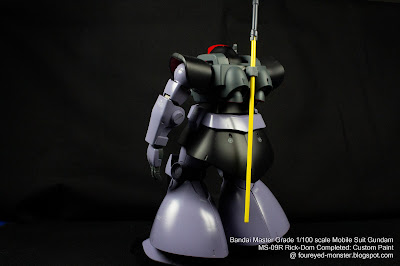
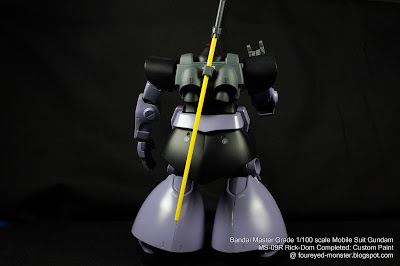
On the Rick Dom's back is a yellow heat sabre attached to its rear rocket vernier thrusters

 However as you can see, the Rick Dom together with the heat sabre on its back is too big for my azure background material which consists of just the bottom sections of two mid-sized azure cutting mats. Nonetheless the azure background does cover the Rick Dom itself reasonably well to give a good view of the Zeon mobile suit's color scheme when contrasted against an azure background.


Back view of the MS-09R Rick Dom against an azure background

All the Rick Dom's grey and black armor plates of have been top-coated with a matte clear coat ...

... as has its heat sabre (both handle and blade) while the red as well as desaturated violet armor plates ...

... and all the metallic parts have been airbrushed with Mr.Hobby Mr.Color lacquer paints.

 One of the unique selling points of this particular Gundam scale model kit is the fact that it includes one of the largest weapons found in Gunpla. In terms of length/height, the Rick Dom itself measures about 18.3 cm, the 360mm GB05R Bazooka about 18.0 cm and the Beam Bazooka about 26.0 cm. In simple layman terms, the Rick Dom have a set of really huge fraking bazookas!


Here the Rick Dom is carrying the huge Beam Bazooka horizontally in both its hands ...

... while here the Zeon mobile suit is doing the same thing with the smaller 360mm GB05R Bazooka.

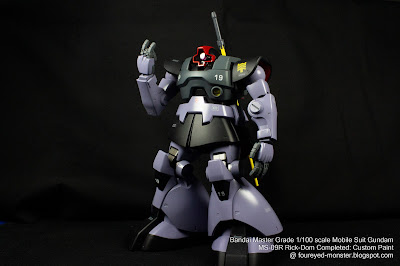
 To see how the Rick Dom would look in its other natural operating environment i.e. outer space, I had posed the mecha against a black background (see below). Although the Rick Dom has a muted color scheme of black, grey, and desaturated violet with small splashes of bright, vivid hues - like the reds on its head and the yellow insignia on its left shoulder - it still manages to stand out fairly well against the darker background. Admittedly, both the azure and black backgrounds are just lazy substitutes for a green background which would allow me to do some nifty "green screen video editing". Such editing would've enabled me to put in either a cloudy blue sky or star-filled space as a background.


MS-09R Rick Dom now against a dark background made entirely out of black cloth (front view)

Even against a black background, the Rick Dom still manages to retain contrast and stand out

One of my key goals when painting the Rick Dom was to ensure that its surfaces weren't too glossy 

A combination of a matte clear topcoat and semi-gloss paint resulted in the desired not too glossy look

Back view of the MS-09R Rick Dom against a black background

Having a solid, stout body with curved lines making up most of its outer armor ...

... the Rick Dom sports a very recognizable silhouette among fans of the Gundam universe

Without a doubt, the MS-09R Rick Dom is one of my favourite mobile suit designs

 Below then is the Rick Dom with its weapons against a black background. There is a slight difference from when it posed against an azure background in that the weapons were arranged vertically here to show a better sense of scale. You can see the huge Beam Bazooka tower over the mecha.


MS-09R Rick Dom with its complement of weapons from a heat sabre to bazookas

Beam Bazooka towers over the Rick Dom while the 360mm GB05R Bazooka is nearly the same height

 So the 1/100 scale Master Grade Zeon Mobile Suit known as MS-09R Rick Dom has the honour of being my first scale model kit project to be completed this year. I certainly didn't foresee my first finished piece to surface so late, nearly a quarter of the way into 2023. Barring further mishaps, I hope to pick up the pace to compensate for all that lost time. Because I also hope to resume drawing seriously again, I had better get cracking if I want to make a dent on my significantly longer hobby-related to-do-list. As someone wise but unknown once said ... There’s no such thing as being too busy. If you really want something, you’ll make time for it. And that's just what I'm going to do. 


https://shireworks.blogspot.com/https://www.facebook.com/shire.works

Sunday, 19 February 2023

MS-09R Rick Dom | Master Grade Zeon Mobile Suit [WIP: Main sub-assemblies either painted or top-coated as well as panel-lined and given decals/dry transfers]

 If there was only one important thing I could take from the Rick Dom project, it would be that painting Gunpla need not be an all or nothing process. Before I begin painting a Gundam model kit, my OCD tendencies mean I am apt to plan for each and every single part - seen or unseen - to be painted.  And seeing that so many pieces (some tiny individual parts and some large sub-assemblies) make up a Gunpla, the very thought of painting everything can kill enthusiasm for a project before it even begins. But this particular Gunpla project has shown me not everything needs to be fully painted.


Rick Dom work-in-progress: Main sub-assemblies painted/top-coated/panel-lined and given sticker decals/dry transfers

 Easiest to get done, at least in terms of the number of parts involved, was the Rick Dom's head (see below). And in a way, the head is a microcosm of what I mean by not everything needs to be painted. For example, the visor is a clear piece that is used as is without being painted. Similarly the black plastic section of the head just needs to be top-coated with a matte clear coat to look like it had been painted in black. So that left the eye (painted a clear pink), the visor-frame (painted red) and the inner section (painted in a titanium hue and panel-lined) as parts that needed actual painting.


Rick Dom Head: individual parts and sub-assemblies prior to final assembly

Fully-assembled Rick Dom mobile suit head (isometric front view)

Fully-assembled Rick Dom mobile suit head (isometric back view)

 While the number of parts involving the 1/100 scale pilot figurines was even less, they weren't as easy to complete. As you can see from the photos below, the tiny figurines were molded as a single piece so no assembly was needed. Both figurines were painted while still attached to the sprue because their tiny size meant there was no other secure way to hold them during the painting process. Also because of the size, both figurines were hand painted using Vallejo Model Color acrylic paints rather than airbrushed. Figurines are always an important part of a Gunpla project because it gives us a sense of scale of the Gundam as to how big it really is in comparison to a human body.


Rick Dom Pilot Figures come in 1/100 scale and two versions i.e. standing and seated ...

... with both pilots shown here after being hand-painted with Vallejo Model Color acrylic paints.

 Next we move on to the Rick Dom's Upper Torso, whereby the only painted parts are the reds of the thrusters; the metal bits; and the clear yellow sensor piece. Meanwhile, the black and gray parts were only top-coated with a clear matte coat. Nevertheless, the quality of the top-coat is such that the parts look like they had been painted anyway. This section have also been applied with the first dry transfer decals: the numeral nineteen representing the unit's number and the Zeon symbol on the front; and the alpha-numerical letterings of MS-09R signifying unit type on the back (see below).


Rick Dom Upper Torso: individual parts and sub-assemblies prior to final assembly

Fully-assembled upper torso (isometric front view); dry transfers on the breast plate show the Zeon symbol (left) and the number nineteen which I choose as the unit's numeral designation (right)

Fully-assembled upper torso (isometric back view); the back also had a dry transfer put on it and it was supposed to show "MS-09R" i.e. unit type but it was torn during application

Rick Dom Upper Torso (isometric back view; upended): inner rim of both thrusters had been airbrushed with a custom red lacquer paint mixture

 Completing the Rick Dom's body is its Lower Torso, which also houses the seated pilot figure. Sadly once the hatch to the pilot cockpit is closed, the pilot will be hidden from view. However, the pilot is still accessible via the opening of said hatch so I guess the pilot isn't completely hidden. On the other hand, the inner section of the Lower Torso was supposed to be painted in a metallic hue but I had left it untouched (i.e. bare unpainted plastic) because this time the inner section is expected to be hidden from view permanently once the outer armor is attached to it. As such I saw no point in painting the inner section; therefore it was left in its original gray molded color (see below).


Rick Dom Lower Torso: individual parts and sub-assemblies (including seated pilot figurine) prior to final assembly

Fully-assembled lower torso (isometric front view); seated pilot figurine is not seen here because he/she is hidden behind the hatch at the front facing side

Fully-assembled lower torso (isometric back view); note the grey innards which remain unpainted because they will eventually be hidden hidden other painted parts

 Then we have the Rick Dom's Waist section which like the others consists of a mixture of painted and top-coated parts. Here, the violet, red and metallic parts were painted using Mr. Color lacquer paint while the black parts were only top-coated with a clear matte coat. A series of dry transfer decals were also applied on selected locations such as a red triangle with white stripes (on the front); two circular target-like symbols (on the back); and a rectangular warning text signage (both sides).


Rick Dom Waist: individual parts and sub-assemblies prior to final assembly

Fully-assembled waist (isometric back view); the two target-like symbols on the black armor sections are dry transfers which I had applied prior to the assembly process

Fully-assembled waist (isometric front view); the red/white triangle symbol and the two rectangular signs (one on the front and one on the side) are all dry transfer decals applied to parts prior to assembly

Fully-assembled waist (upended view from bottom); everything on the waist was either painted or top-coated except for the gray inner section that contain the joints 

 Following this it was the turn of Rick Dom's appendages/limbs, starting with both the left and right arms (see below). Their color scheme and how they were painted is in line with other sections like the waist. Dry transfer decals applied to the upper limbs comprised a yellow rank insignia of sorts on the left shoulder while a rectangular signage can be found on the other shoulder. Of note is the fact that both hands have individually articulated fingers. They aren't fused together like in some Gundam kits.


Rick Dom Shoulders, Arms & Hands: individual parts and sub-assemblies prior to final assembly

Rick Dom Shoulders, Arms & Hands: fully-assembled, painted, and/or top-coated plus dry transfer decals

 Most difficult to paint and assemble were the Rick Dom's legs. While most of the legs' inner section will be hidden from view after the outer armor is attached, enough could still be seen that the parts making up the inner section warranted a coat or two of paint of their own. Due to the complexity involved, it would be best for you to see what I mean in the photos below, rather than have you read a lengthy description. Just note that the violet, red, and metallic bits are painted while the rest have either been top-coated with a clear matte coat or just left in its original plastic state.


Rick Dom Legs & Feet: individual parts and sub-assemblies prior to final assembly

Fully-assembled legs and feet (isometric front view) with the left leg's armor panel removed to reveal the inner framework which has been painted in a metallic titanium hue/gun metal/red combination

Closeup view of the left leg's inner framework, which will eventually be covered up by armor

Rick Dom Legs & Feet: outer armor and inner framework fully-assembled, painted, and/or top-coated

 Working on a mecha project tends to take a lot of out me. As you can see from the photos above, there are a lot of parts to work with, which isn't easy when it comes to painting all (or nearly all) of them. The photos above were taken prior to the series of mishaps that befell my family and I. In a way I was lucky that a major portion of the Rick Dom had been completed before the run of bad luck hit. And it's only recently I found the time to sit down and write a work-in-progress report/blog update of the Rick Dom project. Hope springs eternal that I'll be able to get back into the thick of things soon, hobby-wise. Here's to that, and to you dear reader, being well and happy as always.

https://www.facebook.com/FourEyedMonster-313145002078520/

https://shireworks.blogspot.com/https://www.facebook.com/shire.works

Sunday, 11 December 2022

MS-09R Rick Dom | Master Grade Zeon Mobile Suit [WIP: painting & topcoating parts/sub-assemblies]

 Without fail, the early phases of a mecha or Gunpla project always fills me with a deep sense of trepidation. Be it the amount of planning involved or just the sheer amount of individual parts and sub-assemblies to be painted, it's something I almost want to avoid. Almost. While the hobby is supposed to be fun, it's not the be-all end-all of why we do what we do. At least not for me. A good finish to a demanding custom paint build, which for me means display quality, can be even more satisfying than a simple fun build, if not more. Well that's enough of the why of mecha projects, here now is the what i.e. the initial painting phase of the Bandai Master Grade 1/100 scale MS-09R Rick Dom model kit.


Master Grade Rick Dom painting progress: Mr.Finishing Surfacer 1500 Gray primer

 As with all my mecha projects to date, the painting process begins with the application of a light gray primer (see above). But instead of using my usual go-to primer paint, which is the Tamiya Fine Surfacer Light Gray, I decided to use a GSI Creos Mr.Hobby product namely the Mr.Finishing Surfacer 1500 Gray. I chose the latter this time around because I wanted better control in applying primer coats on parts of differing sizes from tiny to large. This was achieved via airbrushing, which I could not do with the Tamiya primer because I only have those in spray cans at the moment.


Master Grade Rick Dom painting progress: Gaianotes 019 Lavender plus some black

 First and foremost in my color painting to-do list was to decide on the predominant color for the Rick Dom mobile suit. In general that color is purple. But purple is a very general description considering I have seen many different hues, shade, tint, and shades of purple being used to represent the Rick Dom whether in anime or in painted kits. In the end, I decided on a mixture between the Gaianotes 019 Lavender and pure black lacquer paint. I don't have the exact ratio because I was just eyeballing it by adding drops of black until I reached the desired shade of purple/lavender (see above).


Master Grade Rick Dom painting progress: Mr.Color Super Metallic 2 & Mr.Weathering Color

 Another key color choice was to either maintain anime color accuracy by painting the inner frame (and other molded-in gray parts) in a flat gray or to make these parts look more realistic by airbrushing them with metallic colors (see above). It's obvious from the photo above that I had gone for the latter approach. To make the details 'pop', I panel-lined the grooves and indentations with a black wash, Mr.Weathering Color (Multi-Black). The metallic paints used comprised Mr.Color Super Metallic 2 specifically Super Iron 2 and Super Titanium 2, with pure black added to either in some cases where a darker hue was required e.g. the elbow/knee joints.  


Master Grade Rick Dom painting progress: Mr.Color & Vallejo Model Color red mixtures

 Apart from the iconic purples of the Rick Dom, one other flat color that I needed to paint was the reds. In this case, I airbrushed a custom mixture of Mr.Color red lacquer paints on the parts/sub-assemblies. If I remember correctly, the reds I used were a combination of pure Red (C3) and Shine Red (C79) in a 9:1 ratio. Meanwhile for the reds inside the bell-bottom leg armor (see top-left corner of photo above), I used Vallejo Model Color acrylic paints i.e. a rough mixture of Carmine Red and Red. I didn't use the Mr.Color lacquer red paints because to do that I had to mask the intricate purple lattice design on the insides of the bell-bottom leg armor before airbrushing the Mr.Color reds. Hand-brushing lacquer paints is a no-no in my experience unless there is absolutely no other option.


Master Grade Rick Dom painting progress: Mr.Super Smooth Clear Coat

 Finally it was the turn of stuff that didn't require painting with colored paints. These are the molded-in black and gray parts/sub-assemblies, which only needed a combination of clear top-coating and panel-lining to make them look as good as painted. Based on my experience, the best matte clear coat in the market today by a country mile is the Mr.Super Smooth Clear. Use that! Results make the plain plastic look like it has been painted albeit in a flat finish.

 A final thing to note is that all the above painted/top-coated parts and sub-assemblies have had decals applied where applicable. The types used were either sticker decals or dry transfer decals. Next for the Rick Dom is to put together all the stuff you see here into its major sub-assemblies such as the head, body, and limbs. That step should be completed soon, and results will uploaded in the next post. Until we meet again, as always dear reader, be well and happy.


https://shireworks.blogspot.com/https://www.facebook.com/shire.works

https://www.facebook.com/FourEyedMonster-313145002078520/

Related Posts Plugin for WordPress, Blogger...