Showing posts with label Macro Photography. Show all posts

Sunday, 23 April 2017

Woe is Wednesday's child ... the dreaded Error 01 rears its ugly head among other misfortunes

Wednesday's child is full of woe so goes an old nursery rhyme or poem known as Monday's Child. Well colour me woeful for I'm a child of said day and faced with numerous equipment misfortunes. It all began with the dreaded Err 01 message on my camera display. Initially, the error message seemed benign enough. After all I just had to clean the lens contacts right? Pfft ...    

Err 01 - a sight I did not want to see on my DSLR display ... like ever
Tamron SP AF 90mm f/2.8 Di Macro 1:1 camera lens - my trusted hobby lens of choice

Suffice to say the problem was much more serious for a simple act of cleaning to solve. As my luck would have it, the entire front group lens assembly was shot to hell. Since I have had the Tamron lens for over four years now, that meant I couldn't rely on its already expired three-year warranty for free repairs. So a costly repair bill lies on the horizon. For now, I'm using my camera's stock lens as a substitute. Other than lesser clarity in small details, the stock lens also has a slight lens barrel distortion somewhat akin to a fisheye effect. From the two photos below, you'll notice R2-D2's all-terrain treads (legs) tuck further back into the back of its body when shot with the stock lens.  

R2-D2 photographed using a Canon EF-S 18-55mm lens
R2-D2 photographed using a Tamron SP AF 90mm f/2.8 Di Macro 1:1 lens

For a while I toyed with the idea of replacing my old macro lens with the latest model namely the Tamron SP 90mm F/2.8 Di Macro 1:1 VC USD. Only for a while though as it retails for USD649. It's actually a very good value-for-money entry-level macro lens but sadly still too pricey for me. Looking at this new lens was just a way for me to keep my spirits up because a further succession of mishaps and failures meant any longing looks at this new lens remained pure wishful thinking.

Tamron's successor to my old lens and top of my wistful wishlist - the SP 90mm F/2.8 Di Macro 1:1 VC USD
This lens is a thing of beauty and don't get me started on its Vibration Compensation functionality

It sucks when things go wrong. And boy did things go wrong these past few weeks. Adding to my macro lens woe was a whole litany of equipment breakdowns. In brief: my fridge up and died necessitating a replacement; my car's entire clutch assembly - yes, I still drive a stick shift - had to be replaced; the air-conditioner turned into a heater and had to be repaired; and the washing machine stopped powering up resulting in yet another dead appliance. This has not only burned a hole in the metaphorical family wallet but also figuratively obliterated it. Sigh. Time to put on the blues and wallow in self pity. Unless my ancient classic iPod also conks out ... D'oh!

Friday, 17 October 2014

Zombie Girl in a new light, and Last Night on Earth

What with Halloween around the corner, the Walking Dead Season 5 in full swing and the presence of so many wonderfully painted undead on show in the blogosphere during Zombtober 2014, it was inevitable that I would be bitten by the zombie bug. So I decided to revisit the Knight Models Zombie Girl which I painted a year ago and retake her photos (I wasn't too pleased with the original ones) as well as bring out my Last Night on Earth board game pieces to work on in yet another project.

Knight Models Zombie Girl revisited at lower ISO settings

To properly capture the mood of a horror piece, I went for a darker look in my second photo session with Zombie Girl. As such, I used a much lower ISO setting to reduce the camera's sensitivity to light while repositioning the lamps closer to the miniature itself. Hopefully I have done it justice this time. 

Look closely at the ground to spot a Reese peanut butter bar or a Nestle crunch chocolate bar
A wonderfully sculpted piece that captures the true horror of a zombie
Zombie Girl's clothes sported a Halloween colour scheme

With the new lighting, the Zombie Girl now looks like she is shambling oust from the shadows along at dusk rather than the 'deer caught in the headlights' washed out look. Having the camera less sensitive to light also made the background a pure black which better suited the piece on display.

Before and after a change in ISO settings and positioning of lights

Meanwhile, I finally managed to put Zombie Girl in a video inclusive of the appropriate sad and spooky music. The video was intentionally shot at a low ISO setting for that dark look (see below).


360 view of the Knight Models Zombie Girl
To view Zombie Girl in 360 degrees, please check out the YouTube video below. For videos of other selected miniatures I have painted, please visit my YouTube channel FourEyedMonster Miniatures. Please remember to choose high definition (HD) for the best video viewing option.


Also in a breakthrough of sorts, my son seems to be finally over his fear of zombies. For the first time since the Walking Dead series started, he finally sat together with me to watch Season Five's Episode One: No Sanctuary. The abattoir scene alone is worth the price of admission and is a must watch. Now all I have to do is to convince him to have a game of Last Night on Earth with his mum and I.

Last Night on Earth ... the zombie board game

This zombie-themed board game comes with a set of eight survivours and 14 zombies. Details on the miniatures are pretty good considering they were only meant to be functional board game pieces.  

Any horror movie aficionado can tell you that there are way too many survivors ...
... but hopefully these zombies can restore the natural order of things

These plastic miniatures will definitely be the smallest board game pieces I have ever attempted to paint. So far, I have encountered some problems during prep work. For example, I found it extremely hard to remove the mould lines and I also noticed that details are rather blurred on some pieces.

Smallest board game pieces I have yet to try painting

Despite the issues encountered during prep work, I am still very excited with the theme I am planning for the survivors (maybe) and zombies (definitely). I have a specific theme in mind that incorporates my all-time favourite fictional universe/franchise together with the undead and perhaps the survivors too. Conceptualising this theme (more details will be revealed in a later blog post) has been the easy part but pulling it off, I feel, is a whole new ball game altogether. But if I do, it's going to be sweet.  

http://shireworks.blogspot.com/p/knight-models.html

Friday, 18 October 2013

Understanding White Balance in miniature photography

Chances are, at one time or another, you would have been hugely frustrated by a lack of colour accuracy in the digital photos of your miniatures. Unlike the human eye which can instantly adjust to changes in light and see objects in the colours it was meant to be seen, the digital camera doesn't always capture colours properly. After all the hard work put into getting just the right shade or hue of colour in your painting, nothing is worse than to have all that spoiled by a photo with a yellowish or bluish tint. Understanding the basics of White Balance can help you increase colour accuracy.   

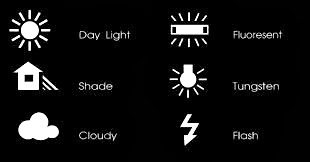
White balance options that are available in most DSLR cameras

Relationship between White Balance and Colour Temperature
Why then do you sometimes get a bluish or yellowish tint to the digital images of your miniatures? It all relates to the lighting environment (or colour temperature if you will) in which the photographs were taken. Learning about colour temperature, which is a characteristic of visible light, can go a long way in getting a basic understanding of why certain White Balance settings are chosen.  

A detailed look at colour temperature
Colour temperature is measured in the Kelvin temperature scale. Cool temperatures are located higher on the Kelvin scale - meaning a light with a higher colour temperature or a larger Kelvin (K) value will have more blue light. Looking at some common lighting situations from cool to warm, Shade comes in at about 7000K, Cloudy is approximately 6000K, Day Light (~5200K), Flourescent Light (~4000K) and Tungsten Light (~3200K). Most Digital Single-Lens Reflex (DSLR) cameras has White Balance settings that you can set for just such conditions. As to what each settings do, read on.

Lighting environment in which my photos were shot
At my workstation is a simple photography setup comprising two lamps, each with a 24W (roughly 125W equivalent) energy saving 6500K cool daylight lights bulbs, which are covered with white diaphanous material to diffuse light, thus reducing glare and harsh shadows. The surrounding area was relatively closed off to outside light with the curtains drawn, although some leakage does occur as the curtains aren't thick enough to completely engulf the room in darkness. This gives you a rough idea of the lighting environment my miniatures were exposed to when their photos were taken. 

Two lamp setup at FourEyedMonster's miniature painting workstation

What does adjusting the White Balance do?
In essence, adjusting a camera's White Balance settings allows you to either add warmth (yellowish tint) or coolness (bluish tint) to the digital photo in order to compensate for the lighting environment. In general, fluorescent lighting adds a bluish cast to digital images while tungsten (incandescent) light bulbs add a yellowish tinge to the photos, if nothing is done with the White Balance to compensate.

For example, if you are taking photos under fluorescent lighting (a cool temperature), you would want to add warmness (yellowish tint) to your digital images by selecting either the 'Shade', 'Cloudy', 'Daylight' or 'Fluorescent' White Balance settings which are ideal for a cool colour temperature range between 7000K and 4000K. In the end, if you have adjusted the White Balance correctly, the colours of your miniature will look close to or be exactly what you see with your naked eye. 

Digital photos of a miniature shown at different White Balance settings

On the above photo montage, I took some photos of the Kingdom Death Pinup Speaker miniature against a black background under different White Balance settings. From left to right, these settings were Auto White Balance (AWB), Shade, Cloudy, Daylight, Fluorescent and Tungsten. I did not use the White Balance settings for Flash Photography as I almost never take photos of my miniatures using the camera flash. Based observations with the naked eye, the setting that displayed the most accurate colours was 'Shade' or the second picture from the left of the above photo montage.

Digital images using the Shade, Cloudy and Daylight White Balance settings

As the lighting environment in which I was working in can be termed as very cool, it stands to reason that I had to select White Balance settings that introduced warmth into my digital images. Based on the series of photos above, warmth was introduced at a decreasing amount from left to right (Shade to Cloudy to Daylight settings). As mentioned earlier, the 'Shade' settings gave me the best colour accuracy for the lighting environment that I was working in. Sometimes, just selecting the 'Auto White Balance' or 'AWB' settings would be good enough but that was not the case here (see below).     

Auto White Balance (AWB) does work on occasion but not this time

As an example how bad your digital images would look like at the wrong White Balance settings, I also took some photos at two extreme settings in my case study (see below). Firstly, while the 'Fluorescent' setting was supposed to introduce warmth to photos, it however, no longer did so under the cooler lighting environment I was working in. Secondly, the 'Tungsten' setting which is supposed to add coolness (or bluish tint) to images taken in warm environment just made things worse.

Fluorescent (left) and Tungsten (right) White Balance settings

So what happens when the custom White Balance settings do not work. Well, for starters you can try manipulating the lighting environment you work in e.g. move the lamps to a different distance from your miniatures etc. You can also either resort to setting a custom White Balance setting or use other advanced hardware functions that modern DSLRs have nowadays. If all else fails, the most efficient method would be to correct the White Balance of digital images using computer software, which I do resort to on occasion if it gives me the colour accuracy that I am looking for.


Now I do not profess a mastery of White Balance adjustments in digital photography as I still struggle to get good colour accuracy especially when using white backgrounds. What I hoped to achieve with this blog post was to share with you my experiences when dealing with White Balance issues and perhaps give you a basic understanding of what White Balance is all about and take the mystery out of that bluish (or yellowish) tinted digital photo of your miniature. Thanks for reading and please do share in the comments below if you have your own solutions to White Balance issues.

Wednesday, 7 August 2013

Achieving a perfect black background in miniature photography

To take a photo of your miniature against a perfectly black backdrop is actually very easy to do when you understand the fundamentals of photography. Now I am not going to go over the basics again so if you have missed out, please check out my post on the exposure triangle. What I am about to show you is what works for me and is by no means to only way to achieve a perfectly black background for photos of your miniatures. By all means use my method as a basis or foundation to tinker around with and hopefully find a technique that works best for you. Now on with my tutorial.

Nocturna Models Le Petit Chaperon against a perfect black background

First off, the following are some steps which I DO NOT use to achieve that perfect black background and the reasons why I do not use them:

1) I do not use any photo editing software. While I am not adverse to using photo editing on occasion, I believe that by forcing yourself to take photos that look good in a WYSIWYG fashion will in the long run make you a better photographer. You are essentially forced to better understand how your camera works as opposed to understanding how to use a photo editing software.

2) I do not use a camera flash. Now some photographers suggest using a flash which subjects the object being photographed to an intense light exposure which also has an added effect of darkening the background, sometimes to become perfectly black. Personally, I never use a camera flash when taking photos of my miniatures because I find the light source from a camera flash to be too 'harsh'.

3) I do not use a black cloth as the backdrop. There are many suggestions out there in the world wide web which suggests varying cloth materials that are black in colour to achieve a perfect black background. In my experience, cloth tends to reflect some amount of light resulting in a more grey rather than black background. That's good if it's the effect you are seeking but not so if you want the blackest of blacks as your background. 

Setup showing lamp, miniature and LCD screen

So with all the no-no's I have listed above, what then is the technique I use to achieve a perfect black background? I placed the miniature in between a diffused light source and a relatively shadowed background which for me was an TV LCD screen located a fair distance away from the miniature. The photo above shows you the setup comprising the lamp in the foreground, the miniature and the LCD screen in the background while the diagram below shows the relative distance between all three. Do note that the distances mentioned here are not hard and fast numbers but a rough suggestion.

Rough diagram of the relative positioning of the lamp, miniature and LCD screen

The key is to understanding the technique above is the nature of light exposure and sensitivity towards the camera sensor which in my case is a Canon EOS 650D - an entry-level DSLR camera. To get your head around why I did what I did, keep in mind these three simple tips:

1) Make use of exposure: A camera can only record a limited range of light or in technical terms - exposure or a measure of how much light the camera's image sensor is exposed to during a shot. Start with the light falling on your miniature, and then think about the comparative amount of light on the background. If there’s a big difference, for example a shadowed area, there may not be enough light reflected back into the camera to register anything on the sensor resulting in a black background.

2) Make use of backdrops: For my purposes, I found the LCD screen on my HD TV to be the perfect backdrop. When aligned correctly (see diagram below) and located at a fair distance away from the miniature I was photographing (see tip three below) it provided me with a shadowed background that would scarcely register on my camera sensor. In this case, using black cloth could be a substitute backdrop but the main issue is to created a shadowed background with the dark backdrop located some distance from the miniature. 

3) Subject-to-background distance: By increasing the distance between your miniature and the shadowed background, you are increasing the likelihood of the background going completely black. 

Light is directed at an angle to the LCD screen to minimise light reflections from the lamp

I hope that you found this post useful and please do share if you have a technique of your own that gives you that perfect black background. Thanks for reading and have a nice hobby week!


Wednesday, 29 May 2013

How exposure affects miniature photography

Before you can improve on your miniature photographing skills, it is crucial to get to grips with a basic concept i.e. exposure, which is a measure of how much light the camera's image sensor is exposed to during a shot. In simple terms - an underexposed shot is one that is too dark while an overexposed shot is one that is too bright. For a better understanding of exposure, you will have to explore all the elements involved - ISO, aperture and shutter speed - or the exposure triangle in short.  


Before I get to the more practical aspects of how to utilise the exposure triangle to get the shots that you want of your miniatures, let us first have a quick look, individually, at the three components of exposure as well as some basic theory of how they relate to one another.

Exposure Triangle in a nutshell
a) ISO is the sensitivity of camera sensor to light in which the higher the ISO setting, the more sensitive the camera sensor is to light so less light is required when taking the shot. Too high an ISO setting may introduce noise (grainy patterns) into your shots. General rule of thumb is to keep ISO as low as possible but the latest DSLR cameras are able to take good quality shots at high ISOs.

b) Aperture is an opening at the camera lens which controls how much light passes through to the camera sensor. While a bigger aperture size allows more light into the camera, the trade-off is a lower depth of field. Aperture size is measured in f-stops in which the larger the f-stop number, the smaller the opening (this takes a bit of getting used to) so f4 is a larger aperture opening than f8.

c) Shutter speed controls the length of time light is allowed to hit the camera sensor. At high shutter speeds, less light is allowed into the camera but your shots won't be affected by shaky hands (something important to consider when you are taking shots with a dedicated macro lens). While a high shutter speed also allows you to freeze-motion-capture a fast moving object, this is not an important consideration when taking shots of stationary miniatures.

So how do they all tie together? Well, when you change any one component in the exposure triangle you will most likely need to amend one or both of the other components. For example, you have just taken a perfect shot at the correct exposure and then decided to increase the depth of field by using a smaller aperture opening. Now less light will hit the camera sensor (shot is underexposed). To regain the correct exposure, you will need to use either a slower shutter speed which increases the length of time that the light hits the sensor, or set a higher ISO to increase the sensor's sensitivity to light.

In general, when taking photographs of miniatures, I prefer a high depth of field so as to take in as much detail of the miniature(s) as possible. This means the lowest aperture size I can get away with before a lack of light becomes a hindrance. I also try not to set the shutter speed too low because although I use a tripod to take shots which can help mitigate against shaky hands, at a low enough shutter speed, the act of just pressing the shutter button itself can shake camera slightly and spoil your shot. This can be solved by using a camera trigger cable but I don't have one yet.  

Practical application of the Exposure Triangle
To show the effects of the exposure triangle when taking shots of miniatures, I decided to use two Word Bearers Anointed minis placed side-by-side but with one slightly behind the other. There was no editing done with any image software so the photos are WYSIWYG.

Shot 1: Shutter speed 1/500th of a second, Aperture at f4, ISO 400

Low depth of field at 1/500 - f4 - ISO 400
In my first shot, I used a low aperture setting of f4 which meant a very low depth of field, the effect of which is the blurred out miniature in the background, on the right.


Shot 2: Shutter speed 1/60th of a second, Aperture at f11, ISO 400

Better depth of field but still not good enough - 1/60 - f11 - ISO 400

To get a better depth of field I made use of an important concept in the exposure triangle i.e. reciprocal exposure. To keep it simple, reciprocity refers to the fact that shutter speed and aperture can be adjusted by the same amount in opposite directions to get the same exposure. In this case, I adjusted the shutter speed by three stops (one stop is a measure of light) from 1/500 to 1/60 while the aperture was also adjusted by three stops in the opposite direction from f4 to f11. (A quick search online should give you a chart showing various reciprocal exposure settings).

To explain further, I had reduced the shutter speed which allows more light into the sensor while lowering the aperture size (better depth of field) which reduces the amount of light that hits the sensor. End result is the same exposure as Shot 1 is maintained but at different shutter speed and aperture settings. Note that the ISO value is maintained at 400 so it is the constant variable here.


Shot 3: Shutter speed 1/30th of a second, Aperture at f16, ISO 400

Much better depth of field at 1/30 - f16 - ISO 400

While the depth of field on Shot 2 was much better, it was still not good enough as the miniature behind was still a bit blurry. Using the reciprocity rules, I increased depth of field and compensated with a lower shutter speed. But the shutter speed was so low that any slight vibrations of the camera would have resulted in a blurry picture. So a better solution if you do not have a tripod-camera cable trigger combo would be to take the shot at a shutter speed of 1/60. To get a better depth of field at even lower aperture settings, we will have to change the one thing kept constant so far - ISO. 


Shot 4: Shutter speed 1/60th of a second, Aperture at f22, ISO 1600 

Required depth of field at 1/60 - f22 - ISO 1600

Using the settings of Shot 2 as the base to work from, the aperture was set as low as the lighting conditions allowed which was f22. As I wanted to maintain the shutter speed at 1/60 that meant I had to change the ISO. Under the reciprocity rules, I set the ISO at 1600 to ensure that the exposure stayed the same as (or at least close to) all the other shots so far. Now the differences in the depth of field might not be substantial enough to necessitate reducing aperture settings to as low as f22 but that's a judgement call the photographer will have to take depending on the way the minis are set up.

Next up for macro photography: Achieving the perfect black background in your shots

Monday, 29 April 2013

Using a dedicated macro lens to photograph miniatures

Let's say you have decided to invest in an entry-level DSLR camera, or have gotten your hands on one for general photography purposes. In  a natural progression of the hobby for a miniature painter, the next dilemma is to pore over the pros and cons of opting for a dedicated macro lens to take photographs of your models. Do you really need such a lens for this hobby? Read on to find out ...

At last, Chaos had gotten their hands on a forbidden Standard Template Construct

Before we delve into detail on what a macro lens can offer, let's us take a step back. An entry-level DSLR let alone a dedicated macro lens is a huge commitment to undertake seeing that the miniature hobby will have already burned a huge hole in your wallet. If you are just starting out in the hobby, I would say NO to a DSLR/macro lens combo. It would be better to save the money - for miniatures, brushes and paints - and slowly built up your arsenal in this hobby. Moreover, in the early stages you will have yet to determine if you prefer the painting or gaming aspect (or both) of the hobby.

So why the all the fuss about DSLR? Well about a year back I borrowed an entry-level DSLR and took some comparison pictures (shown below). Although I had expected the obvious differences in quality, I was still taken aback by the results. While not state of the art, my 8 MP camera phone was still pretty ok with Schneider Kreuznach optics and ISO settings of up to 1600. But more than than, using the entry-level DSLR with just a standard non-macro lens already gave me so much more control over the actual act of taking photos - something that you have to experience to understand.

Comparison photos taken a year ago between my old LG Renoir camera phone (left) and the Nikon D60 (right)

Nowadays, you can find very reasonable performances from cameras in the latest smart phones and tablets as well as from budget compact system cameras (non-DSLR cameras). But if like me, you have more than a passing interest in photography and are putting in a lot of effort to improve your painting skills (I am, by far, not a good painter yet but I am working on it) - then investing in an entry-level DSLR will be a natural step forwards in this hobby. Not too long after that, the question of whether to use a dedicated macro lens is bound to become a serious consideration.

Differences between a standard kit lens and a dedicated macro lens
First up, I compared what the difference in focal length offers a photographer - the Tamron SP AF 90 mm f/2.8 Di Macro 1:1 (an entry-level budget macro lens) versus the basic lens usually sold with the body of a Canon EOS i.e. the Canon EF-S 18-55mm which is a wide-angle to mid-telephoto zoom lens (see the two photos below for comparison). Bear in mind that my aim is to show the difference you would get from a dedicated macro lens over a standard kit lens for Canon's entry-level DSLRs.

An Ork Nobz captured using a Tamron 90 mm macro lens
Here the same miniature is captured by a Canon EF-S 18-55mm lens from the exact same position and at the highest zoom

Right off the bat, the Tamron macro len's 90 mm focal length gave it a greater telephoto capability than the Canon EF-S lens with 18-55 mm focal length (longer lens = more magnification). Both photos above were shot from the same location, using first the Tamron macro lens followed by the Canon's standard kit lens, at the same settings and at each lens's highest zoom setting. However, this does not mean the standard lens you have is useless because when you want to take huge panoramic shots of a huge 2,000 points army, then the Canon EF-S might be a better option . 
 
But to focus on the focal length of both lenses (pun not intended) is erroneous. There are certainly better and more expensive macro lenses with wider ranging focal lengths (from 55-300 mm). But the Tamron SP AF 90 mm f/2.8 Di Macro 1:1 offers the beginner photographer a way into the world of macro photography by being among the lowest-priced macro lenses in the market.


I then proceeded to take focal length out of the equation by moving the camera with the Canon EF-S lens as close as I could to the miniature before taking the shot. From the results seen, you will be hard pressed to tell the difference between the photo shot using a dedicated macro lens and on using the standard kit lens. Try to tell them apart before clicking on the photo above to see which is which.

Zoomed in - Photo taken using the Tamron macro lens
Zoomed in - Photo taken using the Canon standard kit lens

Only by zooming into the head of the Ork Nobz, you will start to see the differences between both photographs. You will notice that when zoomed in, the photo that resulted from using the Canon EF-S 18-55mm lens (standard kit lens) is slightly more blurred and has less definition to it. A dedicated macro lens like the Tamron SP AF 90 mm f/2.8 Di Macro 1:1 offers true macro capabilities at 1:1 magnification. As defined by Digital Camera World magazine - a true macro lens is one that can capture frame-filling images of subjects that are the same size as the sensor itself.


I repeated my experimentation with a different model, this time a Word Bearers Chaos Cultist, and got the same results (see above). So all-in-all, the dedicated macro lens provided better results as was expected of it. No surprises there but a picture as they say is worth a thousand words.


Such detailed photographs have the added bonus of pushing you to improve your painting skills as all the flaws will be twice as visible to the naked eye. I have always had tremendous respect for the 'eavy Metal team, Golden Daemon and Slayer Sword winners as well as other talented painters all over the blogosphere; now more so when even at extreme closeups, their painted miniatures still look great. 

So do you need a dedicated macro lens to complement your DSLR camera when dealing with miniatures? Well, it wouldn't hurt - that's for sure. Can you work without one? Of course you can but once you go the way of a true macro lens you ain't zooming out.


Wednesday, 10 April 2013

Macro Photography ... on the road to taking better photos of miniatures

Any miniature painter worth his (or her) salt would recognise the icon below instantly. Yes, the all too familiar macro setting that can be found from the simplest camera phones to high-end Digital Single-Lens Reflex cameras or better known as DSLRs. When I first started out in the hobby I didn't really bother with the hows-and-whys. All I did was put the settings at macro, point and shoot. If the photos didn't come out right, I usually just shrugged my shoulders and snapped away hoping that somehow, magically, a good photo would emerge. Well, they sometimes did but that's not the point. 


As fate would have it, my camera phone decided to die on me right about the time I was thinking of getting a good camera-and-lens-combo to take better pictures of the miniatures that I was painting. So about 9 months ago, me and the missus decided to invest in a DSLR camera (her for the family photos, me for the miniatures) which resulted in us getting the Canon EOS 650D and the Tamron SP AF 90mm F/2.8 Di Macro 1:1 lens. It's a pricey investment but think of it as money saved which would otherwise be spent on models that will never see the light of day. You know what I mean.

Canon EOS 650D and the Tamron Macro Lens

One thing the DSLR has done is force me to try ever harder to paint better because the level of detail that can be captured in photos has ratcheted up tremendously compared to my old camera phone. The ability to capture fine details can expose a badly painted miniature in all its ugly glory. Having had the DSLR camera for sometime, I have picked up some knowledge (and am still learning) which I hope to share in later blog posts. As the saying goes "If you want to learn something teach it". 

What are the settings I need for my camera?
So going forward, I hope to share what I know on macro photography (not necessarily in that order):
1. Aperture versus Shutter Speed
2. Depth of field
3. Lighting (something simple that continues to be a huge challenge to master, for me anyway)
4. ISO settings
5. Photo taking techniques
6. In-camera effects
7. Flash - to use or not to use
8. Backgrounds
9. Post-editing on the cheap
10. Making your own light box
11. Other fun stuff

Related Posts Plugin for WordPress, Blogger...