Showing posts with label LOTR Dragon. Show all posts

Wednesday, 12 August 2015

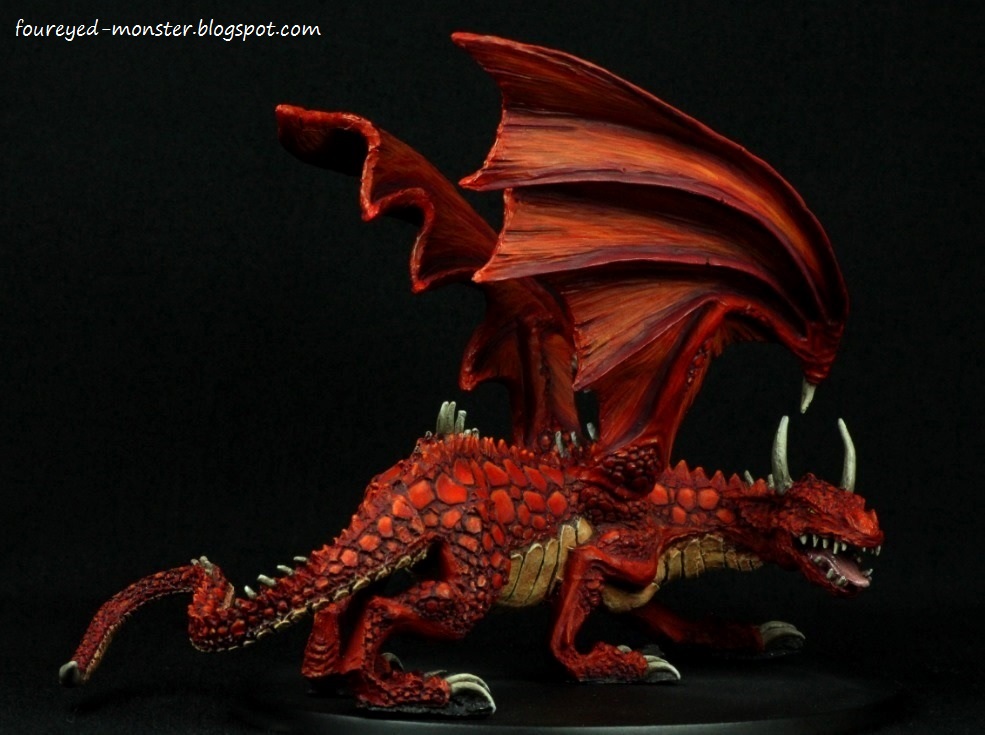
Red Dragon [Completed sans base]

Finally ... an iconic fantasy piece is now part of my personal collection. Painting a red dragon was a non-negotiable item in my must-paint-checklist. If I ever were to visit a hypothetical museum display of all things fantasy, you can be sure that uppermost in my mind would be where is that red dragon?  

A mythical selfie ... even dragons are jumping into the social media bandwagon

Initially, I was sorely tempted to paint a less cliched mythical beast, say perhaps a chameleon dragon with hues ranging from green to purple. Apprehension had clouded my thoughts as to how I could ever pull off a colour scheme that was overwhelmingly dominated by a single hue. So for inspiration I looked towards Larry Elmore, a fantasy artist whose works graced the covers of many a book in the genre (Dragonlance as well as Dungeons & Dragons to name a few) that I had read as a child.       

Red Dragon [Completed sans base]
Light ochre, beige, white, purple and pink were used to contrast the reds
Red, red and more red

Using Larry Elmore's dragon illustrations as the foundation to work from, I also referenced more contemporary takes such as the movie version of Smaug as well as mother nature's Scleropages legendrei (super red arowana) and Naja pallida (red spitting cobra). Placed into a melting pot of ideas, these references then gave rise to the colours I used to contrast the dominant red scheme. Some more noticeable than others, they consist of light ochre, pink, purple, beige, white and yellow. 

For a slime-like effect, a light coat of gloss varnish was applied to the tongue
Wings were painted with near yellow highlights to make them stand out from the rest of the dragon

There is a good reason why this piece doesn't have a base yet. And it's not the usual 'I suck at bases' excuse. The existing oval base will eventually be discarded for a larger and more elaborate base once I have thought of a suitable diorama. Moreover, the antagonist (or protagonist depending on your view) for the dragon remains undetermined. While the Kingdom Death Pinup Savior was an early favourite for the role, she is no longer suitable because her paint job is simply not up to par. It's likely another Kingdom Death girl will take her place, either one that has been or has yet to be painted.

One of the more dynamic viewing angles
Side view facing away from the dragon
Dragon sits atop a soon to be discarded bare-bones oval base

If there is one thing I might consider doing differently, it would be to paint the dragon's wing membranes to a hue as light as its underbelly. But in the end I loved the classic look better. 

Top view of the dragon in which light effectively catches the brighter highlights on both wings

One of the marks of a great artist is that he or she inspires others to mimic and improve upon their work. Larry Elmore does all that and more. This dragon is as much for myself as it is an ode to Mr. Elmore whose works sucked me into the world of fantasy. Don't judge a book by a cover they say. Meh! Dragons on the cover opened the door to a wonderful world of fantasy and I'm the better for it.


http://shireworks.blogspot.com/https://www.facebook.com/shire.works

Saturday, 25 July 2015

Red Dragon [WIP - Scales and Wings]

There is something about painting colour transitions that's seem rather zen-like. More so when the activity takes place on a majority portion of a miniature as it is for the reds on this dragon's scales. Frequently my mind focuses on the repetitive blending brush strokes; senses oblivious to all sensory inputs around me. It's small pleasures like this that make miniature painting such a great hobby.  

Red Dragon sans wings: work-in-progress with scales at an advanced stage
Comparison between the dragon's scales and that of an arowana; both have purplish red shadows

Key to making the reds pop was having a purplish shadow in between the scales for contrast. Yet, as you can see in the photos above, the purples are not as obvious as those found on the Arowana (inset photo above). Making the shadows very purplish was never my intention. Instead, I wanted a dark black red shadow with a hint of purple akin to a secret food ingredient that is just beyond your palate. If I had used pure black for the shadow, results would have had a different and duller effect.

Front view of the red dragon sans wings
Games Workshop's Lord of the Rings Dragon miniature has a fluid, dynamic look to it
Having a light beige underbelly adds contrast to the whole piece

Ever aware of not making the highlights too bright, I consciously limited myself to light orange as the final highlight. My main fear was inadvertently turning this beast into an orange Umpa-Lumpa. So even if I were to make further adjustments to the scales, it would be to add darker reds to the existing colour scheme. This would make the existing highlights brighter as well as create greater contrasts.

Back view of the red dragon sans wings
Purplish dark red is the new black ... at least as shadows for a red dragon
Light orange was as bright as I dared take the highlights on its scales

Meanwhile, the dragon's wings were painted to look slightly brighter than its main body; pure yellows were used as the final highlight. And to mimic the membranous nature of wings found on the reptilian flying lizard or the mammalian bat, I painted a lined texture on the dragon's wing membrane.

Highlights on the wing membranes went one step higher towards pure yellow
Care was taken to create a lined texture to simulate a wing membrane

The next steps would be to paint the dragon's bones, claws, teeth, mouth, tongue, eyes before gluing the wings to its body and finally either brightening up the wings or darkening the reds of the scales (or both or even neither). No work is planned for its oval base as the dragon is meant to be a piece on a yet-to-be-fully-envisioned diorama. There is a possibility the base will be discarded in exchange for a bigger one that can contain other miniatures, so that a story befitting this dragon can be told. But that day is still far away. For now, the priority is to complete the dragon's paint job and do it well. 

http://shireworks.blogspot.com/https://www.facebook.com/shire.works

Tuesday, 21 July 2015

An urge to paint a Red Dragon [WIP - Basecoats to First Mid-tones, Underbelly, Resculpting the Tail]

If like me you are a miniature hobbyist who loves reading fantasy, then chances are you would have had an urge to paint a red dragon sometime in your life. From The Hobbit to Game of Thrones to Dragonlance and to (almost) any fantasy world setting ever created, red dragons are about as ubiquitous as space is to science fiction. Since most dragon miniatures cost a pretty penny - for example Games Workshop's Smaug sells for a whopping £295 - I had to make do with a cheaper yet adequately sized dragon also from Games Workshop which sells for roughly seven times less.  

Red Dragon after initial light coats of the first mid-tone
Red Dragon with underbelly, horns and claws at the basecoat stage
Tip of dragon's tail had broken off - it wasn't even in the package - so I had to resculpt it

Because the way I'm painting the dragon entails a lot of manhandling of the miniature, I decided to use mainly Citadel paints for its high durability. Ideally we shouldn't be touching any part of a miniature while its being painted for fear of leaving oily residues on the surface or chipping the paint work. But the scale of this dragon - measuring 14 cm in length - which sometimes necessitates it being held by hand while being painted as well as the possibility it may suffer yet more manhandling later on as I try to fit it into a (yet-to-be-determined) diorama, I felt Citadel paints was the way to go. 

Red Dragon, work-in-progress - first mid-tones on the red scales and on the horns/claws, ...
... a purplish dark red wash over the scales and a completed underbelly

Citadel Skull White was used to prime the dragon while Scab Red, Khemri Brown and Ratskin Flesh was used as the basecoat for the dragon's scales, horn/claws and underbelly respectively. An initial mid-tone (first of three planned) of Red Gore was applied to the scales followed by a purplish dark red wash. Care was taken to ensure most of the wash ended up on the ridges in between the scales. Similarly, the horn/claws were given an initial mid-tone (one of two planned) of a Khemri Brown and Bleached Bone mix followed by a wash of Devlan Mud. Meanwhile, the dragon's tongue/mouth was basecoated with a pinkish Vallejo Model Color hue (the only paint from this brand used so far).  

Red dragon's soft underbelly [completed]
As with the scales, the wings were washed over with a purplish dark red mix

To date, the only thing I have completed is the dragon's underbelly. After basecoating with Ratskin Flesh, the underbelly was washed with Ogryn Flesh followed by a first mid-tone layer of Bestigor Flesh then a second mid-tone layer of Ungor Flesh before it was dry brushed with Bleached Bone. This was followed by lighter wash of Ogryn Flesh and yet another dry brush coat of Bleached Bone.

Nature's own 'red dragons'

For inspiration on how the scales of a red dragon could be painted, I am taking a leaf out of mother nature's book. Specifically, I will be using photo references of Scleropages legendrei (super red arowana) and Naja pallida (red spitting cobra) to help me paint a combination of the two. As an overall guide, I will likely based the general look of the red dragon on how Weta Workshop's version Smaug the Terrible turned out. So I guess the final product would be an amalgamation of three ideas - two from nature and one from Middle Earth. Only if, that is, everything turns out as it should.


http://shireworks.blogspot.com/https://www.facebook.com/shire.works

Friday, 10 May 2013

Seeking inspiration from Hollywood and Mother Nature's palette

After spending months working my Black Legion / Word Bearers army (with not much progress to boot), I am literally running on empty and have been left hankering for more variety in my miniature painting projects. Having always fancied a go at painting fantasy-based miniatures, I decided the time was right for me to start painting my diorama involving the Lord of the Rings Dragon and the Kingdom Death Pinup Saviour miniatures - that has a working title of "A Marilyn Monroe Moment".

Marilyn in the iconic white dress from the film 'Seven Year Itch', 1955
An iconic Hollywood image - re-envisioned in a fantasy setting

Work on the Kingdom Death Pinup Saviour is still in the very early stages and all I have done is to begin work on the skin tone. Painting on the miniature has gotten off to a rough start because priming it with Skull White spray caused a powdery (as opposed to a smooth) layer to adhere to the mini. I will need to shop for a Tamiya Gray Primer as it should be better for minis with more flesh showing.

Very early stages on the skin tone

Work on the Dragon is even further back in the progress timeline with its basecoat yet to be finished. While it might seem silly to seek a different challenge in my projects and still paint red - more so when I have just finished painting some Word Bearers - the reds for the dragon will eventually be much brighter and warmer than the dull-red of Lorgar's warriors.   

Work on the dragon's basecoat is ongoing

While trying to find the best possible colour scheme for the red dragon, I decided to see what Mother Nature had to offer. In particular, two animals caught my eye namely the Scleropages legendrei (red arowana fish) and the naja pallida (red spitting cobra). Both their red scales looked very beautiful and will be the inspirational foundation from which to paint the dragon.

Scleropages legendrei
Naja pallida

Meanwhile, I decided to also continue working on the Word Bearers without neglecting the creative diversity that I sought. That meant resuming work on Cyrene Valantion which is actually a Kingdom Death White Speaker Pinup miniature. One of the reasons I stopped was because I unhappy with way the mini was turning out. But I decided to suck it up and proceeded to repaint the skin and fix my earlier mistakes. While it still needs more shadows and highlights, the skin tone is now looking much better than my earlier attempt. Other parts of this mini is still at the basecoat stage.

WIP - Kingdom Death White Speaker Pinup, my proxy for Cyrene

My approach to both the Pinup Saviour and Dragon will be to start with the mid-tones first and then work towards shadows and highlights from there. It is a bit different than the usual base-to-midtones-then-to-highlights approach that is usually recommended by Games Workshop for beginners. Starting with the mid-tone actually lets me have more control over the application of shadows and highlights. Thanks for checking out my progress on the diorama and I hope to post more updates soon, especially pictures of a completed Cyrene Valantion.

Tuesday, 7 May 2013

Using a Flow Enhancer on Citadel Acrylic Paints

Part and parcel of trying improve one's painting skills involves a better understanding of the medium that miniature painters work with. Most painters I know work with acrylic paints and I am no different. So while I was trying to solve two issues that have been plaguing me - (a) dried-up paints and (b) getting acrylic paint to reach every small nook and cranny of a miniature - I came across a potential solution to both my problems (i.e. a flow enhancer) and decided to try it out.

Acrylic medium - flow enhancer

While at an art supply shop, I happened to come across the Daler-Rowney flow enhancer, which was described by its label as a colourless liquid that is added to acrylic paints to reduce its viscosity and improve its flow. To someone fairly new to the hobby, that didn't really tell me much. But a little online research shows that a flow enhancer can also function as a clear painting medium in which to thin paints as well as break up the surface tension of the paint - two characteristics which I felt would help solve my problems. While meant to be used with System 3 & Cryla acrylic colours, the Daler-Rowney flow enhancer seems to work fine with both the new and old Citadel paints.

Problem 1: New Citadel metallic paints drying up to a thick and gooey texture

Bad luck with the new Citadel paints which became unusable in less than a month after being opened for the first time

So far, three out of four new Citadel metallic paints that I bought have become unusable in less than a month after being opened for the first time. The paint's texture became a semi-dry, thick and gooey paste after a while. I am baffled as to why this is happening (could be just plain bad luck) as I have used the old paints for about a year-and-a-half without any of them going dry on me. So apart from buying a new pot of paint every time one dried, I had to find another solution, cue the flow enhancer.

Trimmings on the left shows basecoat of Scorched Brown:Runelord Brass mix; Trimmings on the right shows the Runelord Brass paint that was "fixed" by the flow enhancer and then applied on top of the basecoat 

In desperation, I added the flow enhancer into the pot of semi-dried up paint and shook it vigorously. While the flow enhancer did not completely restore to paint to its original consistency and texture, it did, however, change the viscosity of the paint to the extent that made it usable again. There were still some gooey lumps here and there but the paint could now be taken up by a brush and applied smoothly to a miniature (see pic above). Previously, in its semi-dried up state, the paint wouldn't even stick to the brush. So that was one problem solved.


Problem 2: Surface tension causing paints to not reach certain areas of a miniature 

To break up the monotony of having to paint my Chaos Space Marine Black Legion/Word Bearers alliance army, I have decided to resume work on my diorama involving a Kingdom Death miniature (the Pinup Saviour) and a Lord of the Rings Dragon. One problem I encountered while applying the basecoat for the dragon was that the paints were not reaching into certain parts of the miniature, as can be seen from the immediate picture below.

Note the white undercoat showing through a thin layer of a red basecoat

To enable the paint to get into the nook and cranny of the dragon, I had to break up the surface tension of the paint, so cue again the flow enhancer. Mixing just a little bit of the acrylic medium into the paint (on the palette) allowed it to flow more smoothly and cover entire areas of the body without any white undercoat showing through (see picture below). 

After many thin coats of Scab Red - the final few coats contained paint mixed with the flow enhancer

I have only just started using the flow enhancer and to date there have been no adverse effects on the Citadel acrylic paints. I loved it because it has saved me money from having to buy new pots of paint as well as help me in my painting.

There are many other things which a flow enhancer can help in terms of painting techniques. Among the uses of the flow enhancers that has been touted online include being a medium that keeps paint workable for longer periods (for wet blending purposes); for creating ink washes and for help in fine detail work, just to name a few. I hope to try these techniques that use the flow enhancer and share my experience with you in later posts.

If you know of any acrylic medium or additives that can do a better job of fixing dried-up paints please do share.

Sunday, 14 October 2012

Rise of a Chaos Space Marine Alliance

It seemed as if the Gods of Chaos themselves had gotten into my head over the past few days. I started assembling one Chaos Cultist to see how it would look ... two days later, the Chaos miniatures in the GW Dark Vengeance starter set were all done and ready for priming.

Finished assembling all the Chaos minis in the Dark Vengeance set in a 2-day mind-blurring haze

Now I am usually a "paint the separate pieces and then glue them together" kinda guy but I was thinking that if I went that route for the DV minis, I would never finish painting them in a timely manner. So for the most part, the Chaos minis in this set will be painted fully assembled ... nearly all of 'em anyway. Old habits die hard so the front of the Hellbrute, the Chaos Lord's sword and the Chaos Chosen Champion's backpack will be painted separately before being glued on.

Awesome details all round ... Chosen will join Abbadon's army while the Hellbrute seems destined for a Word Bearer army
Chaos Cultists awaiting an undercoat and the teachings of a Word Bearer Dark Apostle
After a lot of thought, I decided to use Abbadon the Despoiler and a Word Bearer Dark Apostle as the first leaders of my Chaos Army Alliance. There will be other HQs down the road (Typhus and a Daemon Prince seems the more likely future projects) but for now, a Black Legion / Word Bearers alliance is one I am going with. Abbadon was one of my first HQ purchases many moons ago while the Dark Apostle was just grabbed yesterday.

Abbadon and ... err ... Urkel? Not sure what to name the Word Bearer Dark Apostle yet

Other Non-Chaos Projects
Such is the power of the Gods of Chaos that I haven't been spending much time with my other projects. The Ork Loota aka Rokkit Mek remains very much a work-in-progress ...

Early stages of the Ork Rokkit Mek
... while the Dragon in my future diorama has barely been painted. On hindsight, choosing a white undercoat for this model might not have been the wisest thing I have done because the many small nook and crannies in this Finecast model has made it very difficult to paint an undercoat without some white showing underneath. Not unlike the problem I faced with Lelith.

Initially a homage to The Hobbit but now part of a Diorama with Kingdom Death miniatures
So it has been a rather busy week hobby-wise. Pretty physced up to accelerate my painting for both the Chaos and Ork armies. It's finding the time that's hard now.
Related Posts Plugin for WordPress, Blogger...