Friday 25 November 2022

MS-09R Rick Dom | Master Grade 1/100 scale Zeon Mobile Suit [Unboxing & Pre-Assembly Review]

 My Gunpla jounrey is well underway with this unboxing of my second Gundam plastic model kit project, namely a Zeon mobile suit designated as MS-09R Rick Dom. First a little bit of backstory on this Bandai Master Grade 1/100 scale mecha kit – this mobile suit made its debut in the first Mobile Suit Gundam anime series, which is also known as First Gundam or Gundam 0079. While since then there have been many other Gundam anime - most with better plot, story, and animation - the original series still holds its ground admirably, at least in terms of the mecha or mobile suit's "coolness factor". My favorite from the original series is the MS-09R Rick-Dom. It's a design that has stood the test of time, and a kit that's the focus of my unboxing blog post today.


Bandai Master Grade 1/100 scale MS-09R Rick Dom plastic scale model kit

 Released way back in 1999, this 20-over-year-old kit has something I had always loved about the older Gundam offerings i.e. a giant glossy poster of a finished/painted version of the MS-09R Rick Dom. There is a newer Rick Dom kit (version 1.5) released early this year, containing allegedly better inner frame mechanics. But like all recent Bandai kits, there was no poster included in that one. The Rick Dom (version 1.0) comes in a fairly large box measuring 39 cm by 31 cm by 11 cm. It has a total of 14 sprues of varying sizes, two sticker decals, and a dry transfer decal.


Even for a Master Grade kit, the Rick Dom comes in a fairly large box

Side box art showing the Rick Dom's weapons and its highly articulated hand

Other side box art showing the Rick Dom in front/back poses as well as its details

A glossy colored photo of a finished/painted Rick Dom is included with the kit

Inside the fairly large box lies a huge amount of sprues that make up the Rick Dom 

 One unwanted characteristic from older kits in general is a predominantly toy-like/plasticky sheen on most of the plastic parts, which is a no-no for scale modelers looking for a realistic paint-like finish. But it's nothing so major that it cannot be overcome with a combination of airbrushing with lacquer paints  and top-coating with clear paints. Of course, adding panel-lining and decal application to the work process will improve the final look considerably. And to be fair, it's still rare for a Bandai kit to look good without any extra work done apart from straight out-of-the-box assembly.


Sprue A: Multi-colored sprue with clear parts for the face and eye/gun lenses; semi-gloss gray parts for its fingers and vernier thrusters; glossy purple parts for the arm armors

Sprue B: Glossy black parts for the feet, body, waist, and knee armors

Sprue C: Glossy gray parts for the bazooka, inner leg frames, hands, heat sabre handle, and backpack

Sprue D: Glossy red parts for the inner shoulder, waist, legs, and head armor

Sprue E: Glossy purple parts for the body, hand, and feet

 As I mentioned above, some parts need to be painted while others need only a top coat to look good. But all would require some panel-lining to add depth and make the details more prominent. Selected application of the provided sticker/dry transfer decals would be icing on the cake. Based on preliminary inspections of the parts on the sprues, I believe I'll definitely need to paint the purple and red parts as well as the dark gray parts that are suppose to be metallic inner-frames and weapons. As for the black and light gray parts, I think I can get away from just top-coating them with a high quality clear flat/matte topcoat paint. Apart from that, there are miscellaneous clear parts that may require painting with clear color paints. That's my analysis for what needs to be done, for now.     


Sprue F: Semi-gloss gray parts for the body, waist, pelvic, shoulder, head, and vernier thrusters

Sprue H: Glossy purple parts for the bell-bottom shaped armor of both legs

Sprue I: Glossy black parts for the head, neck, shoulders, and waist armor, as well as the seated and standing pilot figurines

Sprue J: Glossy gray parts for the feet vernier thrusters, and the elbow/ankle/leg inner frames

Sprue K: Glossy purple parts for the shoulder, arm, leg, and waist armors

 Another characteristic of older kits presents itself as a double-edged sword in that while the inner-frame mechanisms isn't as highly complex as modern day kits, it is in most cases more robust and sturdy which makes it less fragile to pose. It seems likely that this is the case for Rick Dom (version 1.0), at the very least it can stand easily on its own two feet without toppling over at the slightest gust of wind. Moreover the kit's limbs/joints are also less likely to sag over time.


Sprue M: Soft gray polyethylene parts that serve as polycaps for joint connections

Sprue N: Glossy gray parts for both halves of the beam bazooka

Sprue O: Glossy gray parts for the beam bazooka components, soles of both feet, body vernier thruster components, and backpack components

Sprue PC-121: Soft gray polyethylene parts that serve as polycaps for joint connections

Jewel-like sticker seal, dry transfer decals, and sticker decals (clockwise from top)

 In case you were wondering what I would want a glossy poster of the Rick Dom for, well as you can see below, it makes for a great display piece (see below). I just wish the newer kits still included such glossy photos as part of the product offering. It's a shame that Bandai has chosen to forgo this practice. Ah well, at least Bandai still provides these glossy posters with reissues of the older kits. But if they can do that, you can understand my frustration as to why they don't do it for the newer kits.  


Glossy poster of a finished/painted version of the MS-09R Rick Dom

Displaying the glossy poster of the Rick Dom inside the hobby cabinet

 After the ease in which the Toy Story kits were completed, it's now time for a more complicated mecha project. Add to it the necessity for more parts to be painted, topcoated, decaled, and panel-lined, then the time frame involved lengthens considerably. Here's hoping my batteries have been sufficiently recharged by my Buzz and Woody projects, to tackle the more challenging Gunpla.

 To prevent burnout, I tend to intersperse quick straightforward builds in between complicated ones. This strategy has worked again for me as I can't wait to start building and painting the 1/100 scale Bandai Master Grade MS-09R Rick Dom. As one of my favorite characters Charlie from the TV series Supernatural might say ... see you later bitches! Oh, be well and happy too. That one is all me. 


https://www.facebook.com/FourEyedMonster-313145002078520/

https://shireworks.blogspot.com/https://www.facebook.com/shire.works

Sunday 13 November 2022

Toy Story 4: Woody [Videos of the Unboxing, Assembly, and a Full 360 View]

 Although the finished Bandai Cinema Rise Standard Toy Story 4: Woody plastic model kit is quite photogenic, you should still view it either in person, or the next best thing i.e. vicariously via video, just to appreciate how cool this kit is. For that reason, I've embedded two videos about my Woody project, with descriptions about what each entails, so you can decide if they are worth watching.


 First up is the unboxing and pre-assembly video (see above) in which we take a quick look at what's inside the box before proceeding to look at each individual sprues in detail. Here you can get a better appreciation of the quality of the molded plastic parts, while excellent, still requires selected parts to be painted in order for Woody to become color accurate. Of the two, the unboxing video is naturally the more boring one. It's skippable if you don't plan to get the model kit. But if you do, then you might want to take a look at what comes with the kit to see if it's something that you want to work with.


 Secondly we have the assembly and post-assembly review video (see above) in which I put together the main sub-assemblies - head, cowboy hat, torso, pelvis, arms, hands, legs, feet, and gun holster - that was completed off-camera earlier. Because a video of the full assembly process (i.e. from sprue to completed product) would've taken too long, I had shortened the on-camera assembly process to prevent the video from becoming too boring. In this video I also provide you with a 360 degree view of the partially-painted Toy Story 4: Woody plastic model kit.


FourEyedMonster Miniatures YouTube Channel

 If you are interested in viewing videos of other projects, please subscribe to my YouTube Channel FourEyedMonster Miniatures by either clicking on (a) the banner above or (b) the following link: => https://www.youtube.com/channel/UCFKjSgN9sR4U2Lg5_wSFZhg  Soon I'll be working on more complicated projects, like Gundam mecha model kits. Until next time, be well, and be happy.


https://shireworks.blogspot.com/https://www.facebook.com/shire.works

https://www.facebook.com/FourEyedMonster-313145002078520/

Saturday 5 November 2022

Woody [Completed: Out-of-the-box build of the Bandai Toy Story plastic model kit with selected parts painted]

 It's not often I get to say this, but one whole project series is now complete! While my Toy Story project comprises only a measly pair of plastic model kits, I'll still gladly take the win, however small. That Woody turned out better than I expected is the cherry on top. Maybe its because I like Buzz Lightyear better as a character. Or maybe I didn't truly believe Woody would make a good kit (he's actually a soft toy after all). Whatever the reason was, I ended up loving the shelf-presence that the Bandai Cinema Rise Standard - Toy Story 4: Woody kit had, more than Buzz. Way more.


Toy Story 4: Woody; a Bandai Cinema Rise Standard plastic model kit [completed, front view]

Toy Story 4: Woody; a Bandai Cinema Rise Standard plastic model kit [completed, back view]

 Putting Woody together was a much simpler and more straightforward process compared with what I experienced with Buzz Lightyear. Reason for this was an absence of gimmicks in Woody, versus the one found in Buzz's spring activated jet-pack wings. This in turn translates into uncomplicated parts sans somewhat fiddly spring mechanisms. However more work is needed for Woody in the form of painting of selected parts in order to make him color accurate. So the overall effort needed to get to the end result (of a fully-build, partially painted kit) is still roughly the same.


Major sub-assemblies of Toy Story Woody prior to the final assembly process

 Individual sub-assemblies such as Woody's face and hand options, his arms, torso, pelvis/groin, legs, and hat were first put together prior to the final assembly process. Below are images of the various sub-assemblies, with the corresponding captions describing the work done on them. By looking at the individual sub-assemblies in detail before putting them together to make up the final kit, I feel that we can better appreciate the myriad of little details that may get lost in the overall picture.   


Cowboy hat in its original molded-in brown color, but with the band painted in umber

Face options:: the middle one is painted (cheeks and lips) while the ones on the left/right are not

Both arms (checkered grooves panel lined with orange rust) and all the hand options

Torso plus neck (front view) with the neckerchief, shirt (panel-lined with orange rust) & buttons (painted with gunmetal and black), vest (panel-lined with black), and sheriff's badge (given a dark brown wash)

Torso plus neck (back view) with the neckerchief, shirt, and vest with pull-string ring

 One thing that kind of disappointed me about this kit was the lack of a gimmick for Woody. But to be fair, the only gimmick suitable for Woody would've been an actual working pull-string that activates a recording of his voice like in the movies. That's impossible for a relatively cheap plastic model kit. Meanwhile I love how Bandai has got the articulation spot on for Woody. For example Woody's knee can bend forward like a marionette, similar to what you would see with a ragdoll toy, which is what I believe Woody to be. So essentially this is still a fantastic model kit representation of Woody.


Pelvis/groin (front view) comprising the jeans panel-lined with orange rust; the belt loops painted in blue; and the belt buckle given a dark brown wash

Pelvis/groin (back view) comprising jeans panel-lined with orange rust, and belt loops painted in blue

Gun holster in molded-in brown with the ribbon painted a combination of red, gold, and dark brown

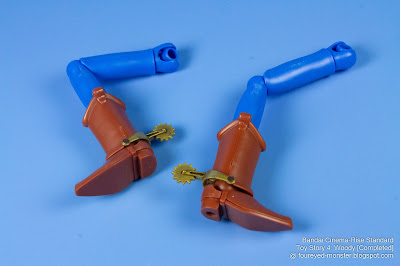
Legs with jeans and boots in their original molded-in colors (i.e. blue and brown respectively) while the molded-in gold boot spurs were given a dark brown wash

Hexagonal clear display base, together with a peg attaches Woody securely to the base

 Earlier I mentioned that Woody seemed to have greater shelf presence than Buzz Lightyear, Perhaps it's due to Buzz's relative lack of vivid colors in comparison with Woody, or it's because Buzz is shorter than Woody, or maybe it's the fact that Woody has a gigantic face versus Buzz's significantly smaller facial profile. Or perhaps I'm just making something out of nothing. Anyway, one thing is for sure. They both look great together. They are best buddies after all. So if do you get one of the Bandai Toy Story kits, you can't afford to ignore the other. In other words, I recommend getting both.    


Buzz Lightyear and Woody on separate display bases that have been linked together (front view)

Woody and Buzz Lightyear on separate display bases that have been linked together (back view)

 Following the completion of Woody and Buzz, I'll be headng towards what are technically more difficult and time consuming projects, namely Gunpla or mecha kits. Those require more planning and painting, and a lengthier project time from start to finish. Or I might even continue with some shelved armored fighting vehicle projects, although I'll likely work on the former rather than the latter for now. In any case, this brief relaxing hobby period is over for now, at least until I'm mentally worn down again by the complexities of the more difficult mecha builds. Regardless, I'm just thankful the hobby train shows no sign of derailing yet. For that I'm grateful. Until my next post, be well and happy!  


https://www.facebook.com/FourEyedMonster-313145002078520/

https://shireworks.blogspot.com/https://www.facebook.com/shire.works

FourEyedMonster Miniatures YouTube Channel

Wednesday 2 November 2022

Toy Story 4: Woody [Painting selected parts of the Bandai Cinema-Rise Standard model kit]

 Previously one of my major hobby no-nos was painting parts while they were still attached to the sprue. And while that still holds true in many instances (especially when the section attached to the sprue needs to be painted as well), it is no longer a hard and fast rule for me. In the case of Woody, almost all the parts that had to be painted could be done with them still attached to the sprues. This was possible because most of the painting involved simple tasks such as straightforward panel-lining, and the application of weathering pastels. Even when a part needed to be painted, it was only done on sections of it and not to the whole part. Here then is how I made Woody color accurate ...


Painting on the sprue ... a big no-no in most cases but acceptable for the Toy Story Woody project

 Easiest to paint were parts still on the sprue that required only panel-lining, for example Sprue B1, which comprises parts for Woody's checkered shirt. What requires painting on this sprue is the lines that make up the checkered pattern on Woody's shirt. In what I believe was a brilliant design choice, Bandai made these lines in the form of grooves. That made a potentially difficult painting exercise into a relatively easy one. Now instead of depending on a steady hand to paint the checkered pattern, all I needed to do was to apply generous amounts of panel-line-paints into the grooves.     


Before painting: Sprue B1 comprising parts for Woody's checkered shirt

After painting: Woody's checkered shirt parts panel lined with orange rust paint

Before painting: Parts making up the pelvic/groin section of Woody's jeans

After painting: Pelvic/groin section of Woody's jeans panel lined with orange rust paint

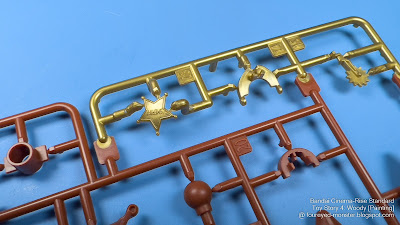
 Similar to the panel lining process, the injected-gold parts required only a wash for them to be considered painted. A dark brown wash helped bring out the details as well as add depth to parts such as the sheriff's badge, the belt buckle, and the bot spurs. Initially I was tempted to paint these parts in metallic gold paint. But I refrained from doing so because I wanted the injected-gold parts to retain a toy-like look to them. To me, a plasticky fake gold look to the sheriff's badge would be more in keeping with the fact that Woody is a soft toy than having the badge in actual metallic gold hues.


Before painting: Injected-gold parts making up the belt buckle and boot spur

After painting: Belt buckle and boot spur given a dark brown wash

Before painting: Injected-gold parts making up the sheriff's badge and boot spur

After painting: Sheriff's badge and boot spur given a dark brown wash

 Meanwhile certain sections of Woody's cowboy hat, gun holster, and belt were painted using acrylic paints. To be specific: (i) the band around the hat was painted in umber; (ii) the ribbon on the gun holster was painted a combination of red, gold, and dark brown; and (iii) lastly the belt loops on the belt had to be painted in the blue of the jeans because it was originally molded in brown (see below).


Before painting: Brown parts comprising the cowboy hat, gun holster, and belt/belt loops

After painting: Band on cowboy hat painted umber, ribbon on gun holster painted red/gold/dark brown, and belt loops on the belt painted in the blue colors of the jean

 And then there were the parts that needed to be cut from the sprue before any painting could be done. This was because the very sections attached to the sprue were the areas that required painting. That being said, technically the parts could still be painted on the sprues provided the aforementioned areas were completely hidden from view after assembly. Unfortunately in Woody's case the areas attached to the sprue won't be hidden from view after assembly, namely the pull-string ring, the white parts o the vest, and all four buttons found on Woody's shirt and sleeves.  


Before painting: White parts making up the pull-string ring and white sections of Woody's vest

After painting: Pull-string ring and white sections of Woody's vest given a black wash

Before painting: White parts making up the buttons on Woody's yellow checkered shirt

After painting: Edges of the white buttons (on Woody's shirt/sleeves) painted gun metal/black

 Finally I painted Woody's face, one of the three facial options anyway, using weathering pastels that came in skin tone hues. All I did was to give Woody rosy cheeks and add some color to his lips. Below is a comparison between a painted Woody face (middle) and the unpainted ones (left/right).


Woody face painted with pastels (middle) compared to unpainted faces (to the left and right)

 With the painting done, Woody is ready for his main sub-assemblies (i.e. head, limbs, body, etc.) to be put together, and following that for his final assembly process to begin. Because assembly of the Woody plastic model kit is expected to be easier compared with Buzz Lightyear, due largely to the lack of gimmicks for the former, I should be able to complete Woody as early as end of this week. Then it's a matter of writing up the process and uploading both the relevant blog post and videos. Looks like it's going to be a busy few days ahead. I better get to it then. Hopefully I'll be back with completed photos of Woody by next week or even before the week is over. Cheers! 


https://shireworks.blogspot.com/https://www.facebook.com/shire.works

https://www.facebook.com/FourEyedMonster-313145002078520/
Related Posts Plugin for WordPress, Blogger...