Thursday 29 August 2019

MG RX-78-2 Gundam Ver.3.0 [Body Unit Completed, Body Unit Part 5 of 5]

As someone who prefers an orderliness to the build process, I had divided up assembly of the Body Unit into specific build sections i.e. the Inner Frame, Outer Panels, Ransel/Backpack and Head. Breaking up a larger body of work into smaller pieces not only made the build processes much more manageable but it also had an added advantage of invoking a greater sense of accomplishment. This is important to stave off the dreaded hobby malaise - a scourge that has resulted in many a scale model kit or miniature figurine to be abandoned half-finished and left in storage to gather dust.  

Master Grade RX-78-2 Gundam Version 3.0: Body Unit (three-quarter view from the front) 
Master Grade RX-78-2 Gundam Version 3.0: Body Unit (three-quarter view from the back)

In the series of photos shown here, you would've noticed the LED lights weren't switched on. That I will leave for after the Head Unit has been attached to the Body Unit. Inside the Body Unit is a huge cavity which houses the LED Unit in the upper torso and the Core Fighter in the lower torso. First though, the fighter will have to be transformed into a compact form before it can fit into the cavity space. But since there is a single molded piece that mimics the fighter in its 'folded-in' form, it's likely I'll paint that part and use it in lieu of the actual Core Fighter which will be displayed separately.

RX-78-2 Gundam's Body Unit completed and awaiting its Head, Arm and Waist/Leg Units
After the neck is attached the LED Unit will be housed within the upper torso, and in order to ...
 ... access to the light's on/off swtich, the Ransel (Backpack) has to be temporarily detached from the torso
Thus far the color scheme is a mix of primary colors, metallic hues, white and a bluish dark grey

Up to this stage, the only complaint I have of this excellent kit is that only sticker decals are provided for detailing work. I prefer either water decals or at least dry transfer decals, both of which provide a more realistic finish. While water decals for this specific kit are available as a standalone purchase, they seem to be out of stock at my favorite Japan online store for the moment. Anyway, below is a series of photos starting with a top down view, then transitioning to a bottom up view.

Top down view of the completed RX-78-2 Gundam (Master Grade Version 3.0) Body Unit
Clear part atop the neck serves to redirect light from the LED Unit upwards towards the Head Unit
Front view of the completed RX-78-2 Gundam Body Unit
Cavity within the lower torso eventually houses the Core Fighter (or a single molded piece resembling the fighter)
Bottom up view of the completed RX-78-2 Gundam (Master Grade Version 3.0) Body Unit

Work on the 1/100 scale Master Grade RX-78-2 Gundam Version 3.0 is progressing surprisingly well, moving along faster than expected. Actual completed work has gone much further ahead of the blog posts, so much so I'm thinking of posting twice a week if I can find the time. For now, I plan to give you, my dear readers, a short break from Gundam, which admittedly isn't everyone's cup of tea. So for the upcoming two posts I plan to reveal the 1/12 scale Race Queen figurine - from her final stages up to the completed photos and videos. All's fine and I feel good. So I leave you for now with the immortal words of Freddie Mercury circa 1985 during Live Aid ... All Right!

https://shireworks.blogspot.com/https://www.facebook.com/shire.works

Friday 23 August 2019

MG RX-78-2 Gundam Ver.3.0 [WIP: Neck & LED Light, Body Unit Part 4 of 5]

While the neck region was the easiest step of the entire RX-78-2 Gundam Body Unit to paint and assemble, it did however require the addition of an LED light unit which I hadn't attempted before. Fortunately, though, the Bandai LED Unit (Yellow) was a straightforward propriety lighting system that did not require any extensive knowledge of electrical wiring.

Master Grade RX-78-2 Gundam Version 3.0 work-in-progress: Neck region with LED light switched on

Only a few parts were involved in the paint/assembly process of the neck region. No new colors were needed as the color scheme utilized existing paint mixes. And from the outset it was clear that its design was to channel light from a LED lighting system housed in the Body Unit onto the Head Unit. 

Pieces of the RX-78-2 Gundam neck region all laid out prior to assembly
All the pieces were painted except for the clear part and the ring-like connector it's attached to
Neck region of the RX-78-2 Gundam fully assembled sans the LED lighting unit

To light up the clear part in the neck - which subsequently lights up the eyes on the Head Unit, a story for another day - I used Bandai's proprietary LED Unit. Also available are units with either blue or green lights but the RX-78-2 Gundam required the version with the yellow light. Putting together the LED Unit (see series of photos below) was a quick and effortless task; the only tools required are a nipper to cut the part off its sprue, a hobby knife (or sanding stick) to clean up nub marks and a Philips screwdriver to securely fasten the cover onto the LED Unit and keep the batteries in place.

Bandai LED Unit (Yellow)
Assembly instructions for the LED lighting unit was printed on the insides of the packaging
Instructions state that the LED unit requires two LR41 alkaline cell batteries in order to light up
Bandai's LED unit comes in two separate parts and a screw to put them together

One complaint I have of the Bandai LED Unit is that the battery contacts were a tad wonky. At one point I couldn't switch on the light and had thought my LED Unit was defective. But after fiddling about with the contacts and repositioning them with a toothpick, I managed to get the light to turn on.

LED unit parts out of the packaging and ready to be assembled plus LR41 batteries from Daiso
LED unit's parts all cleaned up and the batteries out of their packaging
Cover enclosing the LR41 batteries inside the LED unit needs to be screwed on with a Philips screwdriver
Isometric view of the unlighted Bandai LED unit
Isometric view of the LED unit with its lights on (note: lights look dim when viewed from the side)

When viewed from a side angle, the brightness of the LED light seemed a bit dim. However when viewed from a top down angle the light looked much brighter. In a way, this makes sense because the light needs to be directed upwards towards the RX-78-2 Gundam's Head Unit to light up its eyes. 

Top down view of the unlighted Bandai LED unit
Top down view of the LED unit with its lights on (note: lights look brighter when viewed from above)

Upon completion of the LED lighting unit, it was then attached to the neck part (see below). The connection is secure as the neck part was molded to accommodate the proprietary LED Unit.

RX-78-2 Gundam neck region prior to the LED unit being attached to it
RX-78-2 Gundam neck region with the LED unit attached to its underside
RX-78-2 Gundam neck region complete with LED unit now ready to be fixed onto the torso

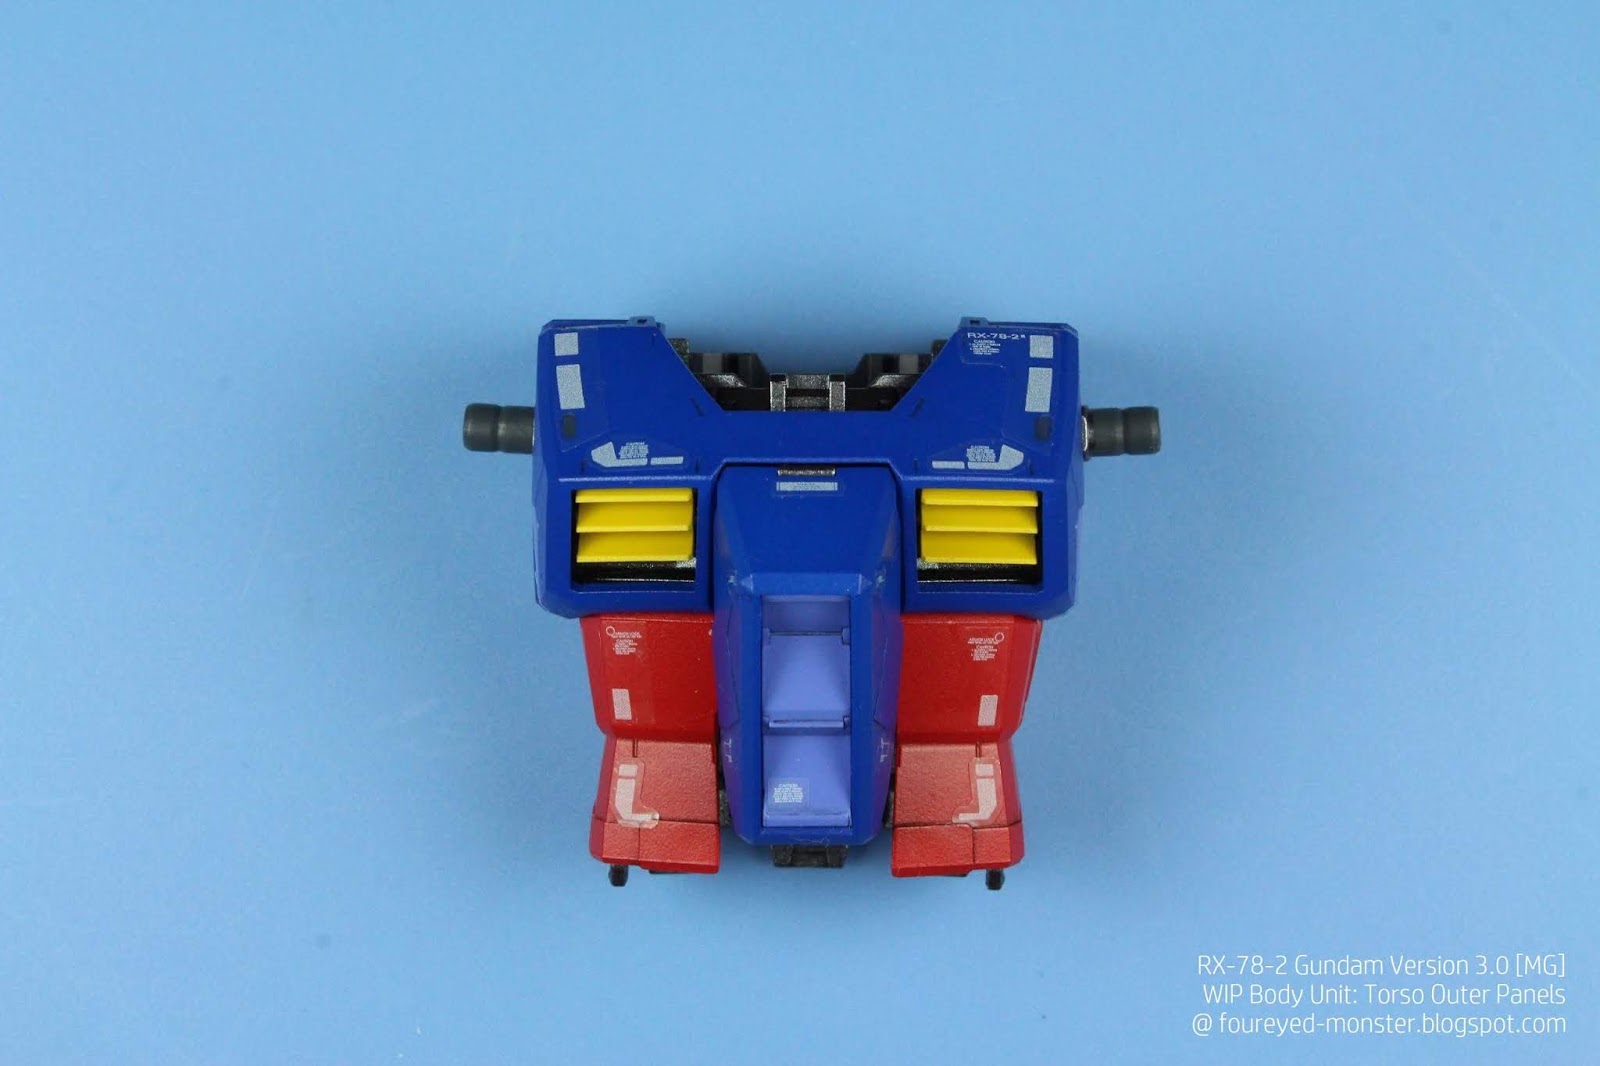
At this stage, the various sub-assemblies making up the RX-78-2 Gundam's Body Unit is essentially done. So all that remains to be done, for the Body Unit at least, is to combine the Neck plus LED Unit as well as the Ransel (Backpack) to the Torso, which itself comprises Outer Panels attached to an Inner Frame. Once that's done and the requisite photos taken, I can then move on to the next stage of the build. Actually before that happens I'm hoping to complete a different project which is in its final stages i.e. the 1/12 Race Queen figurine. For now though, it's goodbye until next week.  

https://www.facebook.com/FourEyedMonster-313145002078520/

Friday 16 August 2019

MG RX-78-2 Gundam Ver.3.0 [WIP: Ransel/Backpack, Body Unit Part 3 of 5]

Initially I was confused as to what a ransel even was. A quick online check showed it's Dutch for a satchel or rectangular backpack. The Japanese equivalent is randoseru, a term that is borrowed from the Dutch ransel which itself is borrowed from the German word ränzel. That perhaps explains why the Japanese language assembly instructions refer to the gundam's 'backpack' as ransel. Anyway, that's enough of etymology for one day. On then to the 1/100 scale ransel of the RX-78-2 Gundam.    

Master Grade RX-78-2 Gundam Version 3.0 work-in-progress: Ransel (Backpack)

Some new colors were utilized at this stage, for example a bluish white hue (Mr.Color Gundam UG01 MS White), a metallic color (Tamiya XF-26 Dark Copper) and a translucent tint (Tamiya X-23 Clear Blue). Also used were three different cans of spray paint i.e. Tamiya TS-38 Gun Metal, TS-42 Light Gun Metal and TS-23 Clear Gloss Coat. And apart from these single color paints, a lacquer paint mixture was prepared for the Ransel armor comprising a combination of 85% Mr.Color No.14 Navy Blue, 15% No.13 Neutral Gray and a small drop of No.03 Red.    

Gundam MS White is a slightly bluish off-white hue
Ransel color comprised a mixture of mainly of navy blue, some neutral gray and a touch of red
Versatility of Tamiya acrylic paints means they can mix with either lacquer thinner (left) or alcohol-based (right) thinner
My first use of clear paint (Tamiya X-23 Clear Blue) on an un-primed clear plastic part
Tamiya spray paint used on the ransel: TS-38 Gun Metal, TS-42 Light Gun Metal, and TS-13 Clear Gloss Coat

As has been the case so far, all the separate pieces of the Ransel were painted individually before being assembled. The only part I didn't paint was the connector piece which will eventually fix the Ransel onto the RX-78-2 Gundam's body. Because it's made out of a soft plastic material, I suspect it will not take too kindly to a primer coat or lacquer paints. In most cases these connector pieces are well hidden from view anyway hence negating any need to paint them up.  

Painted pieces of the RX-78-2 Gundam Ransel all laid out prior to assembly
Clockwise from top left: Beam saber/joint connectors and white armor inserted into the Ransel; clear parts into thrusters 
Copper stripes were hand-pained on the light gun metal thrusters i.e. copper sticker decals were not used
Final two sub-assemblies of the RX-78-2 Gundam Ransel
RX-78-2 Gundam Ransel fully painted and assembled

Painting the clear parts of the thruster with clear blue paint was a conscious decision based on the observed color of the jet trail of an in-action thruster. It was certainly more meaningful than leaving it in its original clear non-color state. In addition, the light clear blue goes well with the white and bluish grey hues of the Ransel. Incidentally this was the first time I had ever attempted to airbrush clear paint onto a clear plastic part. For obvious reasons, I couldn't prime the clear parts but the clear paint seems to adhere well to the clear plastic despite its lack of a primer coat. 

Bottom view of the Ransel shows off the clear blue parts of the smaller and larger thrusters
Top view of the Ransel; note the left and right peg-like contraptions are connectors for the beam saber
Thrusters on the Ransel were painted in Light Gun Metal ...
... with stripes of Dark Copper, and then all given a black pin wash

All in all I was extremely pleased with how the Ransel turned out. It sets me up nicely for the last sub-assembly of the RX-78-2 Body Unit. This next step involves a basic LED lighting unit as well as the RX-78-2 Gundam's neck region. It is the easiest section of the Body Unit to complete, at least the one that requires minimal painting. Even the LED lights require no wiring, just some minor assembly. Until then, I bid you goodbye until we meet again in my next post on the blogosphere. 

https://shireworks.blogspot.com/https://www.facebook.com/shire.works

Friday 9 August 2019

MG RX-78-2 Gundam Ver.3.0 [WIP: Torso Outer Panels, Body Unit Part 2 of 5]

Attachment of the outer panels give us an inkling of the familiar form that is the RX-78-2 Gundam as it is arguably its most recognizable attribute apart from the head. That's done and dusted, and below are the work-in-progress photos leading up to the completion of the Torso Outer Panels.  

Master Grade RX-78-2 Gundam Version 3.0 work-in-progress: Torso Outer Panels

In addition to what came before, two new paint colors were used for this stage of painting. Both the Nazca NC-004 Million Blue and Side Red (a mix of white, grey and red) hues are meant to add color variety to the primary blues and reds respectively. While contrast is stark between the Gundam Blue and violet-like Million Blue, it is less so with the pinkish magenta-like Side Red and Gundam Red.  

As per the Gundam norm, all parts were painted separately before being assembled
Nazca Color NC-004 Million Blue is the paint proxy used for the violet outer panels
A lighter, more pinkish red hue forms an alternate outer panel color to the pure reds

Assembly of the outer panels was pretty straightforward without any complications apart from the infuriating decal stickers which I will expound yet again, ad nauseam, later on in this post. 

Pieces of the painted outer panels prior to being attached to the inner frame
Sub-assemblies of the torso: (from top to bottom) the upper, mid- and lower sections
Torso outer panels with sticker decals, all fully attached to the inner frame

Various angled views of the torso with its outer panels attached to the inner frame are shown below.

Torso inner frame with outer panels attached; view from the bottom-up
Torso inner frame with outer panels attached; the top-down view
Again having to use decal stickers was less than ideal. While I'm getting better at using them, more often than not I tend to get really bad results. A particularly bad pair of decal stickers can be found on both sides of the lower torso. I compounded the issue by positioning the sticker at the torso's lower right (on the lower left in the photo showing the front view of the torso; second photo from bottom) wrongly. Placing decal stickers on uneven surfaces like grooves is a recipe for disaster as it makes the decal stick out like a sore thumb. Sadly sometimes this cannot be avoided but in this case it could.

Back view of the torso showing the H-shaped connector which will attach to the backpack (ransel)
Side view (from right) of the torso; note parts of the inner frame showing through
Front view of torso; two connectors jutting out from the left and right will attach to the shoulder/arms later
Side view (from left) of the torso; note the panel lining on the grooves which add depth to the outer panels

Next for the RX-78-2 Gundam is its Ransel or backpack. So stay tuned, and have a good one.

https://www.facebook.com/FourEyedMonster-313145002078520/

Related Posts Plugin for WordPress, Blogger...