Sunday 30 August 2020

Star Wars Scout Trooper [WIP: Helmet / Head]

Adopting a top down approach to the Bandai Star Wars 1/12 scale Scout Trooper model kit meant I got to work with the most prominent area of the kit first i.e. the Helmet/Head. This kit also comes with the Aratech 74-Z Military Speeder Bike, which makes a great accompaniment to the figurine itself. While the Scout Trooper and Speeder Bike combo is already a huge project by itself, they both are actually part of an even larger project I have in mind. In future Join The Empire/The Empire Needs You vignettes, I plan to pair various soldiers of the Galactic Empire with 1/12 scale female figurines in imaginary propaganda pieces. For now though, let's take look at the Scout Trooper Helmet.    


Bandai Star Wars 1/12 scale Scout Trooper Work-in-Progress: Helmet/Head


As with all attempts to accurately recreate movie-based figurines, vignettes or dioramas, the output is only as good as its input. And what better reference to use than a book focused solely on the original costumes used in the Star Wars Original Trilogy movies, aptly named Star Wars Costumes (see below). So in terms of color scheme, I have the most accurate reference material possible so there can be no excuses if I mess things up. Well almost, there is always the creative license card to play.


Original Scout Trooper costume as seen here in the book Star Wars Costumes

Details of the Scout Trooper Helmet, also sourced from Star Wars Costumes


Because Bandai Star Wars model kits are engineered so well, it's extremely easy to breeze through the early stages too quickly and introduce irredeemable mistakes into the project workflow. Minor, silly mistakes are then further compounded down the line, leading to a less than ideal end result. But the thing is, even these so-called substandard finishes still look fairly good, which brings us back to how well engineered these kits are in the first place. In short, I plan to put extra effort into an essentially straightforward build in order to prevent complacency from setting in. Nothing goundbreaking, mind you. Hopefully enough to elevate this kit beyond that of a standard out-of-the-box build.


Pieces of the Scout Trooper Helmet cut off the sprue, and in its unpainted form

Initially prior to assembly, only the Comlink Mouthpiece and the Earpieces were painted ...

... here the Scout Trooper Helmet is at the sub-assemblies stage ...

... and here it has been fully assembled with the minor paint job applied early on

Scout Trooper Helmet, fully painted and with its requisite decal applied


Although the kit provides water decals for the Scout Trooper Helmet, only one was used i.e. the grey symbol located on the area near the left cheek. Decals to represent the comlink mouthpiece, earpieces, black stripes and circuclar metallic hinges were all ignored and unused because I felt painting these sections would make the Scout Trooper Helmet look far more realistic. 


Grey symbol/marking on the left side of the Scout Trooper Helmet is a water decal

Black stripes on the forehead and bridge of nose  Mr.Weathering Color (Multi Black)

Black earpiece and metallic/black comlink mouthpiece were both painted prior to assembly


Normally it would be a no-brainer to include weathering on the Scout Trooper so that a higher level of realism can be achieved. But because I intend to include these Galactic Empire soldiers in a 'Join The Army' propaganda vignettes, it wouldn't do to have the Scout Trooper's attire dirtied up and soiled by the Endor Moon environment. Instead, the Scout Trooper (and any other Galactic Empire Soldier for that matter e.g. Stormtrooper, Shoretrooper, etc.) will have on his (or her) pristine attire when posing together with the bevy of young, comely beauties that I'll be painting concurrently. 


Located symmetrically on either side of the helmet are circular hinges, which in real-life allows the front of helmet to be swung upwards, were painted a grey metallic color

Striped indentations on the lower right section of the helmet were left in their original unpainted to mimic the Scout Trooper Helmet as seen in the movies (see second photo from the top)

Back of the Scout Trooper Helmet as painted to mimic how they looked in the movies

Indentations on the lower left section of the helmet were panel lined with black weathering paint

Grey symbol/marking on the left cheek section was the only decal applied on the helmet


Below are photos of the Scout Trooper Helmet arranged so that light doesn't reflect off the eye lens. Apart from that, there isn't any differences between the photos you see below compared to the ones above. On a side note, it's great that Bandai included a reflective lens piece instead of a standard molded piece that you had to paint. Not only does it look better, there is less work involved to boot.


Here, the Scout Trooper Helmet was posed to avoid light reflections on the visor

Circular section on the Comlink Mouthpiece is actually black vs. the rest of it which is metallic

Most prominent area of the Scout Trooper is now completed, so on to the rest


With the most prominent part of the Scout Trooper now complete, it's time to systematically move on to other sections like the torso, arms, legs, etc. It's hard to make a Scout Trooper build exciting, especially if no weathering is involved. Color-wise it's all rather staid with only whites, off-whites, blacks and metallic greys to work with. All I can really do is pay extra attention to little details in the kit and hope it'll make for some interesting work-in-progress posts. Anyway, the weekend is here and it's time to recharge my batteries for the week ahead. Until the next post, stay safe dear readers!


https://shireworks.blogspot.com/https://www.facebook.com/shire.works


Friday 21 August 2020

Space Battleship Yamato 2199, Cosmo Reverse Ver. [WIP - Assembly of the painted Hull Exterior/Interior and Wave Motion Engine; sans weathering]

With scale model kit builds requiring individual parts to be painted first before assembly can begin, even intermediated payoffs can feel like a long time coming. After what seemed like a prolonged period of mundane prep work, airbrushing, top coating and panel lining of the numerous pieces, it was finally time to attempt Phase One of assembly for the 1/1000 scale Space Battleship Yamato 2199 Cosmo Reverse Version. This initial process involved assembly of painted parts comprising the bulk of the Hull Exterior, the Hull Interior, the Wave Motion Engine, and the Exhaust Nozzle.


Space Battleship Yamato 2199 Cosmo Reverse Ver. work-in-progress: Assembly of the fully painted Hull Exterior / Interior and Wave Motion Engine (sans weathering)

Hull Interior (gray green section) is suppose to house the Fighter Hangar Bay (not shown)

Wave Motion Engine (metallic orange part) will likely be covered up by an exterior hull plate armor

At this stage of the build, the ship's paint job is suffering from work prior to Phase One Assembly. For example, the hull looks too shiny due to a gloss top coat that was applied to facilitate panel lining. Moreover the basecoat colors look monotone and dull because I airbrushed the hull pieces without adding any shadows or highlights. In theory, my plan to apply oil dot weathering effects on the Hull Exterior should solve both issues in one go. How? Well, the matt clear coat I'll be applying before and after the process should take care of the glossiness while the weathering effects should introduce some hue variation on the exterior. It's not a plan that's set in stone though as I'll need to test out the technique on a spare piece of hull to see if I can achieve the results I'm after.


So far, only a basecoat, top coat and panel lines have been applied to the Exterior Hull

Hull Interior might be left empty if the Fighter Hangar Bay is displayed independently from the ship

One small gimmick inherent in the kit allows the bottom Hangar Bay door to swing open downwards (see below). Meanwhile, above that particular door is an empty space with grayish green interior walls that is supposed to house a carousel like contraption containing a fleet of Cosmo Falcon Fighters (not shown here). The Hangar Bay lies adjacent to the Wave Motion Engine which in turn connects to the Exhaust Nozzle at the stern of the Yamato. I've painted both the interior and engine to give myself the future option of being able to display the ship together with her exposed innards, if I want to.


Hangar Bay door is a movable part, shown here in the closed position ...

... and in the open position from which, theoretically speaking, fighters can exit from the ship

Wave Motion Engine (metallic orange part) connects to the Exhaust Nozzle (burnt metal part)

As much as I'm happy with how the burnt metal effects on the Exhaust Nozzle turned out, I admit the jury is still out on whether such effects actually gel well with the non-metallic looking Hull Exterior. For the moment at least, I don't think it does. So what I'm hoping for is that the oil dot weathering process is able to lessen the seemingly stark contrast that currently exists between the burnt metal effects and the monotone basecoat hull colors, by introducing hue variation to the latter. 


View of the Exhaust Nozzle from behind the Space Battleship Yamato

Weathering effects should lessen a seeming disconnect between the nozzle and hull

Once upon a time I would've been happy to leave the Hull Exterior as it is right now without doing any further work on it. And I might even have gotten ahead and done so if there wasn't such a stark contrast between the nozzle (metallic with burnt effects) and hull (monotone basecoat). In addition to the oil dot weathering process, I'm also hoping that future application of water decal markings on the hull would makes things that little bit more visually varied thus further reducing the said contrast.


Exterior Hull is still missing a few hull plates/armor and winged attachments ...

... as well as the First Bridge and Upper Deck, which will be painted before being attached  ...

... but essentially most of the pieces are already in place, sans weathering and decals

Something you may have noticed in the photos so far is a Display Stand that the Yamato sits upon. In this case, assembly of the stand was actually Step One in the instructions and for good reason. It's needed to hold up the ship during assembly. And because the stand will likely receive some rough handling during this process, I've left it in its original unpainted state. Only once assembly has been completed will I go ahead to paint the stand and apply its shiny signage stickers. Incidentally the stand will also be used to display in scale fighters as well as the structure holding up these fighters.


Display stand (lower left corner) that's holding up the ship will be painted at a later date

Barrel of the Wave Motion Gun is located slightly below the ship's bow, and it will be closed up with an orange cover piece in the Cosmo Reverse Version of the Space Battleship Yamato

Once Phase One of Assembly was complete, another bugbear of mine resurfaced in a more visual manner. I believe I had gone on record before voicing my dissatisfaction with how small this kit is, and this was made more obvious when placed next to a paperclip and five sen coin (see below). Now if it was meant for tabletop gaming then the size isn't all that bad. As a display piece I wish Bandai would've made more Yamato ships in a bigger scale. I do have one kit in 1/500 scale but most of the ships in this scifi universe comes in 1/1000 scale. I guess I'm being hypocritical considering I don't have much space in the house to display that many 1/500 scale ships. That's human nature for you. 


View from above the work-in-progress Space Battleship Yamato shows off the exposed inner section which will eventually be covered up by the ship's Upper Deck and First Bridge

View from above the work-in-progress Space Battleship Yamato displays the red hull section

Scale comparison of the Space Battleship Yamato 2199 against a paperclip and a five sen coin

Coming up next for this build will be either the Upper Deck section or the Fighter Hangar Bay section i.e. the carousel like contraption I mentioned before. And there's also that test piece I need to do with the oil dot weathering process. So the way forward is clear. I just have to start taking those first steps, which every scale modeler knows is difficult once inertia sets in. Speaking of which, I've managed to kick-start yet another mothballed project, namely the Bandai Star Wars Scout Trooper/Speeder Bike kit. As such, do expect work-in-progress photos and posts of this project to start slotting in between the Volkswagen Beetle, Sturmgeschütz, and Space Battleship Yamato. The more the merrier I say. And I might even add a new figurine project to that courtesy of being inspired by my previous book review. More on that later. For now, have a good weekend ... and wear your mask! 


https://www.facebook.com/FourEyedMonster-313145002078520/

Sunday 9 August 2020

Japanese Figurine Painting Book Review 01: Pygmalion - Obsessive Finish of Girl's Figure, The A to Z of Hiroshi Tagawa's Fascinating Female Images

Hiroshi Tagawa. That's the name of my absolute favorite miniature figurine painter. To me his body of work represents the epitome of realistic figurine painting. If you're an artist seeking to render ultra realistic skin tones and facial features on a three-dimensional miniature figurine, you would be remiss to ignore his painting techniques as well as general work practices. And for the longest time I only had Facebook's badly translated (Japanese to English) posts to rely on, to get even the slightest inkling of what Tagawa-san was doing hobby-wise. But it's finally here, a book by Tagawa-san himself that has English translations! Anyway enough with the fan boy talk. Here then is a quick review of Pygmalion - Obsessive Finish of Girl's Figure, The A to Z of Hiroshi Tagawa's Fascinating Female Images.

Pygmalion: Obsessive Finish of Girl's Figure, The A to Z of Hiroshi Tagawa's Fascinating Female Images (Front Cover)

Pygmalion: Obsessive Finish of Girl's Figure, The A to Z of Hiroshi Tagawa's Fascinating Female Images (Back Cover)


Before I begin this review, I would like to make it clear I have yet to try out the painting techniques on this book. But I'm an experienced enough miniature painter to be familiar with such techniques and also be aware of how they might potentially fit into my existing workflow processes. In short, I'm pretty sure these techniques work, and more importantly they are well suited to my own style of painting. As an added bonus, you'll be able to find a short video at the end of this post showing a quick overview of what's inside the book via its pages being flipped quickly. On the video and photos here, all text on the book is intentionally blurred out to protect the author's intellectual property.   

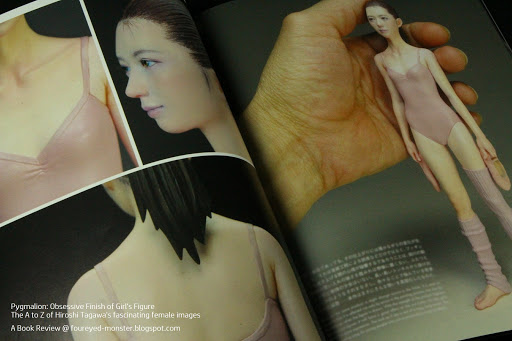
The 1/6 scale Female Android is one of my favorite pieces painted by Tagawa-san


About a third of the book is dedicated to a how-to-paint/prep tutorial of which the end result you can see in the photo immediately below this paragraph. From a cursory glance at the tutorials, I believe Tagawa-san uses a combination of lacquer, enamel and oil paints to achieve the paint effects you see in his work. In addition, he also shows how to place real-life fake eyelashes on the eyelids of the miniature figurines to exponentially increase the realism of the figurine's facial features. In the book, you can also learn how he paints veins and blemishes which makes skin tones look ultra realistic. 

Tutorials in the book are geared towards painting the ballerina girl above
Each painting tutorial step is written in both Japanese and English
In addition, to the how-to-paint guide, there are also descriptions on the resin figurine prep work


Ballerina girl is the only how-to-paint example given in this book and it takes up about one-third of this 96-page book. That leaves the bulk of the content comprising photos of Tagawa-san's completed works, articles about the artist himself and his work area, etc (see below). While this was a bone of contention among some online reviewers i.e. lack of tutorial examples, it wasn't the case for me. I was happy to take quality over quantity. Having a fairly detailed look at how he brings even just one resin figurine all the way from the prep-stage to the final fully painted stage was a real eye opener.    

A large proportion of the book comprises photos of various completed works by Tagawa-san
Tagawa-san's body of has also been on display in art exhibits
The master himself, Hiroshi Tagawa-san (in an article about him and sculptor Hiroki Hayashi)


In line with my wish to get my YouTube Channel up and running with more content, I decided to do a quick page flip viewing video for the book. Please do note that the somewhat blurry book text on the video was intentional in order to safeguard the author's intellectual property. Also blurred out were sections of the book which contained nudity. Personally I've no issue with nudity in miniature figurines as I consider it to be art. However, I'm aware some may be sensitive to it hence the censorship. 


If I had to score this book out of 10, I would give it an 9 out of 10. Being a huge fan of Tagawa-san, I'm frankly just relieved he decided to finally publish a book that highlights his painting techniques. Of course as consumers we'll always want more. More tutorials, more photos, more articles, more detail. But apart from video tutorials or face-to-face classes with the artist, this is about the best one can hope for. In short, I'm extremely happy with my copy of  Pygmalion - Obsessive Finish of Girl's Figure, The A to Z of Hiroshi Tagawa's Fascinating Female Images. I highly recommend it.


FourEyedMonster Miniatures YouTube Channel

https://shireworks.blogspot.com/https://www.facebook.com/shire.works
Related Posts Plugin for WordPress, Blogger...