Showing posts with label Buzz Lightyear. Show all posts

Saturday, 5 November 2022

Woody [Completed: Out-of-the-box build of the Bandai Toy Story plastic model kit with selected parts painted]

 It's not often I get to say this, but one whole project series is now complete! While my Toy Story project comprises only a measly pair of plastic model kits, I'll still gladly take the win, however small. That Woody turned out better than I expected is the cherry on top. Maybe its because I like Buzz Lightyear better as a character. Or maybe I didn't truly believe Woody would make a good kit (he's actually a soft toy after all). Whatever the reason was, I ended up loving the shelf-presence that the Bandai Cinema Rise Standard - Toy Story 4: Woody kit had, more than Buzz. Way more.


Toy Story 4: Woody; a Bandai Cinema Rise Standard plastic model kit [completed, front view]

Toy Story 4: Woody; a Bandai Cinema Rise Standard plastic model kit [completed, back view]

 Putting Woody together was a much simpler and more straightforward process compared with what I experienced with Buzz Lightyear. Reason for this was an absence of gimmicks in Woody, versus the one found in Buzz's spring activated jet-pack wings. This in turn translates into uncomplicated parts sans somewhat fiddly spring mechanisms. However more work is needed for Woody in the form of painting of selected parts in order to make him color accurate. So the overall effort needed to get to the end result (of a fully-build, partially painted kit) is still roughly the same.


Major sub-assemblies of Toy Story Woody prior to the final assembly process

 Individual sub-assemblies such as Woody's face and hand options, his arms, torso, pelvis/groin, legs, and hat were first put together prior to the final assembly process. Below are images of the various sub-assemblies, with the corresponding captions describing the work done on them. By looking at the individual sub-assemblies in detail before putting them together to make up the final kit, I feel that we can better appreciate the myriad of little details that may get lost in the overall picture.   


Cowboy hat in its original molded-in brown color, but with the band painted in umber

Face options:: the middle one is painted (cheeks and lips) while the ones on the left/right are not

Both arms (checkered grooves panel lined with orange rust) and all the hand options

Torso plus neck (front view) with the neckerchief, shirt (panel-lined with orange rust) & buttons (painted with gunmetal and black), vest (panel-lined with black), and sheriff's badge (given a dark brown wash)

Torso plus neck (back view) with the neckerchief, shirt, and vest with pull-string ring

 One thing that kind of disappointed me about this kit was the lack of a gimmick for Woody. But to be fair, the only gimmick suitable for Woody would've been an actual working pull-string that activates a recording of his voice like in the movies. That's impossible for a relatively cheap plastic model kit. Meanwhile I love how Bandai has got the articulation spot on for Woody. For example Woody's knee can bend forward like a marionette, similar to what you would see with a ragdoll toy, which is what I believe Woody to be. So essentially this is still a fantastic model kit representation of Woody.


Pelvis/groin (front view) comprising the jeans panel-lined with orange rust; the belt loops painted in blue; and the belt buckle given a dark brown wash

Pelvis/groin (back view) comprising jeans panel-lined with orange rust, and belt loops painted in blue

Gun holster in molded-in brown with the ribbon painted a combination of red, gold, and dark brown

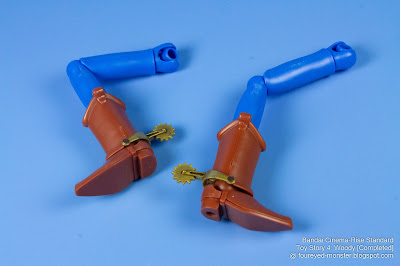
Legs with jeans and boots in their original molded-in colors (i.e. blue and brown respectively) while the molded-in gold boot spurs were given a dark brown wash

Hexagonal clear display base, together with a peg attaches Woody securely to the base

 Earlier I mentioned that Woody seemed to have greater shelf presence than Buzz Lightyear, Perhaps it's due to Buzz's relative lack of vivid colors in comparison with Woody, or it's because Buzz is shorter than Woody, or maybe it's the fact that Woody has a gigantic face versus Buzz's significantly smaller facial profile. Or perhaps I'm just making something out of nothing. Anyway, one thing is for sure. They both look great together. They are best buddies after all. So if do you get one of the Bandai Toy Story kits, you can't afford to ignore the other. In other words, I recommend getting both.    


Buzz Lightyear and Woody on separate display bases that have been linked together (front view)

Woody and Buzz Lightyear on separate display bases that have been linked together (back view)

 Following the completion of Woody and Buzz, I'll be headng towards what are technically more difficult and time consuming projects, namely Gunpla or mecha kits. Those require more planning and painting, and a lengthier project time from start to finish. Or I might even continue with some shelved armored fighting vehicle projects, although I'll likely work on the former rather than the latter for now. In any case, this brief relaxing hobby period is over for now, at least until I'm mentally worn down again by the complexities of the more difficult mecha builds. Regardless, I'm just thankful the hobby train shows no sign of derailing yet. For that I'm grateful. Until my next post, be well and happy!  


https://www.facebook.com/FourEyedMonster-313145002078520/

https://shireworks.blogspot.com/https://www.facebook.com/shire.works

FourEyedMonster Miniatures YouTube Channel

Friday, 21 October 2022

Toy Story 4: Buzz Lightyear [Videos of the Unboxing, Assembly, and a Full 360 View]

 While a photo is supposedly worth a thousand words, the few photos I posted of the non-scale Bandai Cinema Rise Standard Toy Story 4: Buzz Lightyear plastic model kit doesn't do it justice. You have to see this kit in person, or the next best thing i.e. vicariously via video, to appreciate just how cool this kit is. For that reason, I've embedded two videos about the Buzz Lightyear project, with descriptions about what each entails, so you can decided if they are worth watching.         


 First up is the unboxing and pre-assembly video (see above) in which we take a quick look at what's inside the box before proceeding to look at each individual sprues in detail. Here you can get a better appreciation of the excellent quality of the molded plastic parts, so much so that it negates the need for them to be painted in order to look good. Of the two, the unboxing video is naturally the more boring one. It's skippable if you don't have plans to get the model kit. But if you do, then you might want to take a look at what comes with the kit to see if it's something that you can work with.


 Secondly we have the assembly and post-assembly review video (see above) in which I put together the main sub-assemblies - head, helmet, torso, jet-pack, pelvis, arms, hands, legs, and feet - that I had assembled off-camera earlier. I figured a video of the full assembly process (i.e. from sprue to completed product) would take too long hence I shortened the on-camera assembly process to prevent the video from becoming a snooze fest. In this video I also show off Buzz's wing gimmick as well as provide you with a 360 degree view of the model kit.


FourEyedMonster Miniatures YouTube Channel

 If you are interested in viewing videos of other projects, please do visit my YouTube Channel FourEyedMonster Miniatures by either clicking on the banner above or by clicking on the following link: => https://www.youtube.com/channel/UCFKjSgN9sR4U2Lg5_wSFZhg  Soon I'll be working on Buzz's good friend Woody next. Until then, stay safe, be well, and be happy.


https://shireworks.blogspot.com/https://www.facebook.com/shire.works

https://www.facebook.com/FourEyedMonster-313145002078520/

Monday, 17 October 2022

Buzz Lightyear [Completed: Out-of-the-box build of the Bandai Toy Story plastic model kit, with minor painting]

 Once in a long while, it's always nice to take on a relatively simple project that's not only easy to build but also looks good with almost no work done apart from what is required in the instructions. Such projects can give one a sense of accomplishment, a dose of natural dopamine if you will, in return doing the bare minimum to finish a model kit. In other words, the lazy-ass-projects that every modeler needs once in a while as a hiatus from more ambitious projects, which involve lots of painting. This Bandai Toy Story 4: Buzz Lightyear Cinema Rise Standard plastic model kit involved only minor painting, hence it's already completed following from the unboxing post two weeks ago.


Toy Story 4: Buzz Lightyear; a Bandai Cinema Rise Standard plastic model kit [completed, front view]

Toy Story 4: Buzz Lightyear; a Bandai Cinema Rise Standard plastic model kit [completed, back view]

 Buzz has only one notable gimmick and it's a good one. The wings on Buzz's back can be folded into the jet-pack, and then at the push of a red button located at the front of the spacesuit, flip open into an extended/flight configuration. I made a short video demonstrating this gimmick as you can see below.


 Below are photos of the main sub-assemblies - the jet-pack, body, helmet, head options, arms, hand options, pelvis, legs, and feet - that were put together prior to Buzz Lightyear's final assembly process. In hindsight, looking at the completed sub-assembles laid out together on the worktable (see below), the one and only thing I would do differently is to paint the three oblong buttons at the front of Buzz's spacesuit instead of applying the colored stickers that were provided with the kit.


Major sub-assemblies of Buzz Lightyear prior to the final assembly process

 Although this project is a straight out-of-the-box assembly, the one essential thing I had to do was paint Buzz's face. It's the minimum effort needed to make the kit look presentable. To show why Buzz's face required additional work, I painted just one for comparison to the other two unpainted faces. What I did was use pastels to apply a rosy blush on his cheeks as well as add shading below his lip. In addition I applied brown panel lining onto the swirl on his chin. Just this a little bit went a long way in making the face look 'alive'. Even looking at the faces now, one extra thing I could've done to make them better was to paint the lips. Something to take note of when working on Woody.


Buzz's face was painted using Tamiya Weathering Master pastels (note: only the middle face was painted, and here it's compared with the unpainted faces on the left and right)

 Another gimmick I thought that Buzz had had was the space helmet. Initially I had thought the helmet could slide open in one smooth action. But there is only two default positions for the helmet per se i.e. fully closed or half-open with the latter being simulated by just removing the front half of the helmet. There are however what I would call 'mini-gimmicks' on the body of the spacesuit itself. I term them mini-gimmicks because they don't really have the 'wow' factor, and don't really do anything. More on these mini-gimmicks later as I touch on the sub-assemblies concerned (i.e. the arms).


Buzz's spacesuit body and the two halves of the helmet (front view)

Buzz's spacesuit body and the two halves of the helmet (back view)

 But I am being a tad unfair in expecting lots of complicated gimmicks for a simple plastic model kit like the Bandai Buzz Lightyear one that you see here. For the one major gimmick that this kit does have i.e. the extendable wings, the spring mechanism for it is housed within the jet-pack (see below). This spring mechanism connects via plastic parts to the red button on the chest. When the said red button is pressed, the mechanism comprising plastic parts and metal springs work in tandem to allow the wings to flip out and extend straight out on either side, in a flight configuration. 


Jet-pack with wings, which attaches to the back of Buzz's spacesuit

Innards of the jet-pack with the spring mechanisms exposed

 Meanwhile, an interesting mini-gimmick consists of a simple thing like a red button on the right arm that can be depressed, but does nothing. Another is a wrist panel on the left arm that opens up to show a 'control panel', which is essentially just a sticker representation of a control panel. And as mentioned earlier, the spacesuit helmet does not slide open hence I do not consider it a gimmick at all, mini or otherwise. It can only be put in place or removed completely.

 And in case you were wondering, you cannot recreate the iconic scene from Toy Story in which Buzz's left hand is pressing on the red button on his right arm. This is because the left hand is too short to reach the red button. There is a box art image which shows Buzz doing just that. So what gives? To me it's just an optical illusion. If you photograph Buzz at a certain angle it would seem as if he was pressing on the red button. However, that's not possible for the reason I mentioned earlier.


Buzz's left hand options and arm includes a mini-gimmick in which the wrist panel opens up

Right hand options and arm; includes a mini-gimmick in the form of a red button that can be depressed

 As for Buzz's pelvis/groin area, legs and feet, everything is pretty straightforward with no gimmicks in sight. They comprise a lovely combination of white, green, light gray, and purple parts that look fantastic even as an unpainted, straight out-of-the-box build (see below).  


Pelvis/groin area of Buzz's spacesuit (front view)

Pelvis/groin area of Buzz's spacesuit (back view)

Legs and feet sections of Buzz Lightyear's spacesuit

 Lastly is the hexagonal clear display base included with the kit. It's a nice enough base to use with Buzz Lightyear. Also included is a cylinder-like peg that connects Buzz to the base. All in all, the base is functional, and serves the purpose it was designed for with minimum fuss. Unless you plan to display Buzz in a dynamic pose e.g. of him flying like Superman, this base should work just fine.


Hexagonal clear display base, together with a peg attaches Buzz securely to the base

 Of course as a Toy Story project, just Buzz by himself isn't complete when considering there is a Woody plastic model kit from the same product series i.e. the Bandai Cinema Rise Standarrd series. So following close on the heels of this project is one on Woody himself. It's a no-brainer for me to begin work on Woody next before I start with any other project. And until Toy Story's Woody is unboxed in the upcoming blog post - stay safe, be well, and be happy.


https://shireworks.blogspot.com/https://www.facebook.com/shire.works

https://www.facebook.com/FourEyedMonster-313145002078520/

Thursday, 6 October 2022

Toy Story 4: Buzz Lightyear [Unboxing & Pre-Assembly Review of the Bandai Cinema-Rise Standard model kit]

 After an ambience of doom and gloom permeated by the subject matter that is Evangelion, it's time for something a little more lighthearted in the form of Toy Story character, Buzz Lightyear. For this little Pixar Toy Story project of mine, I'll be working first on Buzz followed by Woody, the other half of this dynamic duo. You really can't have one without the other so it's both of them or the project is a non-starter. Let's begin now with an unboxing of the Bandai Cinema-Rise Standard Toy - Story 4: Buzz Lightyear plastic model kit, and see what to expect inside the box.


Bandai Cinema-Rise Standard - Toy Story 4: Buzz Lightyear plastic model kit

 To the best of my knowledge, I think Bandai only ever produced two plastic model kits for their Cinema-Rise Standard line, namely Buzz Lightyear and Woody. In fact, Bandai has another line of figurine kits called Figure-Rise Standard which comprise characters from anime series such as One Piece, Dragon Ball, Naruto, Demon Slayer, Ultraman, Gundam, etc. It seems strange as I'm not sure why the Toy Story 4 kits were differentiated into their own series.    


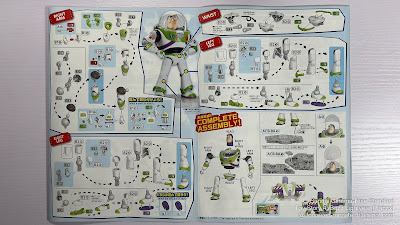
Instruction pamphlet: back and front pages are colored ...

... while the pages inside the covers are mostly in black and white ...

... with mainly visual instructions interspersed by a few lines of instructions ...

... but the final two pages of instructions revert back to color.

 Coming in the form of a folded pamphlet, the instructions are mainly visual and self-explanatory interspersed with a few lines of instructions in both English and Japanese. A cursory glance tells me that while on the whole the kit shouldn't present any problems to a scale modeler who doesn't have many projects under his belt, there are certain sections like the 'wing gimmick mechanism' that may pose a significantly tougher challenge than what beginners are used to. It requires the placement of metal springs and plastic parts in a way that allows the wings to fold into the backpack, stay in place, and subsequently flip out at the press of a button. But let's cross that bridge when we come to it.


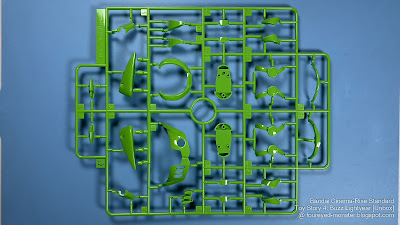
Sprue A: Parts for the eyebrows (dark brown), faces (flesh), buttons (red), and helmet etc. (clear)

Sprue B1: Glossy white parts for Buzz's body/arms/hand armor i.e. the space suit

Sprue B2: Glossy white parts for the space suit's pelvis, legs, and feet sections as well as the backpack

Sprue C: Glossy green parts for the neck, body, arms, hands, knee, backpack, and belt

Sprue D: Matte off-white parts for Buzz's eyes, teeth

Sprue E: Semi-gloss light gray parts for the space suit's joints, helmet seals, and backpack

Sprue F: Matte purple parts used on the head and neck as part of the space suit's inner-wear

Sprue G: Semi-gloss black parts for the inner frame, for the space suit inner-wear (i.e. shoulders, waist, and lower abdomen) as well as for the pupils

Springs: these metal parts form part of the backpack's mechanism 

 For once stickers aren't a hindrance to a good build because it doesn't matter if Buzz Lightyear looks toy-like. After all he is technically a toy. So rather than hinder how Buzz will look in the final build, the stickers will actually enhance the toy-like quality of the subject matter. Despite Buzz being a toy, Bandai got it right by not compromising on the quality of the parts i.e. the finish of the molded plastic parts is absolutely excellent (check out the glossy white and green parts in the photos above). So even in a straight out-of-the-box build, I expect this Buzz Lightyear kit to look great. They could have gone the other way and made cheap, plasticky looking parts. But I'm glad they didn't.   


Stickers for the space suit armor, its buttons, the wings, and for the irises/pupils 

Sprue ACB-BA: clear base for displaying Buzz plus base connector piece

 Another great thing about this kit is that it comes with its own display base. I always appreciate it when a base is provided, and it's of good quality as well as appropriate to the kit. The base in question is a flat hexagonal clear piece with a connector piece that fixes onto a similar base provided with the other Bandai Cinema-Rise Standard kit i.e. the Toy Story 4:Woody plastic model kit. However, if you want Buzz Lightyear to do a dynamic flying pose with his backpack wings extended, then you are out of luck. If this is the case then you would've to get a third party display base.


Assembly instructions that'll be useful for beginners (included in most of Bandai's newer kits)

 Because the glossy/semi-gloss/matte finish on most of the plastic parts is ... simply put ... excellent, painting is expected to be limited to Buzz Lightyear's face. As such I think this kit should be a pretty quick and simple build. Caveat being 'quick' at my pace might not be as fast as how you're probably imagining this project will pan out. That being said, 'quick' still means I don't expect this Bandai Cinema-Rise Standard - Toy Story 4: Buzz Lightyear project to run for more than a month ... or two. With that I leave you with a Buzz Lightyear quote that seems apt when looking at the mess politicians everywhere are responsible for ... There seems to be no signs of intelligent life anywhere.


https://www.facebook.com/FourEyedMonster-313145002078520/

https://shireworks.blogspot.com/https://www.facebook.com/shire.works
Related Posts Plugin for WordPress, Blogger...