Friday 31 December 2021

With 2021 being a near-complete write off hobby-wise, here's hoping 2022 will be a fresh new start

This year, of which there is a single day remaining, has been a near-total write off in terms of what I have achieved hobby-wise. Most of very little work done this year has comprised assembling, priming, and some basecoating. Personally, it was a miserable year for content creation.


 Will 2022 signal a fresh start for my hobby exploits? I hope so. I really do. And with the new year soon to be upon us, I would like to take this opportunity to wish you a Happy New Year. More importantly, may you and yours be blessed with good health in the year to come. Cheers!


https://www.facebook.com/FourEyedMonster-313145002078520/

Sunday 19 December 2021

Reorganizing my Vallejo paint collection, and deciding which colors to use for the Girl's Rider figurine

As the holiday mood slowly sinks its talons into my already snail-paced hobby schedule, it's safe to things are basically at a standstill. With things in the real world similarly in a perpetual pandemic induced semi-lockdown, I guess it's fitting this whole year has been a write off hobby-wise. But a bit of good news on the vaccination front for the missus and me. We finally got our Pfizer-BioNTech booster shots to complement the rapidly ineffectual Sinovac-Coronavac shots we were given earlier. With the Omicron variant already at our shores, it's a timely booster (pun unintended) for the family to grasp at a semblance of 'normal' life or should I say a new normal. But I digress ... this post is about colors.   


Reorganizing my Vallejo paint collection was a task that was a long time coming 

 Previously my entire collection of Vallejo acrylic paints was placed in plastic boxes of varying sizes and located in different sections of the house. So every time I wanted to paint something, a lot of time was needlessly expended on locating the specific colors I needed for a scheme. And at the missus's behest amidst one of her Marie Kondo-like spring cleaning sessions, I had to finally organize my paints. It helped that she took the time to source an appropriately-sized shelf to store my Vallejo paints. The image below shows how the paint bottles are now so much more easily accessible.      


Seeing all the colors organized in one place is a truly heart warming experience 

Finally my paint bottles are readily accessible within the hobby area 

 As for the colors I'll need for the 1/12 scale Girl's Rider figurine, I've so far narrowed it down to about 22 colors with a view to add or subtract from this total as I progress along the project timeline. Having selected acrylic colors for the next stage of the painting process, it means that I have chosen painting-by-hand as opposed to air brushing as my primary technique going forward for the Girl's Rider figurine. Apart from some mild application of oil paints it won't be practical to use more 'aggressive' paint types such lacquer, which is largely applied via air brushing, atop the acrylic paint layers.  


Colors that have been selected for the Girl's Rider figurine project

 After nearly five years of faithful service, it was time to retire my old iPhone 7 Plus. Replacing it, hopefully for the next five years, is the new iPhone 13 Pro Max from Apple. Among the criteria for my new mobile phone was that it has to be future-proofed (the lighting port technology notwithstanding) and it had to have an excellent camera system. With my 10-year-old DSLR camera not being particularly suited for video recording, the new iPhone will function as the de facto video recorder, as well as an occasional go-to photography tool to complement the DSLR camera.     


Macro shots with the iPhone 13 Pro Max is pretty good for a non-DSLR camera system

 How can this new macro function in the 13 Phone Pro Max help in the painting process, you might wonder. Well now I can easily and quickly take macro shots without fumbling with a bulky DSLR and tripod. While the quality might not reach the levels of a DSLR camera with a dedicated macro lens, the images are good enough that I can quickly spot mistakes I had made during the painting process itself and fix the errors without too much disruption to my workflow. What do I mean by this?


Extreme closeup of the Vallejo Model Color paint bottles using the latest iPhone camera system

 Well, the workflow might go something like: paint > notice possible error > take a quick hand-held macro shot > visually isolate and clarify specifics of the error > clean up said error > take another quick macro shot to see result > so on and so forth. This is essential for me because I find it difficult to paint in real-time with the help of any form of artificial magnification such as lenses. In future posts, I'll try to explain why the macro shots taken by the iPhone 13 Pro camera system still cannot rival those taken by a DSLR camera with a dedicated macro lens. But it's good enough as a painting tool and for a mobile phone, the iPhone 13 Pro Max takes a pretty decent macro shot. On that note I'm off to explore the video and photography possibilities of the 13 Pro Max. Cheers, stay safe, and be well.


https://shireworks.blogspot.com/https://www.facebook.com/shire.works

Sunday 28 November 2021

Green and Blue Reversible Backdrop for future Chroma Key Compositing of Images and Videos

 After spending an inordinate amount of time painting our miniatures, most of us are guilty of not putting equal effort into the final photos or videos of the finished project. I am no exception. Though I do try, there is still so much more about photography, video recording, and their post-production processes I should know in order to make the painted miniatures look like they do in real-life to the naked eye. I am also guilty of placing the miniatures against just plain backgrounds. With that playing on my mind, I plan to spice things up once in a while by using a green/blue chroma key backdrop.


 While I have had my eye on a green screen backdrop for quite some time, more so now that I have the requisite post-production editing tools, I could never quite get my hands on one. This was mainly due to the high prices that these chroma key screens usually fetch. Finally though, I managed to find a close to year-end bargain of a Selens green/blue reversible backdrop. Being an on and off again photography enthusiast, I don't really know much about Selens apart from it being a company whose products focus mainly on photography equipment and accessories. So I figured I would be better getting a chroma key screen from such a company rather than any regular green cloth. 


Selens green/blue screen reversible backdrop with T-type tripod stand, yet to be unpacked

Backdrop is folded inside the round zippered bag, shown here with the various tripod parts

 Together with the actual chroma key screen, which came in a round protective bag, this particular bargain I got online included a T-type tripod stand and four clips. The latter group of items function to hold up the chroma key screen. The top bar can be lengthened up to around two meters using rod bar extensions (see below). But in practice, I didn't need to do this because the screen I bought was the smaller 1.5 m  by 1.0 m. The stand was intended to hold screens up to 1.5 m by 2.0 m in size. 


Start from left then clockwise: T-type stand being set up to full length

 With the backdrop being reversible, that is one side green and the other blue, I can easily chose which chroma key I want to use as my screen backdrop. Moreover, the quality of the screen is good enough that the colors don not bleed into each other when exposed to bright lighting (see below). 

Reversible Green/Blue Screen under natural sunlight; note the T-type stand did not need to be at full length in order to hold the backdrop (the extension arms were removed)

Reversible Green/Blue Screen under natural sunlight and a source of LED fluorescent light

 For those of you who might be interested in getting such a product for themselves, I have included the technical specifications as provided by the Selens product pages (see below).   


 But hold on a minute. I have been going on and on again about the chroma key green/blue screen that I never stopped to consider that some of you might not know what it's  used for. Sorry about that. In the unlikely event you do not, please refer to this article on https://www.premiumbeat.com/blog/blue-screen-vs-green-screen/. Anyway it'll be back to painting in the days to come. Using the chroma key screens will have to wait for now as I strive to get my painting projects up and running. Until next time dear reader, please stay safe and be well.


https://www.facebook.com/FourEyedMonster-313145002078520/

Sunday 14 November 2021

Girl's Rider - Hasegawa 1/12 scale resin figurine [Block painting sections with the appropriate basecoats]

 It only took a year of sustained procrastinating but painting sessions have resumed again. Sarcasm aside, it feels good to finally work with paint again. While prepping and priming is an integral part of the hobby, those steps aren't as fulfilling creatively as laying colors on a miniature. At this early stage, the only paints being utilized are basecoats that function as foundation layers on which other hues will rest. Basecoats also serve to block off sections of the figurine into its appropriate colors. 


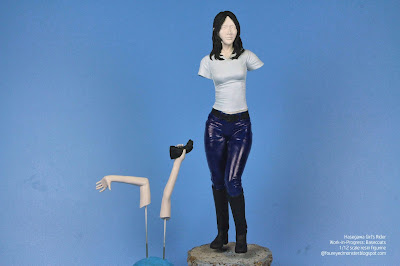
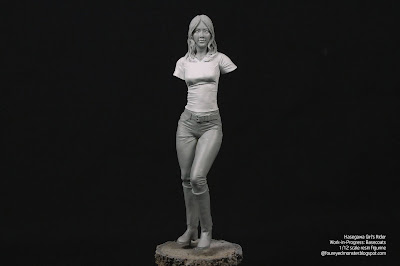
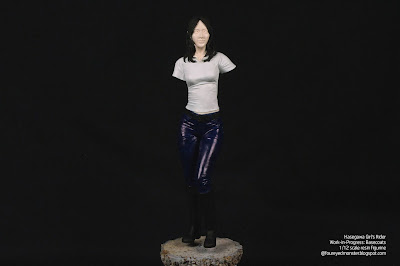
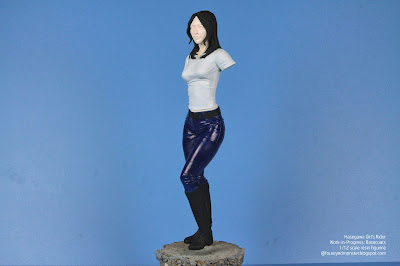
1/12 scale Girl's Rider figurine [work-in-progress: block painting basecoats]

 A mishmash of techniques and materials were at play when laying down the basecoat colors. Various sections of the primed figurine received different types of paint via disparate means of delivery. For example the flesh areas and t-shirt were airbrushed with lacquer paint and fine primer respectively while the hair, jeans, belt, boots, and gloves were hand-painted with acrylic paint. It's important to note that when working with both lacquer and acrylic paints: it's generally okay to paint acrylic on top of lacquer paints but NOT vice versa! So please be aware of at least this point.


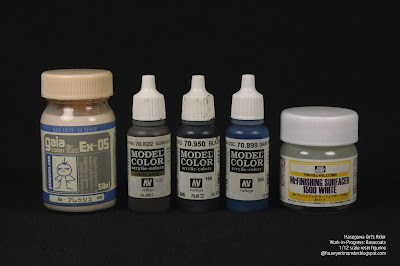
Basecoat paint and primer colors used so far in the block painting process

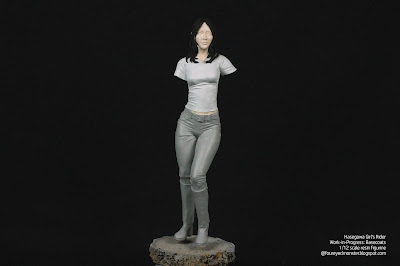
 Block painting was carried out in phases starting with the upper-half of the figurine. First, the whites of the t-shirt was blocked off using an extremely fine surface primer i.e. the Mr.Hobby Mr.Finishing Surfacer 1500 White. In an ideal situation I would've preferred to use flat white lacquer paint instead of a primer. However, I didn't have any of the former on hand. Moreover experience told me it's time consuming to achieve smooth whites using acrylic. Hence the compromise. Luckily I had plenty of Gaia Color lacquer paints for the skin tone, which was airbrushed onto the face and arms/hands. 


First basecoat layer to be applied onto the Girl's Rider figurine ...

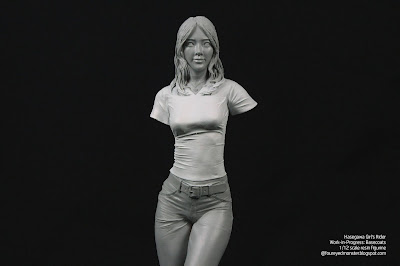
... was the whites of her t-shirt, using the Mr.Finishing Surfacer 1500 White.

Second basecoat applied was the figurine's skin tones through the use of ...

... an old (and no longer produced) Gaia Color flesh color formula ...

... and this was applied onto the face, arms, and hands.

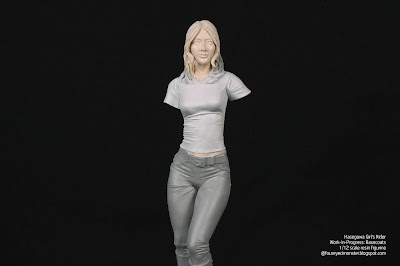
  To complete the basecoat layers for the upper half of the figurine, her hair was basecoated by hand with acrylic paints comprising a mixture of two Vallejo Model Color hues namely German Camouflage Black Brown (70.822) and pure Black (70.950). This will serve as the foundation of black brownish hair that I intend to paint for the Hasegawa 1/12 scale Girl's Rider figurine.


Third basecoat layer was placed on the hair comprised a mixture of ...

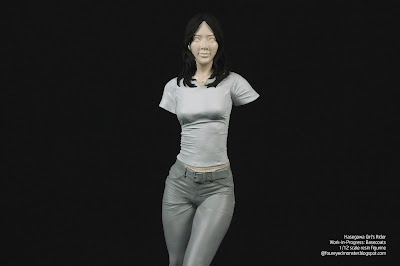
... Vallejo Model Colors German Camouflage Black Brown and pure Black.

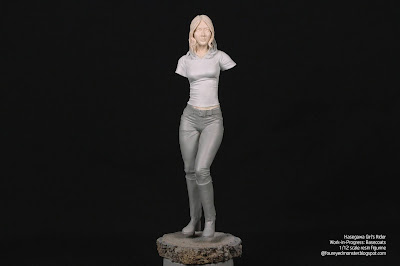
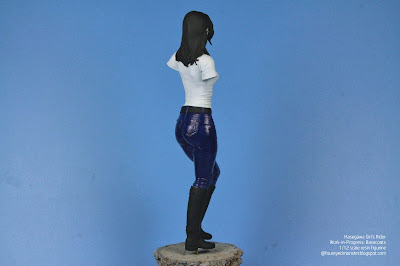
 With the basecoat layers completed for the upper-half, it was time to work on the darker hues of the lower half. This entailed the use of Vallejo's Dark Prussian Blue (70.899) for the jeans and pure Black (70.950) for accessories such as the belt, boots, and gloves. One unintended result of using the former was how glossy the dark blues looked. Whether this will be a significant factor when other blue hues are layered onto jeans, time will tell. Meanwhile, the blacks were flat which was fine by me.


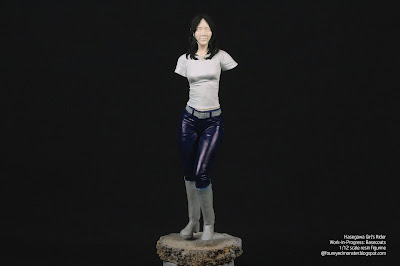
Fourth basecoat layer was for the dark blue denim jeans ...

... which was done using Vallejo Model Color Dark Prussian Blue.

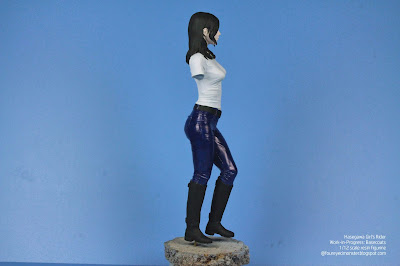
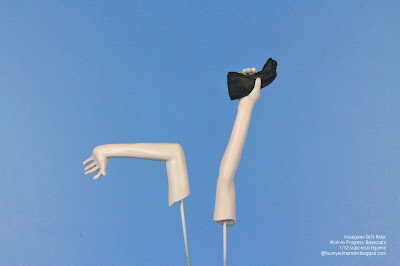
Final basecoat layer was pure Vallejo Black for the accessories  ...

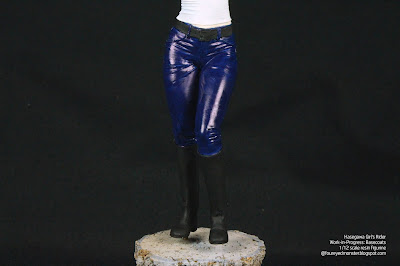
... such as the leather boots and belt as well as ...

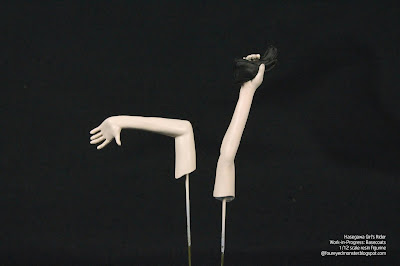
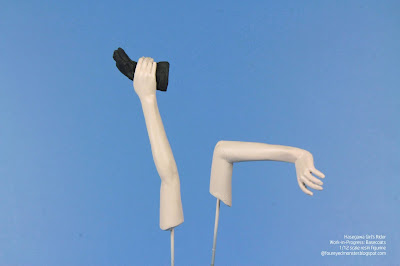
... the leather gloves, which are being held by the right hand.

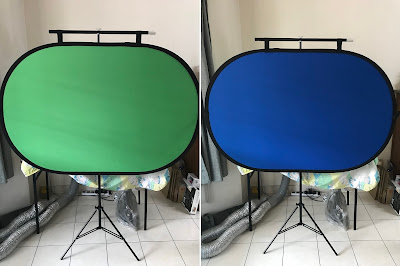
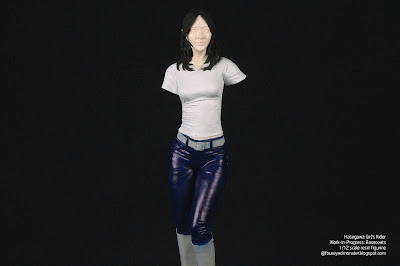
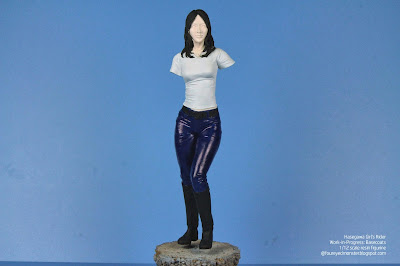
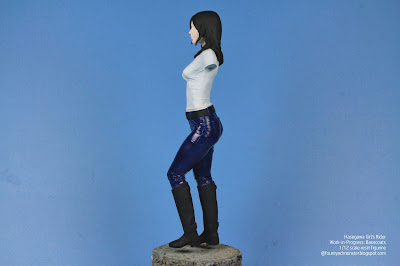
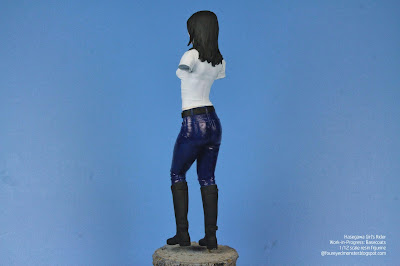
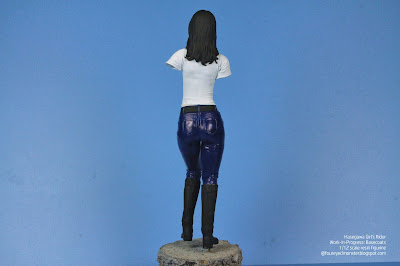
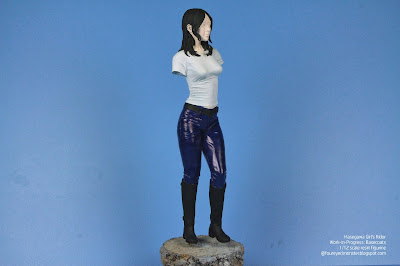
 Below is a series of photos showing the figurine fully basecoated with the appropriate colors. All pictures were taken against a bluish background in order to better contrast the dark areas.


Each sequentially layered basecoat involved a fair bit of masking ...

... actually it was only for the first two layers (i.e. white shirt and skin tones) ...

... because these aforementioned layers involved airbrushing and the inherent ...

... lack of control as to where any overspray may land on the figurine ... 

... This was unlike the later basecoat layers such as those on the ...

... hair, belt, jeans, boots, and gloves ...

... which were all painted by hand using regular paint brushes ...

... Painting by hand removed the need for any masking because ...

... I had much better control over where the new paint layers landed ...

.. thus easily preventing them from encroaching into the earlier layers.

 Going forward from here, the 'real' work will begin. Next up is the selection of paint colors to form the general color scheme of the entire piece. It's also the stage where I tend to overthink things the most. One color scheme after another is selected, discarded, re-selected, discarded again, put on hold, etc. You get the idea. Anyway, this time around I expect the selection process to go much faster seeing that it's only an East Asian female clad in white t-shirt, blue jeans, and black accessories. Easy peasy lemon squeezy, right? Right? Well, we'll see I guess. Until then, stay safe and be well! 


https://www.facebook.com/FourEyedMonster-313145002078520/

https://shireworks.blogspot.com/https://www.facebook.com/shire.works

Sunday 31 October 2021

Girl's Rider - Hasegawa 1/12 scale resin figurine [Primed for Paint]

 As I have alluded to before in one form or another, the year 2021 has turned into a series of 'prep and prime' projects. And while I have set myself up to start painting soon, there is still one figurine left to prep and prime before I do. That figurine is none other than the Hasegawa /12 scale Girl's Rider


Hasegawa 1/12 scale resin figurine Girl's Rider [work-in-progress: primed; front view]

Hasegawa 1/12 scale resin figurine Girl's Rider [work-in-progress: primed; back view]

 As with after every priming session, the details on the miniature figurine tends to stand out more ... for me at least. You should be able see this at a glance from the series of photos below showcasing the figurine after it had been primed by a light grey hue of the Tamiya Fine Surface Primer.


For a figurine is that is based on a minimalist concept ...

... of  a female bike rider clad in a simple tight-fitting white t-shirt ...

... and denim jeans as well as an all leather ensemble comprising ...

... accessories such as black gloves, belt, and riding boots ...

... there is a rich tapestry of little details ...

... ranging from her facial features and elaborate hair strands to ...

... the myriad of creases and folds on both her t-shirt and jeans ... 

... to the straps of her riding boots.

 One thing I love about Japanese sculptors is their approach towards miniature figurines in making every day situations extraordinary by exploiting tiny little details. This is not too different from how anime is made especially by two of my favorite directors namely Hayao Miyazaki and Makoto Shinkai. Let me explain. For example, the concept of a girl clad in a simple t-shirt and jeans ensemble is made remarkable by small details such as the myriad of folds and creases on her clothing which serve to accentuate the body's sensual s-curves. Add to that excellent facial features and you have a winner. 


Each sculpture will invariably have its own distinct racial facial features ...

... and it's no different for Girl's Rider which to me looks distinctly East Asian ...

... meanwhile strategically placed creases and folds on both the t-shirt and jeans ...

... serve to further accentuate the already sensual s-curves on the figurine's body ...

... which is displayed primarily by the figurine's model-like pose ...

... helped of course by the figurines natural body shape ...

... which is shaped like an hourglass.

 Personal workflow of the painting process for this figurine necessitates that I paint her main body (e.g. legs, torso, and face) separately from her arms and hands. However, I am still in two minds whether to paint her using a combination of lacquer basecoats followed by either oil or acrylic paints; or maybe just stick mainly to acrylics. Knowing myself, I will likely try something I have never done before which is the former. If I do so my initial challenge will be to mask the appropriate areas before block painting the separate areas e.g. t-shirt (white), jeans (blue), hair and belt (black), and face (skin tone). Masking is one of the things I hate doing in the painting process, hence my indecision.


In order to make the riding boots look a tad more interesting ...

... I am thinking of painting anthemion-like designs on the shafts.

As for the figurine's hands, the right hand is holding on to a glove ...

... while the left hand is open-palmed and will eventually rest on her hips.

 Suffice to say I have already prepped a fair number of miniature figurines to keep me occupied with painting in the months ahead. This is in addition to my ongoing assemble-prime-&-paint-as-you-go projects that involve working on sub-assemblies before they are put together as a greater whole. An example of this was the RX-78-2 Gundam scale model kit project. And top if off, I finally get to do show better quality hobby-related videos and photographs with selected Corel creative software I had gotten on the cheap. Things are looking up hobby-wise even if they are looking worse pandemic-wise as hospitalization cases shoot up yet again. Will this nightmare never end?


https://shireworks.blogspot.com/https://www.facebook.com/shire.works

Related Posts Plugin for WordPress, Blogger...