Showing posts with label Kingdom Death. Show all posts

Thursday, 1 May 2014

Kingdom Death White Speaker [sans cloak and spear]

One of the reasons why Kingdom Death easily makes it to my Top 5 favourite miniature range is because their figures allow me to do a lot of something I have come to love in this hobby ... painting skin tones. Personally for me, a miniature truly comes alive only when skin tones form a large percentage of the surface area ... caveat being they are painted well, a skillset that I am always striving to improve each time I tackle a project. This then serves as the perfect introduction to my latest work on a Kingdom Death miniature i.e. the White Speaker without her cloak and spear. 

Kingdom Death White Speaker, sans cloak and spear

Although I am fully aware I have a long way to go before I can achieve my two main aims when painting skin tones of female figurines - porcelain-like smoothness and realistic looking skin - this highly detailed 35-mm scale Kingdom Death miniature represents my best effort to date on skin. That's hardly saying much when my baseline effort is so low but I'm happy with any progress I make.

Lovely sky blue to complement the White Speaker's blond hair

After some thought, I felt it best to go with blond hair coupled with white/grey/sky blue clothing. It's a colour scheme which soothes me, and likely the White Speaker's enemies too before she sticks that dagger deep into their gut. But at least they will all die with a relaxed smile on their face. 

The White Speaker [sic] Wears Prada

I was also pleased with how her toes and high heels turned out. I managed to clearly define separate toes on her feet, paint the nails of individual toes and paint a little blue dot into the high heels thus adding depth to her shoes. Some of this came about due to a better understanding of how important it is to paint some lining in between two not-so-contrasting colours. I am still susceptible to lapses in which I forget to paint the lining (e.g. parts of the strap in her clothing) but I am getting better at it. As minor as this may seem, it can be the difference between 'meh' and 'not too bad'.   

Base was kept simple with some sand, stones and grass

Slightly more work was done on the White Speaker's skin but not too much as my original skin tone mix had gone dry despite being in a wet palette. I concentrated mainly on her chest area to improve contrast as well as repositioning her navel lower towards the crotch area. Some minor work was done to bring out her collar bone by adding darker shadows and brighter highlights.

White Speaker's cloak had to go as it would have covered up her beautifully sculpted back

Two things about the miniature that I did not like was her spear and cloak. The former because it seemed out of place. After all, why carry a spear if you already have a dagger in hand. Stylistic I must admit but it looked off-putting to me. Meanwhile, the Kingdom Death White Speaker's cloak was not as well sculpted as her back so I left the former out so as not to block the latter.

Two of her fingers had snapped off turning it into a victory sign gesture

Now if you ask me to choose between resin and plastic miniatures, I would pick resin anyday. The details that a resin miniature can provide a painter cannot, in my honest opinion, be as well replicated in a plastic miniature. Unfortunately, one main drawback of resin is the brittleness of some parts which can result it being snapped in two if not prepped with care and gentleness. Having prepped the White Speaker during my early days in this hobby - when I approached prep work without care and with an impatience bordering on devil may care heavy-handed brush strokes when cleaning the minaitures - there were consequences. This White Speaker had two fingers broken off  so now it's because she was careless during a battle and got them cut off. I am sticking with that story.    

Kingdom Death White Speaker (side view from right)

In line with my Achilles Heel with bases, I didn't put much work on the White Speaker's base other than to glue some sand on it, drybrush the sand with brown/yellow hues, add stones and grasses, and finally drybrush the stone block upon which her right leg rests. All very unexciting stuff. One day I hope to create the very dioramas which made me go 'ooohhhhh' and 'ahhhhh' as a very young kid in a Tamiya model shop (I couldn't afford this hobby till I was well into my late 30's so I am painting with a zealot like single-mindedness to make up for lost time) but for now simple bases will have to do.

I just love this dynamic pose struck by the White Speaker
 

360 view of Kingdom Death's White Speaker
For a 360 degree view of the Kingdfom Death White Speaker 35-mm scale miniature, please check out the YouTube video below. For other videos, please visit my YouTube channel FourEyedMonster Miniatures. Also be sure to choose the high definition (HD) option when viewing the videos.


Finishing the Kingdom Death White Speaker has wet my appetite for yet more skin tone experimentations. With that in mind, I am sorely tempted to get some of Kingdom Death's new hard plastic miniatures to practice on while I keep the few resin miniatures that I have left for future days when my skills have gone up a notch. For now, I feel like I am in 2nd gear and halfway up the RPMs while driving a five gear manual transmission car. Just hope I don't blow up my transmission while moving up the gears. Achh! Why am I talking about cars? Must be the constant bombardment by sexist magazines that equate scantily clad models with cars. Power of the media indeed! 

Monday, 21 April 2014

Kingdom Death White Speaker [WIP - Skin tones, so far]

For some time now I have been pretty unhappy with the skin tones of miniatures I have painted. I am aware that, on occasion, they lack contrast that make skin pop. To get over this mental block that seems to be hindering my progress as a miniature painter, I decided to paint up a miniature with the main objective of achieving deeper shadows and brighter highlights for the skin tone. 

Kingdom Death White Speaker [WIP - skin tones]

To try and make further progress on the painting realistic skin tones, I had a look at some miniatures in my collection to find one that showed a lot of skin. What I found was a 35-mm scale Kingdom Death resin miniature namely the White Speaker, which I thought would be suitable for my purpose. I had primed this miniature way back when I was still fairly new to the hobby and kinda botched up the prepping stage in my impatience thus resulting in rough looking skin on her arms.  

She was a perfect specimen for more painting time on skin tones, for obvious reasons

For a white Caucasian skin tone, I used mainly Reaper Master Series Paints (MSP) and it was based on a paint recipe formulated by one of my favourite miniature painters i.e. Jennifer Haley (the other favourite being Marike Reimer). I find that my style of painting is rather similar to both painters. But of course, on a scale of 1 to 10 with the latter being the best, both are a perfect 10 while I am at 1, that is I feel about nine whole levels away from these two wonderful painters on a scale of 10.   

Kingdom Death White Speaker - [WIP skin tones, side view from left]

At this stage, I don't necessarily feel that I have completed the skin tones of the Kingdom Death White Speaker. I am still contemplating a further increase in the contrast of her skin tone. Other possible touch ups might include trying to clear up an unfortunate wash ring and perhaps smoothening out the transitions between shadows and mid-tones in certain parts of the skin. As for chalkiness in the highlights, I am afraid that is most likely beyond my skills at the moment.

With armour like that, no male warrior stood a chance against the White Speaker

Light skin tones continues to be a challenge to me as chalkiness is still apparent at very up close - especially the highlights. Lighter colours are often more susceptible to chalky results than darker colours. Based on what I understand, the light skin tones can become chalkier for a number of reasons such as being thinned too much or having paint dry slightly on the brush before application. But on the bright side, the level of chalkiness I get is reducing although I have yet to hit the sweet spot of a perfect smooth porcelain-like skin tone without the benefit of a wash. 

"Is my butt too big?" ... a question many warriors dare not reply

Missing from the photos are the White Speaker's spear and her cloak. Personally, I don't really think the cloak goes well with the miniature. However, I will paint it up later and stick it to the miniature using blue tack to see how it looks before making the final decision on whether to keep the cloak.

Her hair is also nicely sculpted ... question is, will she be a blonde or red head?

Other than painting the Kingdom Death White Speaker's skin tone, I also blocked in the leather (or is it cloth) straps that serve as armour with a Reaper MSP Brown Liner diluted with water. Officially her armour ... and I used that term lightly ... is white in colour though I am toying with the idea of using light blue. Specifically, sky blue would look good if I make her a blonde.

Kingdom Death White Speaker - [WIP skin tones, side view from right]
A very dynamic pose ... and in high heels too

This Kingdom Death miniature saw me taking a short break from a much bigger miniature I am also currently working on, namely Nocturna Models's Le Petit Chaperon. To give you an idea how small the White Speaker is, I took a shot of her next to a paper clip and a Malaysian five sen (cent) coin.

In the grand scheme of things, she does look rather petite

To get myself out of a rut (I have not been improving as well as I hoped), I needed to remind myself of the level to which I aspire to - for example the miniatures that placed first and second in the Best of Show Crystal Brush 2014. To paraphrase a recent battle cry by the captain of a football team I have supported since before my teens - the completion of every miniature I paint is followed by an attitude that it's done and finished. Then it's time to move on to the next miniature and start again. There is a lot of improving I need to do but the fun lies in the journey which I hope will be a long one.

http://shireworks.blogspot.com/

Friday, 18 October 2013

Understanding White Balance in miniature photography

Chances are, at one time or another, you would have been hugely frustrated by a lack of colour accuracy in the digital photos of your miniatures. Unlike the human eye which can instantly adjust to changes in light and see objects in the colours it was meant to be seen, the digital camera doesn't always capture colours properly. After all the hard work put into getting just the right shade or hue of colour in your painting, nothing is worse than to have all that spoiled by a photo with a yellowish or bluish tint. Understanding the basics of White Balance can help you increase colour accuracy.   

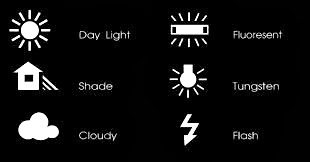
White balance options that are available in most DSLR cameras

Relationship between White Balance and Colour Temperature
Why then do you sometimes get a bluish or yellowish tint to the digital images of your miniatures? It all relates to the lighting environment (or colour temperature if you will) in which the photographs were taken. Learning about colour temperature, which is a characteristic of visible light, can go a long way in getting a basic understanding of why certain White Balance settings are chosen.  

A detailed look at colour temperature
Colour temperature is measured in the Kelvin temperature scale. Cool temperatures are located higher on the Kelvin scale - meaning a light with a higher colour temperature or a larger Kelvin (K) value will have more blue light. Looking at some common lighting situations from cool to warm, Shade comes in at about 7000K, Cloudy is approximately 6000K, Day Light (~5200K), Flourescent Light (~4000K) and Tungsten Light (~3200K). Most Digital Single-Lens Reflex (DSLR) cameras has White Balance settings that you can set for just such conditions. As to what each settings do, read on.

Lighting environment in which my photos were shot
At my workstation is a simple photography setup comprising two lamps, each with a 24W (roughly 125W equivalent) energy saving 6500K cool daylight lights bulbs, which are covered with white diaphanous material to diffuse light, thus reducing glare and harsh shadows. The surrounding area was relatively closed off to outside light with the curtains drawn, although some leakage does occur as the curtains aren't thick enough to completely engulf the room in darkness. This gives you a rough idea of the lighting environment my miniatures were exposed to when their photos were taken. 

Two lamp setup at FourEyedMonster's miniature painting workstation

What does adjusting the White Balance do?
In essence, adjusting a camera's White Balance settings allows you to either add warmth (yellowish tint) or coolness (bluish tint) to the digital photo in order to compensate for the lighting environment. In general, fluorescent lighting adds a bluish cast to digital images while tungsten (incandescent) light bulbs add a yellowish tinge to the photos, if nothing is done with the White Balance to compensate.

For example, if you are taking photos under fluorescent lighting (a cool temperature), you would want to add warmness (yellowish tint) to your digital images by selecting either the 'Shade', 'Cloudy', 'Daylight' or 'Fluorescent' White Balance settings which are ideal for a cool colour temperature range between 7000K and 4000K. In the end, if you have adjusted the White Balance correctly, the colours of your miniature will look close to or be exactly what you see with your naked eye. 

Digital photos of a miniature shown at different White Balance settings

On the above photo montage, I took some photos of the Kingdom Death Pinup Speaker miniature against a black background under different White Balance settings. From left to right, these settings were Auto White Balance (AWB), Shade, Cloudy, Daylight, Fluorescent and Tungsten. I did not use the White Balance settings for Flash Photography as I almost never take photos of my miniatures using the camera flash. Based observations with the naked eye, the setting that displayed the most accurate colours was 'Shade' or the second picture from the left of the above photo montage.

Digital images using the Shade, Cloudy and Daylight White Balance settings

As the lighting environment in which I was working in can be termed as very cool, it stands to reason that I had to select White Balance settings that introduced warmth into my digital images. Based on the series of photos above, warmth was introduced at a decreasing amount from left to right (Shade to Cloudy to Daylight settings). As mentioned earlier, the 'Shade' settings gave me the best colour accuracy for the lighting environment that I was working in. Sometimes, just selecting the 'Auto White Balance' or 'AWB' settings would be good enough but that was not the case here (see below).     

Auto White Balance (AWB) does work on occasion but not this time

As an example how bad your digital images would look like at the wrong White Balance settings, I also took some photos at two extreme settings in my case study (see below). Firstly, while the 'Fluorescent' setting was supposed to introduce warmth to photos, it however, no longer did so under the cooler lighting environment I was working in. Secondly, the 'Tungsten' setting which is supposed to add coolness (or bluish tint) to images taken in warm environment just made things worse.

Fluorescent (left) and Tungsten (right) White Balance settings

So what happens when the custom White Balance settings do not work. Well, for starters you can try manipulating the lighting environment you work in e.g. move the lamps to a different distance from your miniatures etc. You can also either resort to setting a custom White Balance setting or use other advanced hardware functions that modern DSLRs have nowadays. If all else fails, the most efficient method would be to correct the White Balance of digital images using computer software, which I do resort to on occasion if it gives me the colour accuracy that I am looking for.


Now I do not profess a mastery of White Balance adjustments in digital photography as I still struggle to get good colour accuracy especially when using white backgrounds. What I hoped to achieve with this blog post was to share with you my experiences when dealing with White Balance issues and perhaps give you a basic understanding of what White Balance is all about and take the mystery out of that bluish (or yellowish) tinted digital photo of your miniature. Thanks for reading and please do share in the comments below if you have your own solutions to White Balance issues.

Wednesday, 24 July 2013

Kingdom Death Pinup Savior [sans cloak]

Excluding the Pinup Savior's peacock feathered cloak, painting on my second Kingdom Death miniature is essentially complete. It was a joy to paint the Pinup Savior's hair because it was wonderfully sculpted to the extent that individual strands were visible. I went with a dirty blond hair look as I felt it was better suited to the overall colour scheme of the miniature. Additionally, her sword scabbard was painted up to match her vest while the staff had a very simple object source lighting (OSL) effect from the lamp attached to it. Other work comprised her "scarf" and necklace.     

Kingdom Death Pinup Savior sans cloak
OSL effect of the lamp on her staff was kept to an absolute minimum
Sword scabbard was painted in a similar colour to the Pinup Savior's clothes
Staff was painted grey as I felt it was a better fit to the overall colour scheme
Where possible, I painted each individual strand of the Pinup Savior's hair
Hair on the Pinup Savior was beautifully sculpted, in my opinion
From the side, you can see she is leaning slightly backwards, likely due to the absent cloak's weight
A nice angle that accentuates the Pinup Savior's curves

Painting the two Kingdom Death miniatures has given me the confidence to tackle more miniatures of a similar nature. While I am generally pleased with the Pinup Savior's final paint job, there is definitely room for improvement especially on the skin tone transition from shadows to highlights as well as on the eyes. With more minis in the pipeline, there will be ample opportunities to practise.

And then there were two - Pinup White Speaker (left), Pinup Savior (right)

One reason for not painting the Pinup Savior's cloak was the time and effort that it would have required. With the amount of detail in the cloak (see below), it would have taken me a very long time to finish painting. When my brush control improves to a higher level, I might consider painting the cloak. But for now I am happy with the Pinup Savior without her cloak.

Very detailed cloak showing peacock feathers

Originally, the Kingdom Death Pinup Savior was depicted as a redhead in brown-red garments. Although I do like the original colour scheme, I decided to mix it up a little by going blonde/blue.

Pinup Savior in her original brown-red colour scheme; notice her peacock feathered cloak on her back

Without a doubt, I need loads more practice before I can paint better skin tones and eyes. One thing I could try is to strike better balance between thinning a paint versus the resulting chalkiness that arises from being diluted with too much water. Some added flow improver/enhancer could be the solution. Certainly wouldn't hurt for me to try it out in my next miniature. Till the next post, thanks for reading!

Monday, 22 July 2013

Kingdom Death Pinup Savior [WIP - Clothes and Shoes]

For the Kingdom Death Pinup Savior's clothes, I decided to paint a blueish-grey colour scheme with a checkered pattern for her skirt. Initially, I wanted to go with a red colour scheme but after painting so many Word Bearers, I felt I needed to mix it up a little. It was a toss up between green and the colours you see below. I did, however, manage to incorporate some green into the checkered design.

Checkered skirt design for the Pinup Savior was actually inspired by Scottish kilt designs
Natural flare of the skirt helps accentuate the skirt's design
For the checkered skirt design, the vertical lines were not as pronounced as the horizontal lines
Bird eye's view of the front of the Pinup Savior's skirt
Bird eye's view of the back of the Pinup Savior's skirt
Some concept work prior to actual painting of the Pinup Savior's clothes

Final results of the checkered skirt were not as detailed as I initially envisioned. Painting the design was more difficult than I had anticipated which meant less lines were painted on the Pinup Savior's skirt. Ideally, the final results should have mimicked my concept art (see above) but I decided to quit while I was ahead before the whole skirt became a jumbled mess of paint splatter. But with every miniature that I attempt to paint comes a better grasp of what is needed to improve for future minis.   

Can you spot her big toe sticking out of a leather shoe?

Meanwhile, the Pinup Savior's boots were given brownish-ochre colours to stimulate treated leather. Having her big toe pushing out of one of the leather shoes was a nice sculpting touch. I tried my best to do justice to that little bit of detail. Below are some other shots of the work-in-progress Pinup Savior. Her sword (not shown in the photos), staff, hair and base remains unpainted.

Normal front view of the work-in-progress Kingdom Death Pinp Savior
Existing clothes colour scheme is screaming for a blonde hairdo
Metallic designs on her belt hints at a gothic attire
Her unpainted hair reminds me of the silver hair of Daenerys, a Game of Thrones character

Next up for the Kingdom Death Pinup Savior will be her hair. I am currently leaning towards her having a blonde look as gold/yellow goes well with blue. More progress pictures soon ... hopefully!

Thursday, 18 July 2013

Kingdom Death Pinup Savior [WIP - Skin Tone]

Long neglected, the Kingdom Death Pinup Savior finally got the attention she deserved as I started work on the miniature by painting her face, skin and stockings. Thus far, she has been a pleasure to paint as the sculpture is fairly detailed which makes a painter's job that much easier.

Kingdom Death Pinup Savior with completed flesh colours

To paint her skin, I used a paint recipe developed by a painter whose work I admire, Jen Haley. It involved the use of Reaper Master Series Paints comprising colours such as Fair Skin, Golden Skin, Tanned Skin, Ashen Brown, Fair Skin Highlight. For her eyes, I used Citadel colours such as Skull White and Chaos Black as well as the Reaper Brown Liner, which I also used to paint her garters. I plan to do a more in depth review of the Reaper Master Series Paints at a later date. 

Holes in her stockings was a nice touch to the resin sculpture

Painting the Pinup Savior's eyes was a tough challenge for me because I wanted to try painting in the light reflections on her pupils. While the overall result was not all that I wanted it to be, I hope to improve over the coming months as I have a lot of miniatures in the project pipeline that will require the painting of eyes as well as flesh/skin tones. This is one skill I am determined to master.   

On her left thigh is a small hole which is meant for the assembly of her sword

For the Pinup Savior's stockings, I wanted to achieve a see-through white nylon stocking effect. I was happy with the final result, and the sculpted holes in her stockings helped provide some depth and contrast to the overall paint job. Kudos to the sculptor for adding the stocking holes.   

Garters make the stockings stand out even more

Initially, I had used the Reaper Brown Liner on her garters as a means to block out the area before painting a more dark and opaque colour. However, I really liked the translucent effect the Brown Liner had on the flesh, not unlike what you would see on some real-life stockings, so I left it as it is.

Small of her back had been damaged slightly from a previous incident

Although the paint job on the small of her back was quite rough, I had expected this because of a certain incident with this miniature. This particular area had the worse of it when I tried to remove the initial primer with a hobby knife, resulting in her back being damaged by knife marks.

Long legged beauty
Even looking at her sideways, you can tell that the miniature has been wonderfully sculpted
From this angle, the shading on her abs is more visible

Well, I can't wait to continue painting the Kingdom Death Pinup Savior. Currently finding a suitable checkered design for her skirt. I am also trying to decide between painting her as a blond, red/auburn or black haired beauty. It will have to match the colour of her skirt which will be predominantly blue. Stay tuned for further progress reports on the Pinup Savior! 
Related Posts Plugin for WordPress, Blogger...