As I take a temporary step back from the recent denim disaster (of which restorative works should be completed before end of this month), momentum for the hobby continues unabated. Perhaps for the first time since I began this hobby more than 10 years ago, I find myself devoid of the apathy that has been a recurring thorn in my side. So instead of project after project being shelved midway through its progress, the reverse is happening. Stalled projects are either being revived (e.g. Space Battleship Yamato 2199, Sturmgeschütz III, Neon Genesis Evangelion EVA-01, Volkswagen Beetle, etc.) or have been revived i.e. the Star Wars Speeder Bike project you are going to see here.
 |
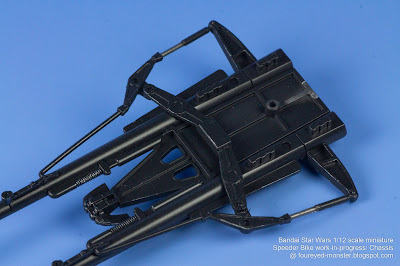
Star Wars 1/12 scale Speeder Bike work-in-progress: Chassis/Main Frame Structure
|
Because a shiny metallic chassis/main frame structure would not have been consistent with a movie-accurate representation of the Speeder Bike, a different route was taken to make the relevant parts look like metal components without completely covering them with metallic paint. What I did was to first airbrush a semi-gloss dark grey (almost black) basecoat on the chassis/main frame structure. Following this, I painted on as well as dry-brushed metallic acrylic paints in strategic locations. This I did to mimic scuff/scratch marks that reveal/hint at a shinier metallic surface underneath. This then creates an optical illusion of a completely metal chassis/main frame structure.
 |
Acrylic paints applied onto the dark grey basecoat comprised metallic gunmetal and silver colors
|
In my years of painting metallic colors by hand with a brush, I have found Citadel Boltgun Metal to be the acrylic paint with the best coverage in terms of smoothness and opaqueness. And although I would've preferred to use Citadel Boltgun Metal as the sole metallic paint for my purposes here, I only have two bottles of the old recipe (and no longer in production) paint left in my possession. As such, I use it sparingly. To paint the Speeder Bike chassis/main frame structure, I also used a mixture of Vallejo Model Color 70.863 Gunmetal Grey and 70.997 Silver to complement the metallic hues.
 |
Speeder Bike outriggers with multi scanner array (bow), tracking sensor/comlink (amidships), and steering linkages (stern); the bottom facing side is shown in the image above
|
 |
Speeder Bike multi scanner array (bottom facing side)
|
 |
| Speeder Bike tracking sensor/comlink, and steering linkages (bottom facing side) |
To be fair the Vallejo Model Color metallic paints aren't that bad, especially if you dilute the paints with Vallejo Airbrush Thinner instead of water even if you are hand-painting with a brush. However if given a choice I will still choose Citadel Boltgun Metal over the Vallejo metallic paints.
 |
Speeder Bike outriggers with multi scanner array (bow), tracking sensor/comlink (amidships), and steering linkages (stern); the top facing side is shown in the image above
|
 |
| Speeder Bike multi scanner array (top facing side) |
 |
| Speeder Bike tracking sensor/comlink, and steering linkages (top facing side) |
Dirt and grime weathering on the Speeder Bike is non-existent, and it'll likely stay that way if I am to paint it for the Join-the-Empire umbrella project. To recap, this project comprises a series of vignettes combining a 1/12 scale Bandai Star Wars figurine/scale model kits with a 1/12 scale non-brand-specific female miniature figurine. Because the scene intends to depict figurines posing for a propaganda poster, it wouldn't do to have a dirtied up Speeder Bike in the background.
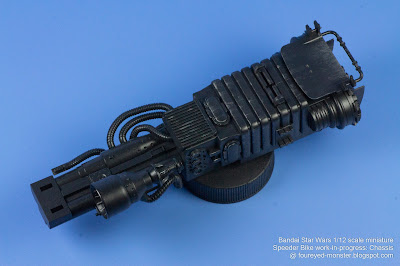 |
Speeder Bike repulsor block housing the engine, power plant, power converter, and power cell
|
 |
To simulate the look of an all-metal repulsor block, metallic acrylic paint was painted and dry-brushed in strategically selected areas onto a semi-gloss layer of dark grey lacquer paint
|
 |
Speeder Bike engine (of which no molded part exists) is theoretically housed within the repulsor block
|
 |
Power cell (turbine-like contraption) and fuel lines (segmented hoses) connected to a fuel cell
|
 |
A view of the repulsor block from an isometrically opposite angle, with the repulsor projection units (exhaust nozzle-like contraption) as well as repulsor deflectors at the (far left) end
|
It should be noted that the chassis/main frame structure isn't the only part of the Speeder Bike that sports the "black metal" look. Other components such as the handlebars, rocker-pivoted footpads, repulsor deflectors (air brakes), blaster cannon, power/sensor management controls will also be painted to have that "black metal" look. Those will be painted later after I had a go at the weathering the bike's already basecoated armor/hull plating and steering vanes.
 |
Back of the Speeder Bike (bottom facing side) with the repulsor projection units at each side
|
 |
Metallic paint scratches give an optical illusion that the repulsor block is made out of metal
|
 |
A closeup view of the Speeder Bike's power cell (turbine-like contraption)
|
It's early days yet for this renewed vigor for all things hobby-related, and I don't want to jinx it. For now the revival rolls on with yet another shelved project about to be resurrected, namely the Space Battleship Yamato 2199 Cosmo Reverse scale model kit version. So with the ongoing Girl's Rider figurine and the recently revived Star Wars Speeder Bike, this means I'll have three projects running simultaneously as the first quarter of 2022 draws closer to an end. Let's hope this isn't a false dawn as I don't think I can get through another malaise filled hobby period so soon after the disastrous last two years. Anyway there are worse things happening in the world right now, so I'll keep it simple as this blog draws to an end. Stay safe, and be well!


.jpg)

Looking great! Can't wait to see more!
ReplyDeleteThank you for you continued support Michal.
DeleteSplendid work, enormously realistic. I also find the Vallejo metallics kind of hard to work with, but I've never tried to thin them with the airbrush thinner you speak of, I may have to give it a try! Thanks for the tip!
ReplyDeleteThank you for your kind words Suber. As for using the airbrush thinner ... don't use too much airbrush thinner though. Just enough for the paint to be thin enough to be manipulated accurately. Different colors have different viscosity so it's always a learning process with Vallejo Model Color paints.
DeleteNice work and good luck for a successful 2022 :)
ReplyDeleteThank you so much. I hope for a good 2022. At this rate it's will be the best in many, many years. But I am counting my chickens before even getting any eggs so ... ;) :)
Delete