Just as it was for the upper section, I had similar misgivings for ignoring the manual's assembly order. Instead I had put together all relevant components onto the Speeder Bike's Lower Hull before combining the upper and lower hulls together. Whether this will adversely affect the final assembly process which for me means snap-fitting large pieces with fragile attachments - the Steering Vanes on Outriggers; the Upper Hull with all its components fully attached; and this the Lower Hull sub-assembly - remains to be seen. For now let's see how the Lower Hull Components was put together.
.jpg) |
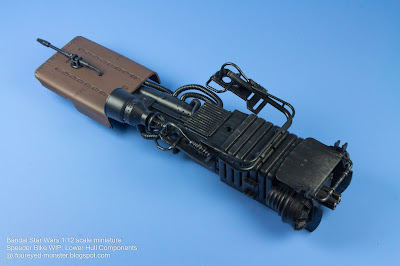
Star Wars Speeder Bike work-in-progress: Lower Hull and its components attached
|
In keeping with my modus operandi for all things Bandai, I had painted the individual parts and sub-assemblies first before attaching them to an also fully-painted Pseudo-Metallic Chassis/Main Frame Structure. And of the three Lower Hull Components I painted - i.e. the lower hull armor, blaster cannon, and rocker-pivoted footpad - it's the last piece that's most fragile. As such it's the piece that I was most worried about with further assembly that's required along the line.
.jpg) |
Lower Hull Components: bottom armor plate, rocker-pivoted footpad, and blaster cannon
|
.jpg) |
Speeder Bike's blaster cannon (left) and rocker-pivoted footpad (right)
|
.jpg) |
Speeder Bike Lower Hull Components next to the Main Frame Structure/Chassis
|
Despite my heightened apprehension about breaking the rocket-pivoted footpad, the assembly process went off without a hitch. But I'm not counting my chickens just yet as there is a much more difficult assembly process to be tackled i.e. the final assembly process mentioned earlier.
.jpg) |
| Star Wars Speeder Bike Lower Hull with a near-full complement of components installed |
.jpg) |
| Speeder Bike's lower hull is at this stage fully painted and weathered |
.jpg) |
Components like the Rear Side Hull Plating/Armor and Air Brakes (not shown here) ...
|
.jpg) |
... have yet to be attached to the Speeder Bike Lower Hull because those pieces are best assembled ...
|
.jpg) |
... only once the upper/lower hulls and steering vanes/outriggers and fixed together
|
If you have been following along with the Speeder Bike's progress since the beginning you may have noticed that the rear side hull plating/armor and air brakes have not been fixed onto the chassis. There is a reason for that. Before the aforementioned parts are
fixed onto the chassis, I fel that I should first put together all
the sub-assemblies completed so far i.e. the Steering Vanes/Outriggers; Upper Hull; and Lower Hull (shown in this post). This is just a matter of preference in that I believe it would be easier to handle and fix the Lower Hull onto the Upper Hull sans the said parts.
.jpg) |
Fragility of the rocker-pivoted footpad as well as the existence of a myriad of ...
|
.jpg) |
... other components such as the power cell, blaster cannon, etc. makes the bottom-half ...
|
.jpg) |
... of the Speeder Bike's surface uneven thus necessitating an elevated base for display.
|
As it stands at this point in time, I have in my hands all the full-painted parts and sub-assemblies that I need to proceed with the final assembly process of the Speeder Bike. It has been a long journey, but it'll end soon for this iconic Star Wars vehicle. And this opens up another slot in the hobby worktable, which I intend to fill with a type of model kit I have never attempted to build before. But more on that later. For now, I thank you for taking the time to read this blog. Stay safe, and be well.

.jpg)
.jpg)
.jpg)
.jpg)
.jpg)
.jpg)
.jpg)
.jpg)
.jpg)
.jpg)
.jpg)
.jpg)


.jpg)

Great progress!
ReplyDeleteThank you Michal.
DeleteThis is coming along nicely. I'm looking forward to seeing the whole kit ready!
ReplyDeleteThank you very much Suber. I hope to upload photos and a video of the final assembly process in the coming weeks.
Delete