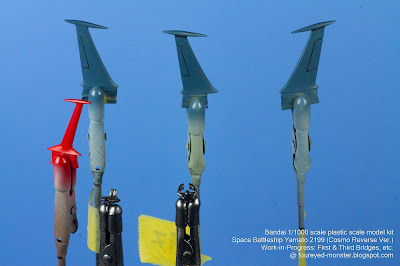
Overthinking things is an unfortunate trait that I possess, and it resulted in a prolonged hesitation to start work on the First Bridge of the Space Battleship Yamato 2199 Cosmo Reverse Version. But I am getting ahead of myself. Beforehand, I need to explain the characteristics of the First Bridge that lead to my overthinking. To simulate windows, the First Bridge has a clear part fixed within its sub-assembly. As such the clear parts are located in recessed niches at regular intervals at the front. For the longest time I couldn't decide between using either a masking paint or masking tape to protect the clear parts. So much so that inertia set in, and the project stalled for a prolonged period.
.jpg) |
Space Battleship Yamato 2199 (Cosmo Reverse Ver.) work-in-progress: Base-coating and Panel-lining of the First/Third Bridges, Missile Launchers, and Lower Hull Fin
|
.jpg) |
| Space Battleship Yamato 2199 (Cosmo Reverse Ver.) work-in-progress: Base-coating and Panel-lining of the Upper and Lower Hull Fins as well as Rocket Anchors |
So what changed? How was my mental block - silly as it was - finally overcome? I would love to say an inspiring eureka moment allowed me to solve this dilemma but I would be lying. It all boiled down to picking a choice in which I felt most confident in pulling off, and that was using masking tapes. And with the decision made, assembly of the First Bridge proceeded without a hitch, followed by the Third Bridge and Missile Launcher Structure. Meanwhile, the Rocket Anchors and Fins were standalone parts that needed no assembly. They only required minimal prep work such as cleaning of nubs and mold lines. The diagram below shows where these components fit into the whole battleship.
.jpg) |
Diagrammatic representation of the parts worked on in this session
|
.jpg) |
Foundational Base of the Missile Launcher and First Bridge assembled and prepped for priming
|
.jpg) |
| First Bridge with the Captain's Room (clear part at the top of the sub-assembly), and portholes masked |
.jpg) |
| First Bridge sans the Captain's Room (note: top of the sub-assembly is now without the clear part) |
.jpg) |
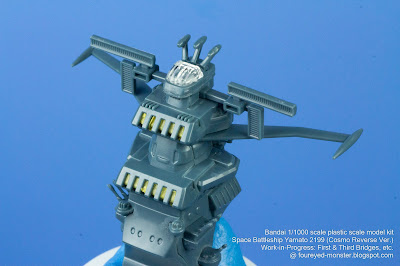
| Missile launcher structure, which would've been an exhaust funnel in a traditional battleship |
.jpg) |
Third Bridge which is located at the lower hull of the Space Battleship Yamato
|
.jpg) |
Rear and Lower Hull Fins as well as the Rocket Anchors, all ready to receive their primer coat
|
Once the appropriate sections were masked off, it was time to apply the primer coat. As with the earlier hull pieces, I used the Tamiya Fine Surface Primer (Light Gray) to prime the First/Third Bridges, Missile Launcher, Rocket Anchors, and Fins (see below).
.jpg) |
Space Battleship Yamato 2199 (Cosmo Reverse Ver.):
Priming the First/Third Bridges, Missile
Launchers, and Lower Hull Fin with Tamiya Fine Surface Primer (Light Gray)
|
.jpg) |
| Space Battleship Yamato 2199 (Cosmo Reverse Ver.):
Priming the Upper and Lower Hull Fins as well as the Rocket Anchors with Tamiya Fine Surface Primer (Light Grey) |
At this stage and after priming, the work done here comprised just base-coating and panel-lining. The former was accomplished using a Mr.Color lacquer paint recipe for two hues named Yamato Gray and Yamato Red respectively while the latter made use of the Mr. Weathering Color (Multi Black). And as you can see from the results below, the masking tape was effective in preventing both primer and paint from getting onto the clear parts that represent bridge windows/portholes.
.jpg) |
First Bridge and Foundational Base of the Missile Launcher: Base-coat and panel-lines completed
|
.jpg) |
First Bridge: base-coated and panel-lined, and portholes unmasked (isometric view, front)
|
.jpg) |
| First Bridge: base-coated and panel-lined (isometric view, back) |
.jpg) |
Foundational Base of the Missile Launcher with Fins: base-coated and primed (isometric view, front)
|
.jpg) |
Foundational Base of the Missile Launcher with Fins: base-coated and primed (isometric view, back)
|
.jpg) |
Third Bridge: base-coated and panel-lined (isometric view, front)
|
.jpg) |
| Third Bridge: base-coated and panel-lined (isometric view, back) |
.jpg) |
Missile Launcher: base-coated and panel-lined (also shown here is the small lower hull fin)
|
.jpg) |
| Upper/Lower Hull Fins (including fin from photo above) and Rocket Anchors: base-coated and panel-lined |
But before these individual parts and sub-assemblies are fixed onto the hull, there are other sub-assemblies like the Main Guns, Secondary Armaments,and Catapults to be completed first. Once all these are done, there are water decals that need to be placed on the missile launcher, guns, and hull. Only then can the assembly process proceed further. Moreover upon perusing the photos above, I noticed I had forgotten to apply a clear green paint on the First Bridge windows. So that's another to-do-item on the before-further-assembly checklist. Most important though is my unwavering desire to maintain momentum in hobby projects. I'm just thankful my years-long hobby malaise hasn't resurfaced. On that small blessing I'll end this post with a wish for you to stay safe, and be well.

.jpg)
.jpg)
.jpg)
.jpg)
.jpg)
.jpg)
.jpg)
.jpg)
.jpg)
.jpg)
.jpg)
.jpg)
.jpg)
.jpg)
.jpg)
.jpg)
.jpg)
.jpg)
.jpg)
.jpg)


.jpg)

Fantastic looking project!!
ReplyDeleteThe Space Battleship Yamato is quite impressive even at 1/1000 scale!
DeleteGood to know you broke your block! Nothing can stop you now...
ReplyDeleteDon't want to jinx it :) Hopefully the hobby malaise doesn't come back!
Delete