Tuesday, 31 January 2012

Khorne Berzerker Rhino interior ... humble beginnings

Should I ... shouldn't I ... after having grappled for a few days with the question of whether to paint the interior of my zerkers' armoured transport, I decided to go for it. Time to make up for loss time due to indecision and paint, paint, paint.

First, all areas of the interior which did not require a basecoat were masked with Scotch Tape. Additionally, movable parts such as the backdoor hinges and parts that will be slotted into a groove during assembly were masked with or some rubber mastic adhesive (more commonly known as Bluetack) to ensure that paint does not add thickness and cause problems during later assembly.

Prepped up for basecoating

Then, parts forming the Rhino's interior were sprayed with Skull White. Ideally, the distance between the spray can and the figure should be around 12 inches, according to Games Workshop. Here it was slightly less but thankfully no clumping of paint occurred.

Basecoating the pieces
Pieces with Scotch Tape and Bluetack removed
Skull White was used as the basecoat paint to ensure a 'brighter' canvas for the subsequent paint layers. I plan to glue shut both the side doors as well as the top hatch, so it will be rather dark in the interior as only the back door can open to allow light in.

Now all that's left to do is to paint the interior before assembling it. Haven't decided on final colour-scheme of the interior yet but I am getting inspiration from some cool pieces by limp and snake88. I am leaning towards a brighter colour scheme to show off the darkly lit interior but that seems counter to what a Chaos Rhino interior should look like. Any comments or advice on what would be a cool interior colour scheme for the Black Legion/Khorne Rhino is most welcome.

Thursday, 26 January 2012

Midtones done, 'zerkers are assembled and ready for highlights, decals and basing

It being the lunar new year holiday season and having some time-off has allowed me to paint faster than I have ever had before. Hopefully, I can get some momentum going to paint even faster and work on yet more miniatures.
Kill, maim, burn and errr loot?
Finally, after some painfully slow progress, I have gotten the zerkers' midtones done up, got them assembled in some awesome (I gotta find some better adjectives) poses and ready for highlights, decals and basing.
Did more 'How-To' photo montages and am getting a hang of taking better photos.
Midtones done - armour has layer of Red Gore, leather pieces have Bestial Brown added, zerker eyes have Snot Green, and in the previous step gold parts had 1:1:1 mix of three metallic paints
A watered down layer of Red Gore was applied to 'brigthen' up the armour. Having diluted paint to work with allowed me to 'drag' the paint pigments towards the area where I wanted the armour to look brighter (see picture below).
Being a novice painter, end-results were not satisfactory but the idea is roughly there. I expect the highlights to look much better when diluted Blood Red is applied in the next, proper highlights stage).

With midtones completed, the model was assembled in preparation for the next stage.
I'm too sexy for my boots, too sexy for ...
A sweet ride for my zerkers
To maintain the momentum I have going, parts to a Rhino that I plan to use for these zerkers have been taken out and cleaned. Washed it using plain dish soap as I was out of white vinegar, a liquid which Alvin of Glued My Fingers fame recommends.


To a noob like me who has never assembled a vehicle before, the parts in itself look awfully daunting but I am up for the challenge. Now, if only I can pimp it to look like a Mitsubishi Evo X.

Tuesday, 24 January 2012

Happy Lunar New Year!

Belated new year wishes on my part but do have a good year full of health, happiness and prosperity, for you, your family, loved ones and friends. Keong Hee Huat Chai everyone.

Progress on my zerkers have been pitiful ... just managed to put on a second coat on the gold parts and give it a wash.
Tried to continue doing my "How-To" picture montages using the new lamp but ended up with mixed results. Was playing around with the camera's white balance settings but in the end it was better to just leave it at auto. More tweaking of lamp-positioning is needed as there are instances where the frequency lines do not appear and where lighting seems to be 'brighter'.
Gold areas were painted with 1:1:1 mixture of Burnished Gold:Dwarf Bronze:Tin Bitz
A wash of Gryphonne Sepia was applied to the gold parts
Sigh ... final how-to series of pictures will not only show the steps involved in painting the miniatures but also a nooby's struggle in getting the hang of taking good pictures.

Sidetrack to some awesome miniature cars
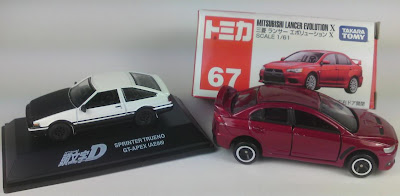
Hopefully a sign of good things to come as I finally managed to get my hands on miniature versions of two of my all-time favourite cars after three-plus years of searching. But were found by my wife who got them as a gift for me. xD 
On the left is the famous Toyota AE86 car driven by Takumi in Initial D. On the right is my dream car. Others may dream of a Ferrari or Porsche but just give me an Evo X and I will be happy. On that note, have a happy lunar new year everyone!!!

Tuesday, 17 January 2012

At last ... a lamp to light my way

For most hobbyists, a work lamp would have been one of the first things in their to-get-list. For me, it was placed, wrongly I might add, way down the list as I splurged on paints and models instead. Then unexpected circumstances caught up with me, resulting in the budget for my miniature hobby to be slashed to a big fat zero. Currently, my budget is still nada, zilch, zip ... but I decided to make an exception for essential hobby tools. So finally I got the Ikea Work Lamp I had been eyeing for a long time. It cost RM45 (US$14) but its worth it.


Bulbs used with this lamp
Currently, I use two different bulbs, one for painting (15W/75W) and one for taking photos (20W/100W). Both were on sale at a local Tesco store for RM15.88 (US$5) each.


First pictures using the lamp
Took a couple of trial photos using the work lamp. One weird anomaly I encountered was frequency lines running across my camera display as I took the photos, not unlike what you would see if you tried taking a picture being displayed by a CRT TV. If you examine the photos below, you can just make out a series of faint shadowy lines running across the picture from top to bottom. Well, that's one problem that needs solving.

Photos still could use some improvement I guess. Placing of the light source as well as some tinkering with my camera-phone's limited settings might be the way to go. Any helpful comments would be appreciated. 


Moral of the story, learn from this nooby's mistake. You so need a lamp. It's the one thing you must not skimp on. Get it ... now.

Monday, 9 January 2012

How to paint a Chaos power sword (fast version)

After the build-up of what would be the unveiling of a legendary chaos power sword, results were ... meh. Nonetheless, it does offer a very quick way of painting a power sword. All steps shown below can be completed in about 15 minutes or less. Unfortunately with the sun as the main light source, picture quality was uneven.

1
a) Sword was first undercoated using Chaos Black.
b) Metals parts were then painted the usual Boltgun Metal with a touch of Badab Black wash.
c) Straps on the sword's hilt were basecoated with Scorched Brown, followed by a layer of Bestial Brown, and highlighted using Vermin Brown.
d) A coat of Dark Angels Green was painted on the blade's upper-half in an arrow-shaped manner. Edges of the sword and ridge line down the centre were also painted with Dark Angels Green.

2  

A layer of of Snot Green was added on-top of the Dark Angels Green layer with care, leaving some parts of the latter colour showing,

3
Scorpion Green was then painted on-top of the Snot Green layer. As with step two, when painting be careful to leave some of the darker Snot Green layer showing so as to give an illusion of colour transition from a darker shade to a lighter one.

4
a) Sword's upper-most part was painted with yet another lighter shade of green (1:2 mix of Scorpion Green:Skull White), again leaving some of the darker shade of Scorpion Green showing.
b) Lastly, Skull White was painted on the tip of the sword.

So there you have it. An obsidian power sword in the midst of powering up.

Monday, 2 January 2012

Long before Space Marines ... there were Pirates

Before I started painting Game Workshop's Citadel miniatures, Japanese anime 'miniatures' were my passion. At first, I just collected fully-completed miniature figures from the various anime shows that I love. Eventually, I got interested in assembling and painting them, leading me to Luffy, of One Piece fame, and his motley crew of pirates and the ships they sailed in. 

Luffy (right), seen here with two ship models from the anime One Piece

Having gone through the arduous process of basecoating my Khorne Berzerkers this couple of weeks, I decided to revisit my anime 'miniatures' and see how I could apply some of the tools and techniques I had learnt while painting Citadel miniatures on Luffy's famous straw hat.

Pre-Citadel washes and paints

Early attempt at creating shadows

Prior to my experience with Citadel Washes, I had tried using a Gundam real touch marker to ink the shadowy recesses of Luffy's straw hat. Needless to say, it was a disaster and the end-result looked very artificial. Hence, I washed the gundam ink away with nail polish and tried again ... W40K style.

Post-Citadel washes and paints

Luffy's straw hat, painted using GW products

Well, the new approach was successful ... in parts. The red band around Luffy's straw hat turned out kinda ok. It was basecoated with Mechrite Red, layered with Red Gore and highlighted with Blood Red. But the interplay between light and dark in the straw hat's weaving didn't turn out too well. My mistake was to apply the Devlan Mud wash onto the hat without basecoating it first. This caused the ink to stick onto the plastic hat in an inconsistent manner. Something to look out for in the future.  


Compass to the world of Warhammer 40K

Other than a desire to learn more about W40K lore, anime models also played an important part in piquing my interest in miniature painting techniques. Models in my One Piece collection range from being very much larger than Citadel miniatures ...

Attack of the Giant Pirate from Mars?

... to being slightly smaller.
Itsy bitsy models

It was the latter that forced me to look for painting techniques for small-scale models, which in turn led me to Games Workshop's webpost on miniature painting.


Anime I love

One Piece, Bleach, Naruto Shippuden, Soul Eater, Fairy Tail, Initial D etc count among the many anime that I love. But there are three that have managed to really pull at my heart-strings (I am an old softie after all). My wife also loves the first two. They are:

1. My Neighbour Totoro

2. K-On!
3. Welcome to the NHK
Related Posts Plugin for WordPress, Blogger...