Sunday, 10 November 2019

MG RX-78-2 Gundam Ver.3.0 [WIP: Leg Outer Panels & Hip Joints]

Like meat on the bones, the outer armor panels - when attached to the Leg Inner Frames - provide a significantly bulkier presence to both legs. This might seem like a natural progression of the build but the designers deserve some kudos for designing great looking shapes, combining both sharp and rounded edges, to deliver legs with oomph; legs worthy of arguably the most famous Gundam.    

Master Grade RX-78-2 Gundam Version 3.0 work-in-progress: Leg Outer Panels &  Hip Joints (isometric front view)
Master Grade RX-78-2 Gundam Version 3.0 work-in-progress: Leg Outer Panels &  Hip Joints (isometric back view)

Although I would've expected it to be the other way around, the part count of the Leg Outer Panels turned out to be actually higher than those of the Leg Inner Frames. Detailed analysis shows this was due to the larger single-piece-molded-parts on the skeletal frame (as an equivalent think femur and tibia on the human leg). Apart from some minor masking, the painting process was straightforward.   

Numerous tiny pieces of the Leg Outer Panel parts were all individually painted before assembly

Meanwhile, putting it all together was almost intuitive but not quite. I don't have the experience for that to happen yet. There was a lot of referencing to the instructions to make sure the right pieces went into the right place. But if push came to shove, say I lost the instructions, I dare say I could've figured it all out like a jigsaw puzzle if I spent enough time tackling the assembly task. Below are the series of photos showing the various parts being slowly put together one sub-assembly at a time.

Pieces of one Leg Outer Panel all painted up and decaled; awaiting assembly onto the Inner Frame (center)
First some of the outer panel pieces were pieced together prior to being attached to the Leg Inner Frame
At this stage, most of the outer panels have been attached to the inner frame except for the knee area
Only the uppermost Leg Outer Panel (white part) is left unattached together with the Hip Joint (metallic part)
RX-78-2 Gundam Right Leg: Outer Panel & Hip Joint fully attached to the Inner Frame

As is the case for the entire RX-78-2 Gundam so far, color separation of the leg outer armor panels was well thought out by the Bandai designers. I just followed their recommendations and painted the panels as intended in the instructions. What's nice to know is that one doesn't really have to follow the recommended color scheme. Because the parts are already separated based on color, one could use that as the basis to paint your own color scheme. For example, you can just replace the light brown panels with another color say pink; the light bluish grey with violet; and the white panels with red, or a different combination all together. This would result in a whole different Gundam altogether.

Color separation on the outer armor panels make the leg look less flat as a whole
Orientation of the Hip Joint means that this is the right leg of the RX-78-2 Gundam
Exposure of the innards at the back of the knee ensure the inner frame is not completely covered up
Metallic innards are most visible around the knees, especially when the leg is bent
Decals on the leg aren't numerous but enough exists to increase the realism of the whole pice
Color separation of outer panels; metallic innards; and strategically placed decals form a potent mix

On my previous post I had shown that the Leg Inner Frame could bend in on itself at a 180 degree angle. And as expected, once the outer armor panels were attached the leg could no longer bend that much. At best the thigh could only bend around 120 degrees towards the calf. But in all fairness, even this level of movement was extremely impressive considering the bulkiness of the outer armor.

As expected, the outer panels on the leg prevent it from fully bending in on itself
Freedom of movement of the leg with the outer panels attached was still very impressive
Notice how the outer panel armor on the knee opens and closes to facilitate flexibility of the joint

Now complete, both legs are part of larger Lower Body section that also comprises the Ankles/Feet and a soon to be completed Waist Unit. Below are photos of both completed legs.

Both legs of the RX-78-2 Gundam sans ankles and feet (front view)
Both legs of the RX-78-2 Gundam sans ankles and feet (inner side view)
Both legs of the RX-78-2 Gundam sans ankles and feet (back view)
Both legs of the RX-78-2 Gundam sans ankles and feet (outer side view)

For the legs to be part of the larger Lower Body it needs to connect to the Ankles/Feet via holes on the lower end and to a Waist Unit via Hip Joints on the upper end (see below).

Ankles/feet will attach to the holes (see above) at the end of both legs
Hip Joints at the other end of the legs will attach to the soon-to-be-completed Waist Unit

So all that's left of the Lower Body to be tackled is the Waist Unit. This will be the next step. Once done, the lower half of Grandpa Gundam will be ready for assembly. And as always I leave you with quote that may not be entirely relevant but it's a quote nonetheless. This week we have a quote from Lucifer Morningstar who says ... What I hate more than anything is a liar, a charlatan, someone who doesn’t believe in what they say. That's a lot of people to hate. Oh well, have a great week ahead!

https://www.facebook.com/FourEyedMonster-313145002078520/

Sunday, 3 November 2019

MG RX-78-2 Gundam Ver.3.0 [WIP: Leg Inner Frames]

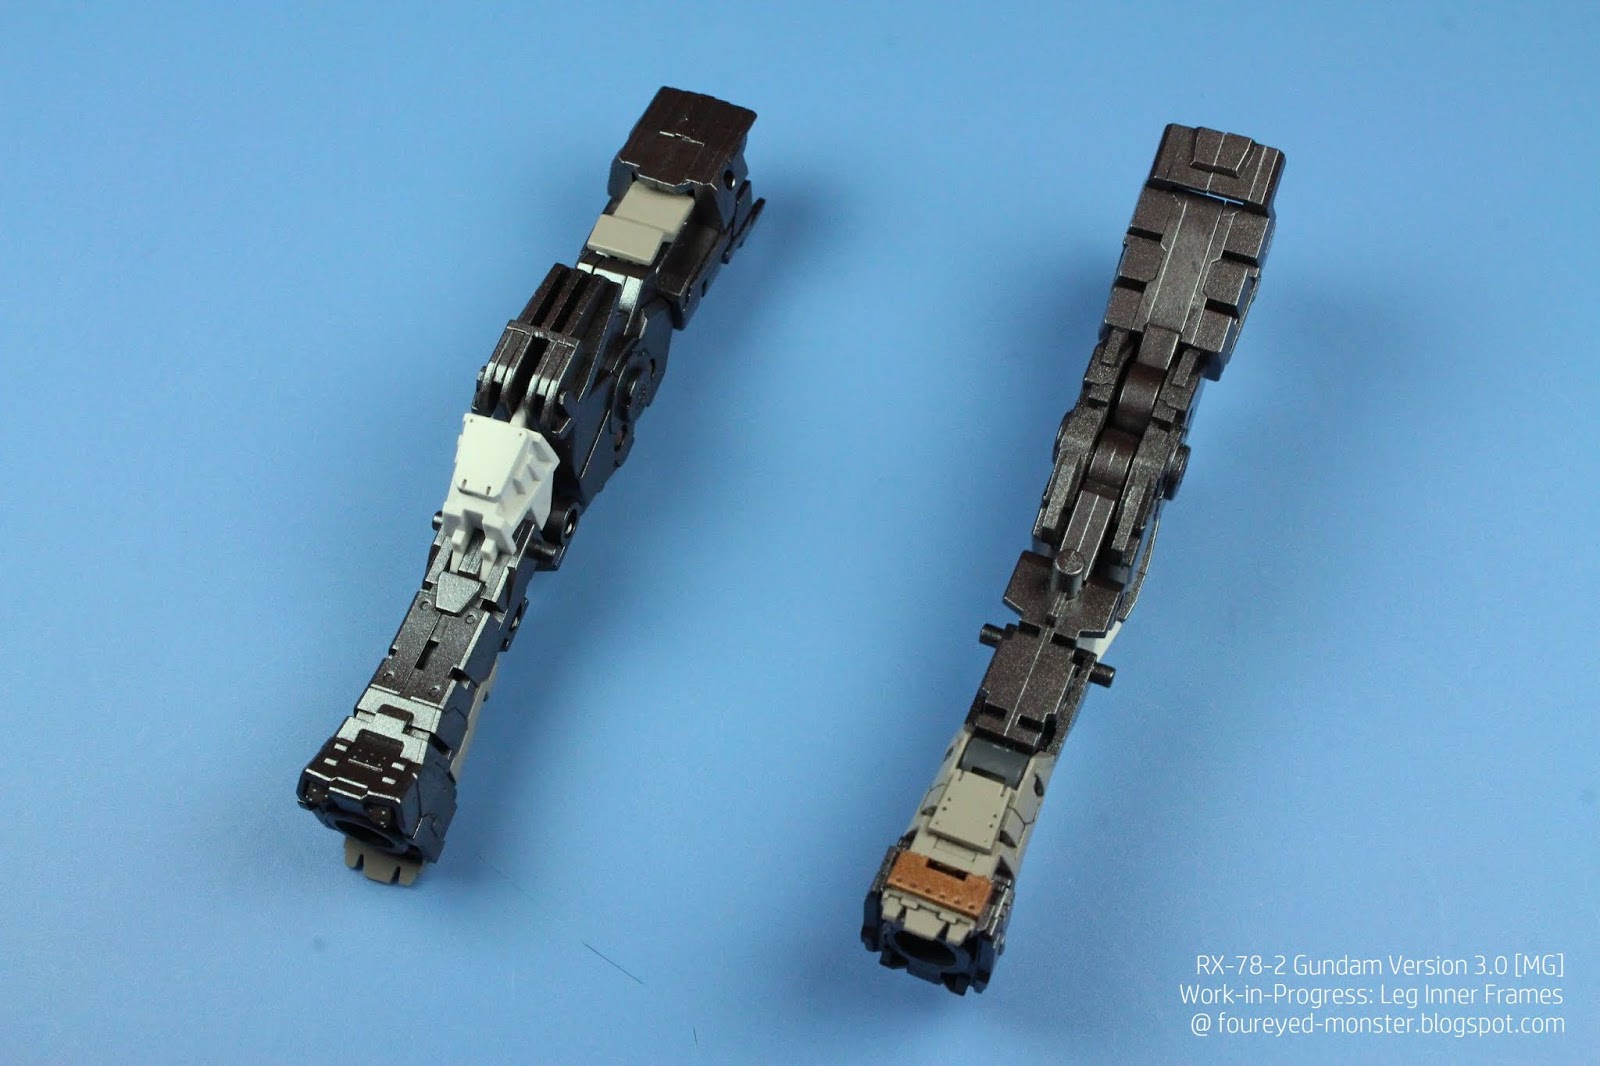
As with the arms and torso of the RX-78-2 Gundam, the legs possess an inner frame that can be assembled first before the outer armor panels are attached. In all instances - on the arms, torso or leg - when inner frames were being build, the assembly design has been such that some pieces outer armor would invariably become part of the overall mix. Visually these outer armor panels stick out by virtue of being the few non-metallic pieces of the inner frame build (see below).

Master Grade RX-78-2 Gundam Version 3.0 Work-in-Progress: Legs Inner Frame (angled, side views)
Master Grade RX-78-2 Gundam Version 3.0 Work-in-Progress: Legs Inner Frame (angled, front & back views)
Master Grade RX-78-2 Gundam Version 3.0 Work-in-Progress: Legs Inner Frame (opposite side views)

Similar to the Arm Inner Frame before it, the number of parts involved in the Leg Inner Frame build was surprisingly low. Both had assembly processes that were considerably less complicated than the Torso Inner Frame which comprised a fairly high part count. The only issue of note, if you could call it that, was the need to mask some of the parts during the painting process. This was more of a chore rather than being difficult, due to the need to mask tiny parts with big clumsy hands.  

Leg Inner Frame parts were all individually painted before being assembled

Compared with the arms and torso, it was actually much easier to build the leg's inner frame. That could have been because I had become more experienced at this stage or it was due to the inherent design of the build. Either way I found it almost effortless when putting the Leg Inner Frame together. Perhaps the parts with hooks confused me for a while but it wasn't too big of a deal.

Parts of the Leg Inner Frame painted up and awaiting assembly; no decals were required at this stage
Trickiest part of the Leg Inner Frame build was attaching the hook-like parts together (see 11 o'clock position) ...
... which was then attached to the largest inner frame part (see center piece) ...
... a small piece with the copper surface was then attached to the lower end of the center piece
Upper section of the Leg Inner Frame was attached to a side metallic panel which will eventually cover up the knee joint (see extreme right)
One of the two RX-78-2 Gundam Leg Inner Frames after the parts were fully assembled
White and light brown sections constitute the Outer Armor Panels of the Leg Inner Frame build
Holes and pegs seen on the inner frame will be points onto which the Outer Armor Panel will attach
Masking was required when painting the lower section (see copper atop the light brown surface)

Good articulation design of the build allows the Leg Inner Frame to bend almost 180 degrees onto itself. However, it's likely the knee joint might not bend as much once the Outer Armor Panels are attached onto the inner frame. At the very least, I would expect this level of articulation to allow the RX-78-2 Gundam to execute the "take a knee" pose, once the mecha is fully assembled. 

Leg Inner Frame freedom of movement: Fully bend in on itself at an 180 degree angle
Leg Inner Frame freedom of movement: Bend at a 90 degree angle
Leg Inner Frame freedom of movement: Bent at a 45 degree angle
Leg Inner Frame freedom of movement: Fully extended

It's a shame that most of the leg's inner frame will eventually be covered up by the outer armor panels.There is a beauty to just the inner frames themselves. In fact some modelers have created an "open hatch" version of the build in which they leave all the Outer Armor Panels half open to give visual access to the inner frame. Although I won't be doing my own "open hatch" version, I still had to paint the inner frames. Even with the outer panels fully attached, some inner frames still show.

Front view of the RX-78-2 Gundam Leg Inner Frames
Side view of the RX-78-2 Gundam Leg Inner Frames
Back view of the RX-78-2 Gundam Leg Inner Frames
Opposing side view of the RX-78-2 Gundam Leg Inner Frames

While I've managed to keep to my self-imposed minimum of one blog post a week by writing about my backlog of completed stuff, it has been relatively quiet on the actual hobby front these past month or so. Thankfully it's not another episode of the dreaded hobby malaise. It's just life imposing itself on available hobby time. Oh well, there is always tomorrow. And with that I leave you with a quote from Stranger Things 3 ... Yeah, the real world sucks, deal with it like the rest of us - Jonathan Byers

https://shireworks.blogspot.com/https://www.facebook.com/shire.works

Friday, 25 October 2019

MG RX-78-2 Gundam Ver.3.0 [WIP: Ankles & Feet]

In keeping with the order of assembly given in the instructions, I began work on the Leg Unit of the RX-78-2 Gundam from the bottom up. This meant starting with the mecha's ankles and feet. These together with the Leg Inner Frame/Outer Panels and the Waist Unit will eventually make up its Lower Body. Here then are the very foundations of Grandpa Gundam; its ankles and feet. 

Master Grade RX-78-2 Gundam Version 3.0 Work-in-Progress: Ankles & Feet (Front View)
Master Grade RX-78-2 Gundam Version 3.0 Work-in-Progress: Ankles & Feet (Back View)

From the outset it was fairly clear what Bandai was trying to accomplish when they separated the lower leg build into ankles and feet rather than fusing it as one whole piece. More than that, Bandai had also engineered two articulation points on the feet itself thus allowing the sole to bend both outwards and inwards on itself. Taken all together, this design should allow for a higher degree of mobility on the feet and ankles. That's always a good thing when it comes to posing your Gundam. 

Sticker decals provide the only out-of-the-box options for markings on the ankles and feet
Build complexity of the ankle and feet translates into better articulation and movement
Bottom and top view of the Master Grade RX-78-2 Gundam's ankle and feet

As per the norm in a Gundam build, the greater freedom of movement usually comes hand-in-hand with higher complexity thus more tiny parts to paint before assembly. This is something I like to term as the Gundam Process. Admittedly though, the said process has slowly become second nature to me. While I do not claim to be good at it yet - more complicated builds lie ahead - now I can at least face the task with much less trepidation. Practice breeds a familiarity that lays the foundation for a more confident application of technique. This in turn leads to an improved skill set. And if all goes well the end result should be an artful piece of scale modelling. That's the hopeful idea anyway.     

Repeatedly having to paint and assemble small parts into a greater whole equals familiarity with the Gundam process

Despite their design complexity, actual assembly of the foot/ankle wasn't too complicated to be fair. It was quick and painless, which made the highly articulated final build all that more impressive. Below are a series of shots showing the gradual assembly of the RX-78-2 Gundam's feet and ankles. 

Individual parts of an ankle/foot all painted up with decals applied, and awaiting assembly
Assembly begins with the core of the foot inner frame (see left side) ...
... with the inner frame done, next up are some armor panels (see left side) ...
... and finally all that's left for the foot is its final three outer armor panels (see left side)
Feet is finally assembled (see left) with the ankle parts (see right) soon to follow suit
RX-78-2 Gundam foot (see left) and ankle (see right) fully assembled

It's always nice to get a section of a build done up quickly sans any problems. And the ankles and feet of the RX-78-2 Gundam was that kind of build. They look good to boot.

Master Grade RX-78-2 Gundam Version 3.0 Work-in-Progress: An ankle and foot

With the bottom up approach, next on the build list are the leg inner frames. The process is similar to that of the mecha's arms in which an inner frame provides structure and articulation while the outer panels provide the aesthetics. For now I will wallow in the satisfaction of taking another step towards the completion of the Grandpa Gundam project. So it's not without irony that I leave you with this quote just as things are going well for me ... Anything that can go wrong, will go wrong. That's a famous law. If you live a long life, you'll understand. - Tanya von Degurechaff aka Tanya the Evil.  

https://www.facebook.com/FourEyedMonster-313145002078520/

Related Posts Plugin for WordPress, Blogger...