Sunday, 12 January 2020

MG RX-78-2 Gundam Ver.3.0 [Part 1 of 2: Completed]

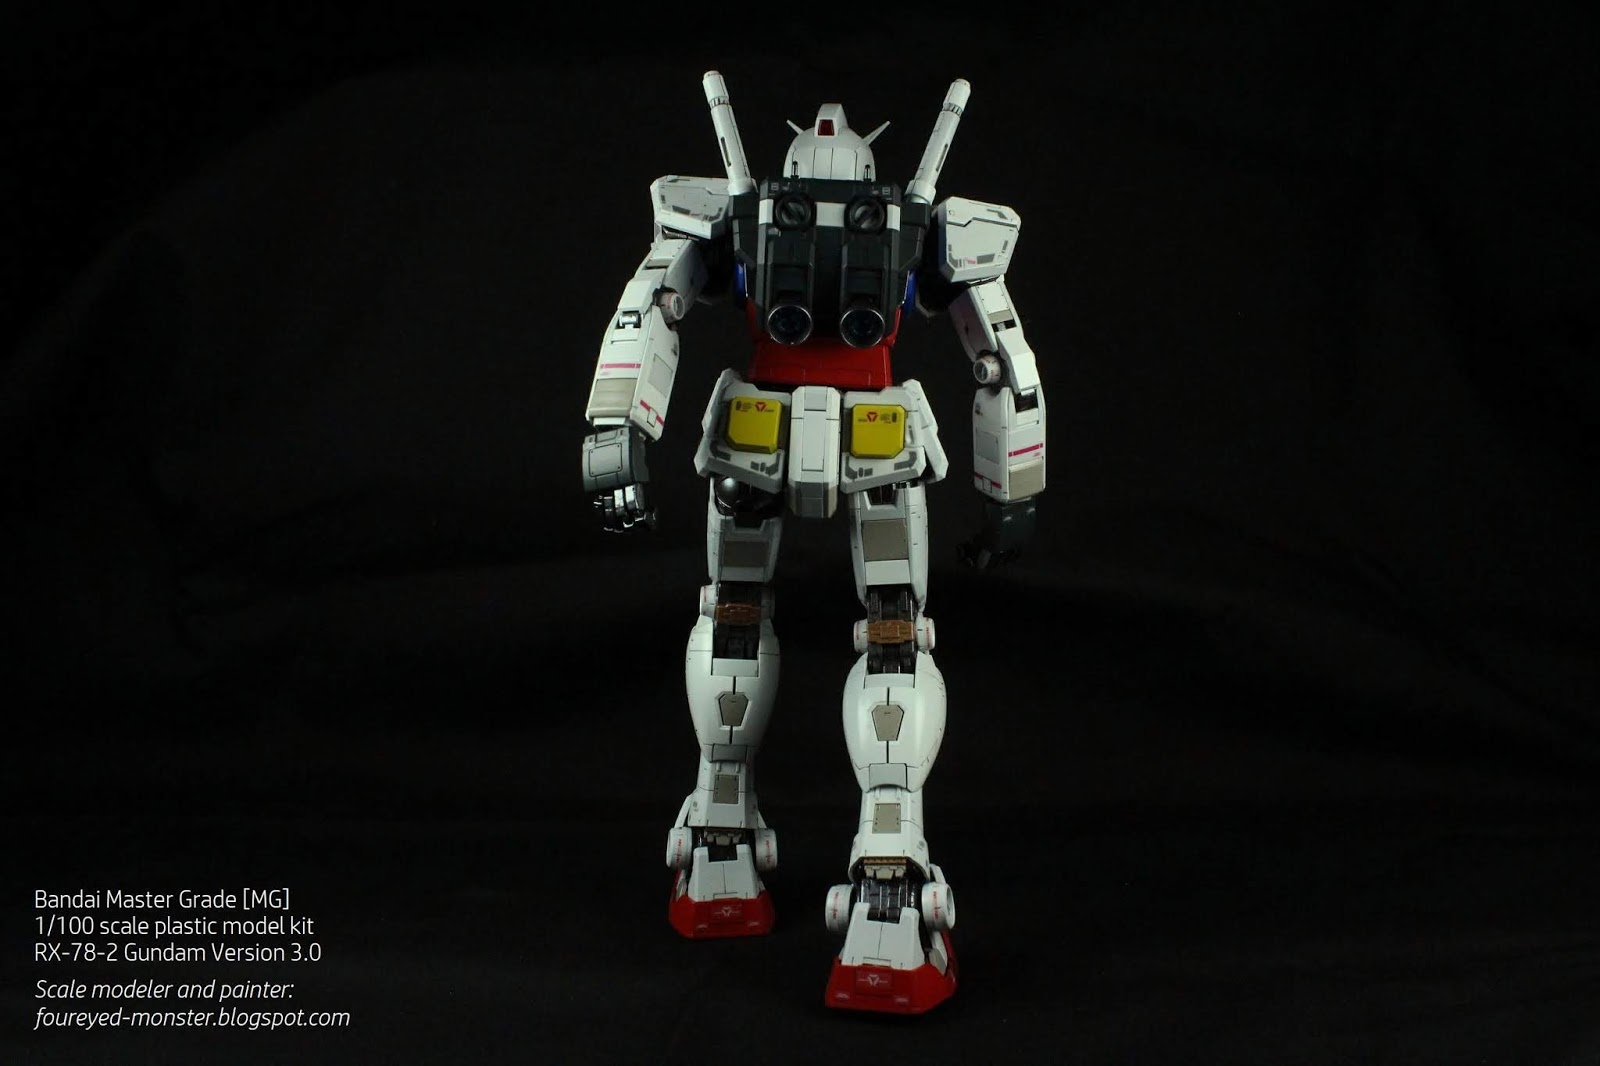
Relief more than elation, although the latter feeling is definitely present, greets me at the journey's end for the Bandai Master Grade RX-78-2 Gundam Version 3.0 scale model kit project. Relief that I could pull off the task of airbrushing and putting together a kit with so many small parts; something I sincerely doubted I could do before this project began. Here then are photos of Grandpa Gundam sans his weapons (that comes in Part 2). Apart from the standalone shots of just the RX-78-2 Gundam, there were also some taken with Amuro Ray (the pilot) and the FF-X7 Core Fighter.  

Bandai Master Grade RX-78-2 Gundam Version 3.0 [Completed, sans weapons]

With hindsight, I cannot believe I had actually contemplated just clear coating the plastic model kit without doing any painting at all. I'm sure doing so would have resulted in pretty decent results depending on the quality of the clear coat used. However, trust me on this, there is just no way a clear coated plastic kit can look just as good or better than a painted plastic kit. Now this might seem to be a no-brainer but the temptation to be lazy and go the former route is so strong that you'll start giving excuses to try and convince yourself to not paint the kit. I certainly did. But I'm glad I resisted the urge to take the easy route and went ahead to paint each and every part of this kit.

Main sub-assemblies of the RX-78-2 Gundam prior to final assembly

Below is a series of photos showing a 360 view of the fully painted RX-78-2 Gundam.

If you were to nitpick, you could say the RX-78-2 Gundam was bottom heavy ...
... but despite that it still looks pretty awesome on the whole, in my opinion
Joints on the RX-78-2 Gundam are extremely flexible thus allowing for various poses
Bandai Master Grade RX-78-2 Gundam Version 3.0 (back view)
Exposed metallic innards of the RX-78-2 Gundam (e.g. back of knees) give it a cool look
Bandai Master Grade RX-78-2 Gundam Version 3.0 (side view, from the left)
Pose adopted by the RX-78-2 Gundam is one of the mecha taking a step forward

Most important in any scale model display is to give it proper context in terms of an appropriate reference object for scale comparison purposes. In this case, the objects came in the form of the 1/100 scale pilot Amuro Ray and the similarly scaled Core Fighter. When displayed next to Grandpa Gundam, both showed how big the mecha is when compared to a human and a fighter plane.

Grandpa Gundam holds Amuro Ray in the palm of his right hand
What's that on the ground? Why it's the FF-X7 Core Fighter
Flexibility of its leg joints allows the RX-78-2 Gundam to get down on one knee ... 
and reach out its left hand for the FF-X7 Core Fighter on the ground
Like Amuro Ray before this, the Core Fighter represents a readily identifiable object for scale comparison purposes
When folded up, the FF-X7 Core Fighter actually fits into the hollow torso of the RX-78-2 Gundam
  
Long forgotten perhaps is the LED gimmick (see below) that lights up Grandpa Gundam's eyes and his headpiece. Unfortunately, the LED lights were too dim for my taste and were near unnoticeable when the whole mecha was placed under strong photography lighting (aka plain IKEA lamps). Access to the LED switch was via the back of the mecha. And this switch was only accessible when the Ransel (Backpack) was removed from the kit. All in all, the LED gimmick held no wow factor for me because the lights were too dim to be seen unless you were looking for it in the first place.   

Total blackout except for the LED lights shining through the eye and headpiece of Grandpa Gundam
With the camera lighting back on, the LED lights are still visible but less so
LED lights from the headpiece is more noticeable when Grandpa Gundam's head is tilted slightly forward
To access the LED light switch, the Ransel (Backpack) had to be removed first
Zoomed out view of Grandpa Gundam with its back exposed and the Ransel on the ground
RX-78-2 Gundam aka Grandpa Gundam cuts an imposing figure even without its weapons

Bear with me though as I'm not yet done with Grandpa Gundam. He still has pose with his weapons and shield à la the scene in Ready Player One, which made me want to start the project in the first place. Although the weapons and shield have been painted, decaled and assembled, it will be difficult to pose them with the RX-78-2 Gundam without some stabilizing anchor. This said anchor comes in the form of a specialized display base. I plan to assemble this base and cover it with a high quality flat clear coat before using it for poses. (And yes, I know that sounds contradictory seeing that I said clear coating can never beat painting. But there is a reason I'm doing in this way and all will be explained in the next post.) So that's next for this project. A final lull before the last storm. 

https://www.facebook.com/FourEyedMonster-313145002078520/

Sunday, 5 January 2020

MG RX-78-2 Gundam Ver.3.0 [WIP: Shield]

A shield is perhaps a fitting subject for my first blog post of the year seeing that I plan to safeguard the exhaustive effort put into this hobby, preventing time wastage. In the spirit of the KISS principle, what all this entails is that I stop working on too many projects concurrently, lest I end up finishing none. It also requires me to stop buying too many new scale model kits before I even complete the ones I have. That, I guess, is my 2020 hobby resolution. But I digress. Below then is the last sub-assembly post for the Bandai Master Grade RX-78-2 Gundam Version 3.0 plastic model kit.

Master Grade RX-78-2 Gundam Version 3.0 Work-in-Progress: Shield

Parts count for the shield was relatively low with good separation, at least that how I see it for modelers who want to paint each and every part. Color scheme comprised white, red, yellow and silver. The metallic parts were intended to be dark grey but I sprayed on a metallic color instead.

Fully painted parts of the Shield: before assembly and before decal application

Putting it all together was as easy a task as it was to paint the separate parts. Everything fit extremely well and the actual task of assembly was an effortless one. No glue was needed. That's how good the fit was. Most importantly, it all looked good to me once it was fully assembled.

Only the red colored section of the Shield required the application of sticker decals
Good parts separation meant the yellow cross and metal sections could be painted first before assembly
At this point all parts of the Shield had been assembled sans the metal sections ...
... which were to be attached to the white colored, back of the Shield
RX-78-2 Gundam Shield, fully painted [back view]
RX-78-2 Gundam Shield, fully painted [front view]

In comparison to the other weapon accessories of the RX-78-2 Gundam, the shield lies in between the Hyper Bazooka and Beam Rifle in terms of size (see below).

Clockwise from the top: the RX-78-2 Gundam Hyper Bazooka, Shield and Beam Rifle

With the shield completed the RX-78-2 Gundam is ready for its final photo shoot. Well, there is a special stand-alone base to be clear coated and used to help in posing the mecha. But I will be posting a full set of photos with just the RX-78-2 Gundam with minimal posing and sans weapons so there will be no more delays to the mecha's final reveal. That being said, I plan to split the final reveal into two parts ... the first as mentioned, and the second of the mecha with weapons and more complicated poses courtesy of the said stand-alone base. So I leave you, my dear readers, with a quote from Ruth Bader Ginsburg ... "So often in life, things that you regard as an impediment turn out to be great, good fortune." And with that I wish you a belated Happy New Year!

https://shireworks.blogspot.com/https://www.facebook.com/shire.works

Sunday, 29 December 2019

MG RX-78-2 Gundam Ver.3.0 [WIP: Hyper Bazooka]

With the holiday season in full swing, my hobby activities seem to have come to full stop. Inertia has set in but not in a bad way as I find myself enjoying other hobbies instead such as PC gaming and watching the English Premier League's insane schedule of football fixtures over the festive period. Thankfully I still had some photos of previously completed steps to upload and write about, although such backup hobby content is rapidly dwindling as I remain inactive for the third straight week. Well enough with the negatives; here then is the RX-78-2 Gundam Hyper Bazooka in all its glory.  

Master Grade RX-78-2 Gundam Version 3.0 Work-in-Progress: Hyper Bazooka
RX-78-2 Gundam Hyper Bazooka (angled, rear view)

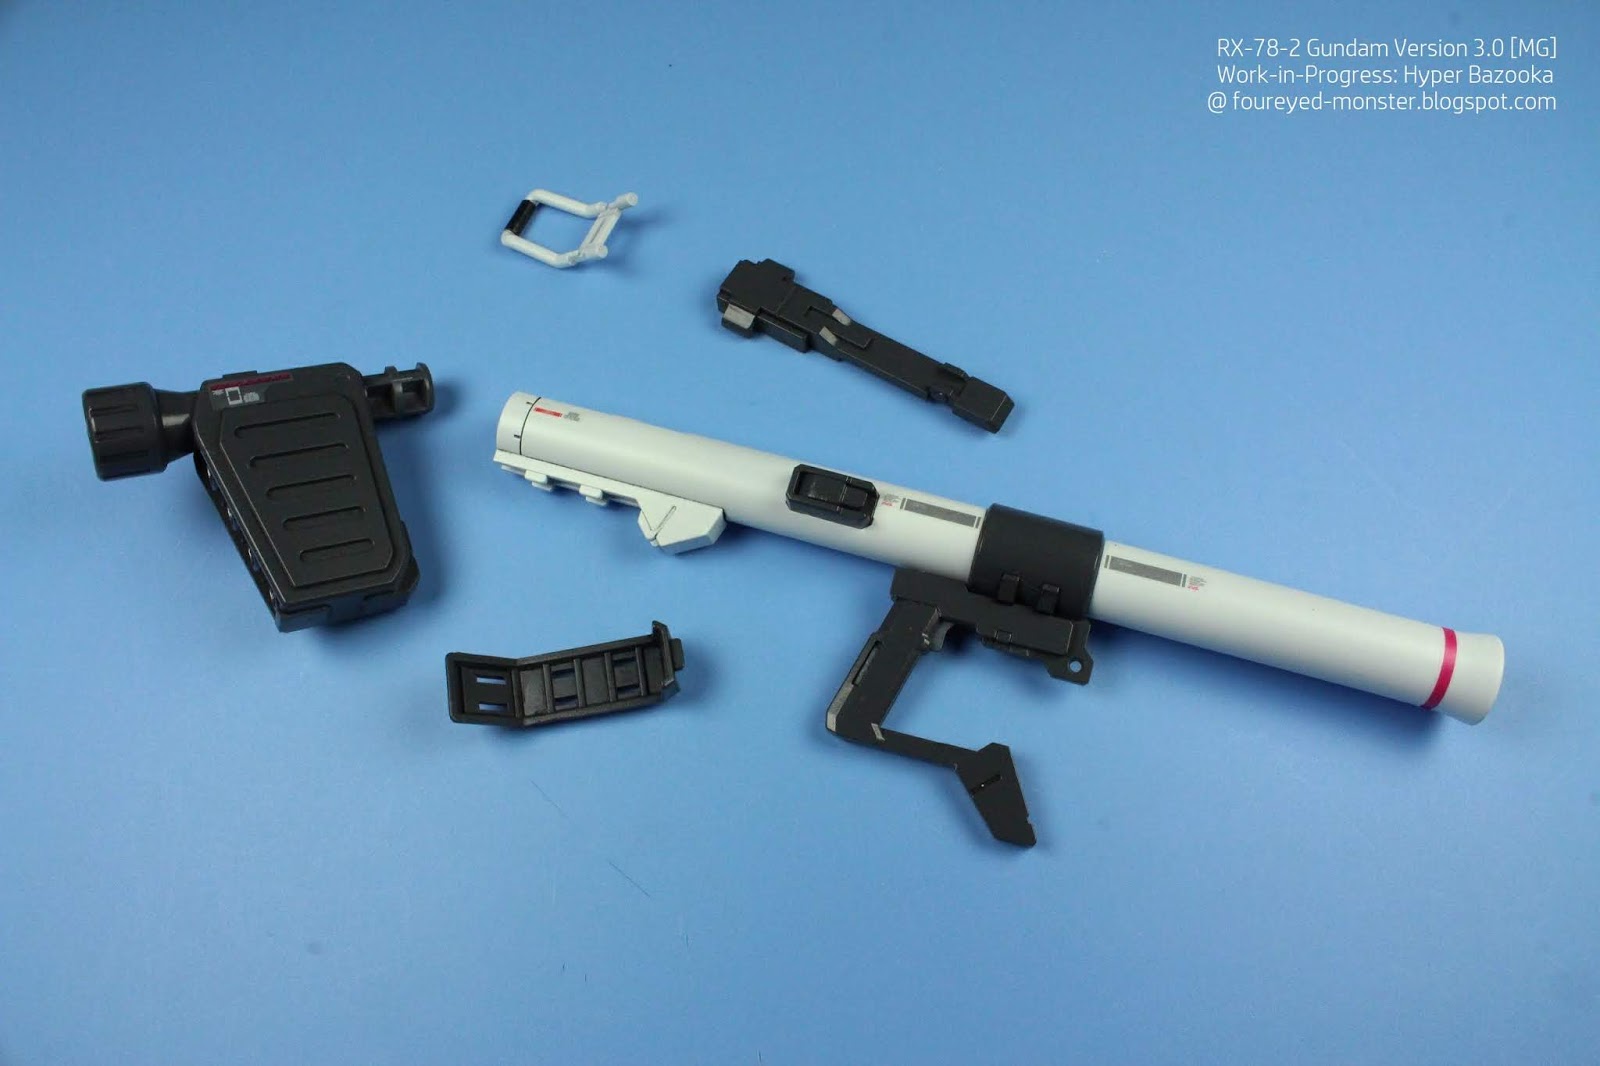
As has been the case for the RX-78-2 Gundam's previous weapon (i.e. the Beam Rifle), the color scheme for the Hyper Bazooka is fairly boring but functional. It looks good enough in dark greys, whites and a thin ring of red at the muzzle. Add in the parts which I decided to paint in metallic silver and gun metal as well as the strategically placed sticker decals, and the Hyper Bazooka actually takes on a pretty cool look. One nice thing about having the weapon come in a myriad of different parts was that I could paint them separately without having to mask anything (see below).

Parts of the Hyper Bazooka: painted; before assembly and before decal application

Assembly of the Hyper Bazooka was straightforward and easy. Thanks to Bandai's brilliant design, all the parts snap-fitted securely into place without the need for glue at all. That's a great attribute for a model kit to have, especially for a modeler like me who always paints the individual parts before assembly. As you should well know, glue and painted parts are not a good combination. 

Start of assembly process: painted and decaled pieces of the Hyper Bazooka all laid out
Most of the Hyper Bazooka's sub-assemblies are completed at this stage apart from the barrel
Hyper Bazooka's barrel is attached to the trigger sub-assembly; while rear sub-assembly is done
Hyper Bazooka of the RX-78-2 Gundam, fully assembled, painted and decaled

Simple as it is, the design of the Hyper Bazooka looks really cool to me. The ratio of rounded edges versus sharp edges leans more towards the former, a design style which I personally prefer. However, as much as I like the aesthetics of this weapon, I'm still not completely sold on it. At least until I see how it 'performs' with the RX-78-2 Gundam e.g. can it be attached to the hand easily and securely.

Hyper Bazooka of the RX-78-2 Gundam (side view, from the right)
Hyper Bazooka of the RX-78-2 Gundam (side view, from the left)

In terms of size, the Hyper Bazooka seems to be more than twice as big as the Beam Rifle, if not more. Meanwhile, the greys on the Hyper Bazooka comprised a lighter mix then the ones found on the Beam Rifle. Having learned from my mistake with the Beam Rifle, I added more light grey to the overall paint mix in order to get a much lighter dark grey, one that I was finally happy with.

Size comparison between the Hyper Bazooka (top) and the Beam Rifle (bottom)
Hyper Bazooka is roughly twice in overall size compared with the Beam Rifle

So the year is at an end or near to the end anyway. I don't know if it's just me but as the years roll by it seems harder and harder to find the time to hobby in. All this could just be psychological as time always seems to fly by faster as one gets older. To add insult to injury, I seem to be adding more scale model kits to the to-do pile rather removing them from the completed pile. As such, in the spirit of the coming new year I hereby declare that I will finish more projects in 2020. And as I remove my tongue-in-cheek, I leave you with yet another quote from the Rick and Morty animated series ... Break the cycle Morty. Rise Above.Focus on science, said Rick Sanchez to grandson Morty Smith.  

https://www.facebook.com/FourEyedMonster-313145002078520/

Sunday, 22 December 2019

MG RX-78-2 Gundam Ver.3.0 [WIP: Beam Rifle and Beam Saber]

A severe bout of flu certainly put paid to any plans for sustained progress in my scale model kit and miniature projects. While I was too sick to even write last week, I felt much better this week at least enough to write this blog. The RX-78-2 Gundam Beam Rifle was completed a week prior to me falling ill so all I had to do was edit the photos and do the write up that you see below. 

Master Grade RX-78-2 Gundam Version 3.0 Work-in-Progress: Beam Rifle

Similar to how I've approached the other sub-assemblies of the RX-78-2 Gudam, the various pieces of the Beam Rifle was painted first before being decaled and then finally assembled together.

Various painted parts of the Beam Rifle before assembly; some decaled, some not

After painting (see immediate photo above) and applying decals (see immediate photo below) to the individual parts, the assembly process began in earnest as was chronicled in the following photos.

Painted pieces of the Beam Rifle, this time decaled and awaiting assembly
Assembly process of the RX-78-2 Gundam Beam Rifle begins 
Exposed core section of the Beam Rifle (center piece) is done at this stage
Everything in its place except for what I assume to be the Beam Rifle's targeting scope
Beam Rifle of the RX-78-2 Gundam, fully assembled

In terms of color scheme, the recommended guide went out the window because for some reason or other I had decided to put my own take on how the Beam Rifle should look. To compound matters, I had used a shade of grey that was so dark that it bordered on black. So if the Beam Rifle looks a bit off color-wise, it's all one me. I think it still looks kinda okay, not great, but not bad I guess.

Color scheme of the Beam Rifle differs greatly from the official colors ... 
... so if it looks bad, then it's all on me

Meanwhile, I also managed to put together the Beam Sabers (aka power swords of the RX-78-2 Gundam). This means I've actually finished 50% of its weapons system; the other two being the Hyper Bazooka and Shield. Unfortunately because of flu, any chance I had for this project to be completed outright by 2019 is now gone. At most I can finish the rest of its weapons system and leave the final photos for the start of 2020. All was not lost, however, as the hobby downtime gave me a chance to catch up on a show I had been meaning to watch i.e. Adult Swim's Rick And Morty.

Master Grade RX-78-2 Gundam Version 3.0 Work-in-Progress: Beam Saber

Before you ask. No, it isn't a children TV series. This show's target demographics actually range from 18-49 years-old. And as I write this, the new season should air tomorrow hence my binge watching of the first three seasons. In short, if you love science and intelligent writing - watch this series. I leave you with the words of co-protagonist Rick Sanchez ... To live is to risk it all; otherwise you're just an inert chunk of randomly assembled molecules drifting wherever the universe blows you...

https://shireworks.blogspot.com/https://www.facebook.com/shire.works

Saturday, 7 December 2019

MG RX-78-2 Gundam Ver.3.0 [WIP: Amuro Ray in a Pilot Suit at 1/100 scale & Teaser Shots of Grandpa Gundam]

Whatever the build, whatever the scale, a model kit only ever comes alive when there is a human figurine at the same scale that can be displayed next to it. That's my personal theory anyway. I felt that all the hard work that went into the 1/100 scale RX-78-2 Gundam would've gone to waste if I didn't also paint up the similarly sized Amuro Ray figurine. For non-fans, Amuro is the protagonist of the first ever Mobile Suit Gundam anime series. As such below is the 1/100 scale Amuro Ray and some teaser shots of Grandpa Gundam himself (full photos will be uploaded at a later date).

Master Grade RX-78-2 Gundam Version 3.0 Work-in-Progress: 1/100 scale Amuro Ray in a pilot suit
Trying to balance himself on RX-78-2's hand, Amuro Ray grabs onto one of its fingers for dear life 
As the camera pulls back from Amuro, we get a long shot view of Grandpa Gundam from the waist up

To give you a idea of how small this figurine is, I took some photos with it next to a five sen coin as well as a regular paperclip (see below). With my old man eyes, this is the best I can manage these days. I suppose if I really tried I could do better but it would take too much time to be worth it.

First scale comparison: 1/100 Amuro Ray against a five sen coin
First scale comparison: 1/100 Amuro Ray against a paperclip
Closeup front view of the 1/100 scale Amuro Ray in a pilot suit
Closeup back view of the 1/100 scale Amuro Ray in a pilot suit

There was another Amuro Ray figurine that I completed and wrote about in the previous post. Back then, I didn't have time to assemble him and take photos. Well I've finished inserting the Body Core into the RX-78-2 Gundam's torso and took some closeup shots of the seated version of Amuro. If you look closely at the photos below, especially at the midriff section, you should be able to spot an open hatch exposing the seated pilot inside. This is yet another way a modeler can show the scale of the Gundam in comparison to a human being. If you recall, there is actually one other Amuro figurine that I painted (for a total of three), namely a version that was placed inside the Core Fighter.

Torso of the RX-78-2 Gundam opens up to reveal a seated version of Amuro Ray
Closeup view of the seated version of Amuro Ray, located inside the midriff section of the RX-78-2 Gundam

At first I had planned to upload photos of the RX-78-2 Gundam before I finished work on its weapons. Well, I've changed my mind. Instead I intend to finish its weapons first - Beam Rifle, Beam Sabre, Shield and Hyper Bazooka - before taking the final shots of the RX-78-2 in various poses. Doing it the way I had originally planned would've been anti-climatic. That I even showed any shots at all of the Grandpa Gundam in this post was because they were needed to show scale comparison of the figurine. But these are only teaser shots. The full monty will be presented in all their glory once the weapons are done. With that, another weekend comes to a close and I bid you au revoir.   

https://www.facebook.com/FourEyedMonster-313145002078520/

Related Posts Plugin for WordPress, Blogger...