Before any further work can be done on the 1/1000 scale Space Battleship Yamato 2199 (Cosmo Reverse Version) model kit - be it continuation of the assembly process or painting of the few pieces I had inadvertently left unpainted - first, the ship's hull and deck needed to have the water decals applied on them. Below are the results of my attempt at detailing the ship's hull and deck with decals.
.jpg) |
Space Battleship Yamato 2199 (Cosmo Reverse Ver.) work-in-progress: water decals (side view, left)
|
.jpg) |
| Space Battleship Yamato 2199 (Cosmo Reverse Ver.) work-in-progress: water decals (side view, right) |
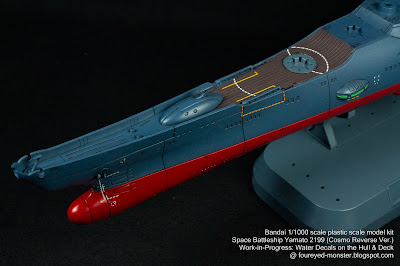
Above are photos of the battleship's hull while the two photos immediately below this paragraph are photos of its deck, after water decals had been applied. These first four photos showcase a zoomed out view, which allows you to see all the decals that had been applied on the hull and deck.
.jpg) |
| Space Battleship Yamato 2199 (Cosmo Reverse Ver.) work-in-progress: water decals (top view) |
.jpg) |
Positioning of decals on the deck meant the deck guns will sit above them in most cases
|
Luckily for me this kit came with its own water decals. Bandai's water decals are usually of very high quality. With them in hand the chance for a successful decal application increases dramatically. This is of course in comparison with third party water decals which vary in quality. Sometimes they can be pretty bad, and are a nightmare to work with. That being said, some third party decals have reasonably good quality. At least good enough to work with without pulling your hair out.
.jpg) |
| Water decals that came with the Space Battleship Yamato 2199 (Cosmo Reverse Version) kit |
Unfortunately not all water decals were applied onto the space battleship without incident. While most of the decals went onto the hull and deck almost flawlessly, there was one in particular that gave me some problems (see photo immediately below). On the lower rear section of the right side of the hull, the decal became crooked while being applied. Worse still the decal actually folded in on itself at one point, the fact that I managed to salvage as much as I did is testament to the decal's quality. End result is a misshapen decal, but better that than it becoming a complete write-off.
.jpg) |
A rare instance where the water decals were damaged while being applied (see lower left section)
|
.jpg) |
In most cases though, the water decals were applied as intended, in a near flawless manner
|
.jpg) |
At the battleship's bow, there is a host of dash line decals that were fragile and difficult to apply
|
Whenever the option to do so is available, I always try to use original Bandai water decals because as I mentioned earlier, their quality is extremely good. This allows me to manipulate the water decals for longer periods when trying to get them in place. Moreover, the chances of the decals tearing or folding in on themselves are lower, though not completely eliminated.
.jpg) |
Water decals on the deck were sturdier and easier to apply compared with the ones on the hull
|
.jpg) |
Deck guns (not shown here) that will be placed onto the deck will have their own decals
|
.jpg) |
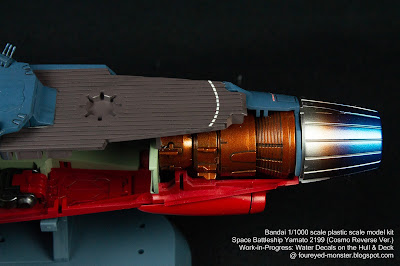
Apart from the deck, the rear left section had no decals due to an absence of the hull plating
|
Without a doubt, the battleship looks much better with water decals than without. If you're going to make the effort to paint your kit, then by all means get some water decals on the painted kit. The only time I would use alternatives such as dry transfer decals or stickers is if the kit didn't come with water decals and I was unable to source some good quality water decals for the kit in question.
Despite the abundance of decals you see applied here, there are actually more decals that I haven't applied yet. These are to be applied onto the missile launcher and deck guns, and will be done later just prior to them being attached to the battleship's deck. So there is much more to come for the 1/1000 scale Space Battleship Yamato 2199 (Cosmo Reverse Version) model kit. Until my next hobby blog update, thank you for reading, and as always stay safe and be well.

.jpg)
.jpg)
.jpg)
.jpg)
.jpg)
.jpg)
.jpg)
.jpg)
.jpg)
.jpg)
.jpg)
.jpg)


.jpg)

Excellent work as always!
ReplyDeleteExcellent work as always!
ReplyDeleteThank you very much Michal!
DeleteI am always blown away at the level of detailing that goes into your work.
ReplyDeleteKind of you to say so Michael, very much appreciate :)
DeleteIt looks great Kuan ! Looking forward to see more !
ReplyDeleteGreetings
Thank you for the positive feedback Mario :)
Delete