Least straightforward of all the Evangelion Unit-01 (EVA-01) Test Type sections was the head. Not the assembly process mind you but in the painting of it, reason being the head was the only section that involved the use of two different types of paint i.e. lacquer and acrylics. Masking was needed to paint in the green stripe on the Evangelion's horn, but nothing too intricate. And with lacquer paints being more 'aggressive' than acrylics, the former was airbrushed on before the latter was applied onto the parts. Below are work-in-progress as well as completed photos of the EVA-01's head.
.jpg) |
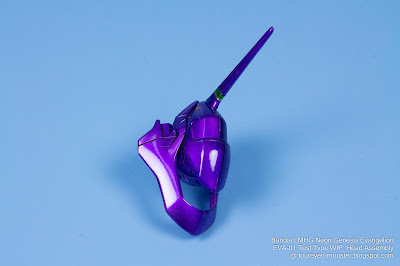
| Evangelion Unit-01 Test Type work-in-progress: Head (custom painted with lacquer and acrylics) |
For the head, the assembly process was significantly easier than the painting process. While the upper- and mid-sections of the head were first put together into sub-assemblies, the upper and lower jaws of the EVA-01 remained as individual parts prior to painting and assembly. In the end there were four fully painted sub-assemblies/individual parts laid out for final assembly of the head (see below).
.jpg) |
(A) Laying out individual fully-painted parts/sub-assemblies of the head, prior to assembly
|
.jpg) |
| (B) Custom painted head of the EVA-01 Test Type, after assembly |
Although decals were provided for the eyes, I couldn't bring myself to use it. I felt it was 'cheating' to do so. Of course that doesn't mean I'll never use decals on the eyes of figurine/mecha model kits if they were provided together with the kit. It just means if I think I can pull off painting the eyes, I'll not use the decals. In the case of EVA-01, I felt I could do a fairly good job of painting the eyes despite the need to paint in a white diamond/rhombus shape within another diamond/rhombus shape that is black. Based on a close up macro shot of the head, the white eye pupils admittedly look bit rough on the edges. But thankfully none of this is significantly noticeable to the naked eye.
.jpg) |
While assembly of the head of Evangelion Unit-01 Test Type was relatively straightforward ...
|
.jpg) |
... the painting of it was more complicated as it involved use of a combination of paint types ...
|
.jpg) |
... such as acrylics for the matt red tongue and inner teeth as well as black and white for the eyes ...
|
.jpg) |
| ... and lacquer for the candy metallic finish of the purple, blue, and greens ... |
.jpg) |
... with candy metallic purple being the dominant hue of the Evangelion head.
|
Apart from the airbrushed candy metallic coats of purple, green, and blue, there were the hand-brushed acrylics of red for the inner teeth and tongue as well as black and white for the eyes. Vallejo Model Color paints comprising Carmine Red (70.908) for the inner teeth and tongue, Black (70.950) and White (70.951) for the eyes. To get a smoother consistency, I mainly used Vallejo Airbrush Thinner instead of water to dilute the acrylic paints. Although I still mixed in the occasional drops of water when needed, my main solvent was the airbrush thinner.
.jpg) |
Having a candy metallic finish for the Evangelion head involved ...
|
.jpg) |
... airbrushing a purple hue on the majority of the head's surface area ...
|
.jpg) |
... with stripes of green on the 'horn' and chin as well as swathes of blue on the mouth (or outer teeth) ...
|
.jpg) |
... acrylic paint (Vallejo Carmine Red) was used on the inner teeth and tongue ...
|
.jpg) |
... while Vallejo Black and White was used on Evangelion's eyes.
|
And so here we are. Critical components of the EVA Unit-01 have been fully painted and put together into their respective main sub-assemblies such as the head that you see here, the torso, and limbs. What remains to be done is to put all these main sub-assemblies together and see if the candy metallic finish works as a whole. Aesthetics of the final assembly will determine if I'll continue with this technique for future projects. Signs are good but you never actually know until you see it with your own eyes. Thank you dear readers for following along with the assembly process so far. I hope the payoff will be worth it in the coming weeks. As always, until my next post, stay safe and be well.
Reminder: Videos showcasing a more in depth view of the
Evangelion Unit-01 Test Type assembly process, of which there will also be five parts, will all be released simultaneously
after
all (or most) of the blog post updates have been uploaded. If you are
the type who prefers watching instead of reading, then the videos will
be more to your liking. Be sure to stay tuned for that.

.jpg)
.jpg)
.jpg)
.jpg)
.jpg)
.jpg)
.jpg)
.jpg)
.jpg)
.jpg)
.jpg)
.jpg)
.jpg)


.jpg)

Looking great!
ReplyDeleteThank you Michal!
DeleteGreat work Kuan ! Love your choice of colors. Again great job on the head and the other parts. Greetings
ReplyDeleteThank you very much Mario. Much appreciated :)
DeleteBy the way Mario ... although I follow your blog I am unable to comment because it says I have to be a team member :(
DeleteThanks for mentioning this. I changed the settings and you should be able to comment again. It will not be visible right away , but like yours. Visible after inspection. Greetings
Delete