Friday, 22 June 2018

Star Wars AT-ST [WIP - Base depicting a clearing in Forest Moon of Endor & Weathering the Footpads]

In this final Star Wars AT-ST work-in-progress post, two significant processes are dealt with namely creation/painting of the base and weathering fresh mud effects on the scout walker's footpads. Completion of both means the walker is essentially completed and ready for its unveiling. But before the AT-ST is seen in its finished state, here's a look at how a base depicting a clearing in the Forest Moon of Endor was created and how its footpads were weathered to blend into the base.

Bandai Star Wars AT-ST work-in-progress: Base and Final Phase of Weathering

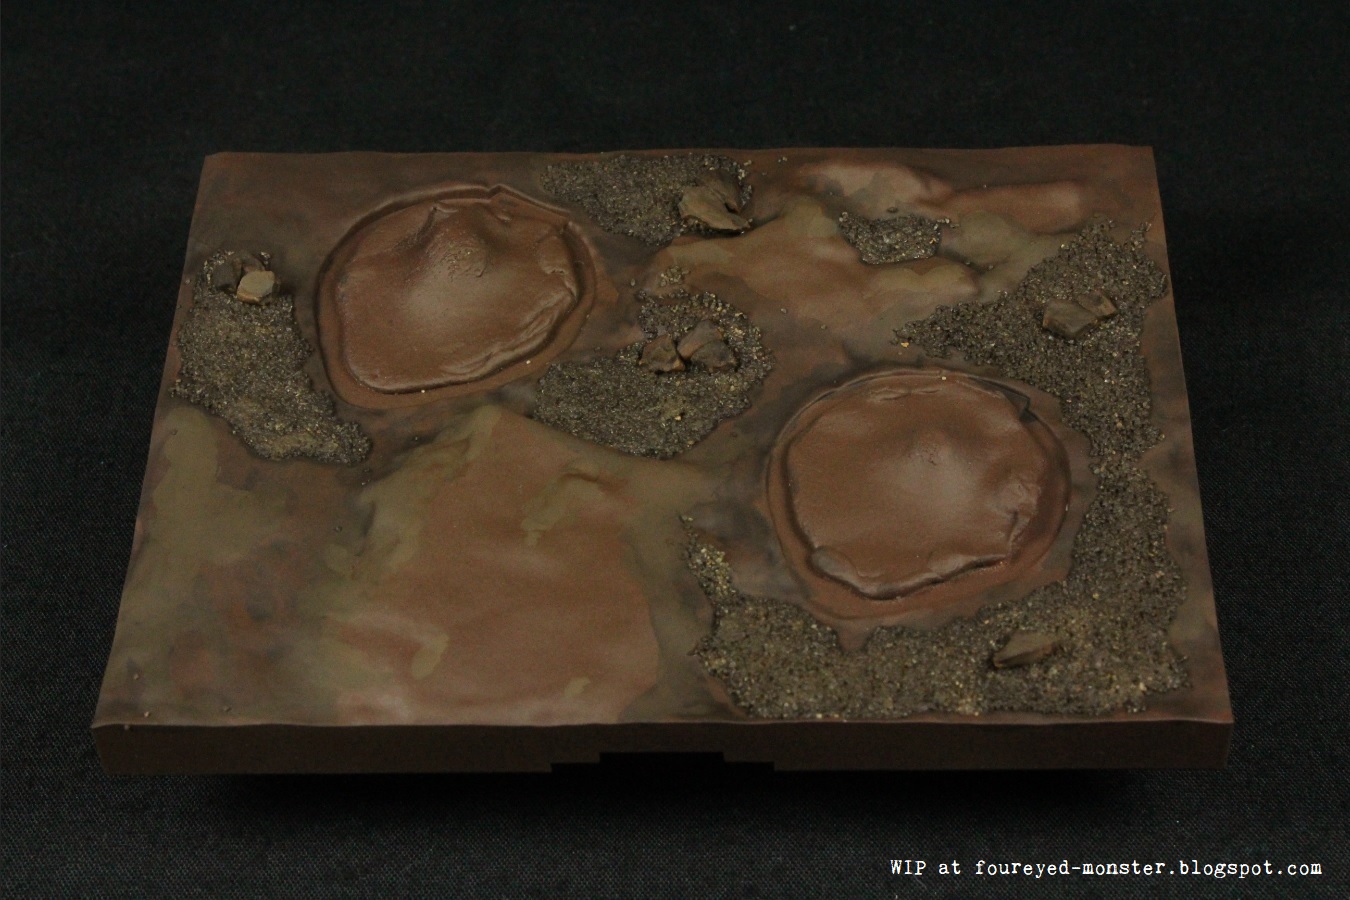
To recreate conditions approximating how a clearing in the Forest Moon of Endor might look like prior to having its soil turned into fresh mud, I used common basing materials such as modelling sand and stone, generic all purpose (or white craft) glue as well as two tones of spray paint i.e. Tamiya TS-1 Red Brown and TS-69 Linoleum Deck Brown. Below is a step-by-step process of how the base came together to reach a completed 'dry state' before it was given an additional mud weathering step.

Materials used to create foundation of the base: sand, stones, wood glue and two tones of spray paint
Base after sand and stones are glued onto base with two dark brownish hues of spray paint
Greater tonal variation on base is achieved using Vallejo Model Color acrylic paint
Base after layering in Vallejo Model Color colors of Black Brown, Burnt Umber and US Field Drab
Bright green 'grass' was glued onto the base using wood glue
Closeup of the base prior to the final mud weathering

With the 'dry state' of the base completed, all that was left to do was to remove the adhesive tacks placed onto the male joint connectors. These sticky tacks help protect the joints from being coated with paint which in turn prevents any eventual fitting issues when the AT-ST's legs are fixed onto the unmasked areas. As you can see below, the chicken legs were seamlessly attached to the joints.

Removal of the adhesive tack covering the joints onto which the footpads will eventually connect
Footpads of the AT-ST after they had been connected securely to the base

Why did I choose to depict a clearing in the Forest Moon of Endor? Primarily it was because I didn't have the basing materials needed for a proper recreation of the flora in Endor or what is actually the giant redwood forests of northern California. But luckily for me, the clearing located outside the shield generator bunker - as seen in Return of the Jedi (see below) - looked very similar to a generic grass and soil combo. So much so that I could use the materials I had at hand to recreate it.  

Clearing near the Imperial Army's shield generator bunker on the Forest Moon of Endor
Ground flora on the Forest Moon of Endor comprised largely fern-like vegetation

Meanwhile, further work on the base in its 'dry state' involved the application of an enamel-based weathering product i.e. AK Interactive Fresh Mud. The method of application involved spraying bursts of air at a hand brush loaded with the enamel paint thus causing the 'fresh mud' to splatter onto the footpads. White spirit was used to clean up excess 'mud' to prevent over-weathering. Results of this final (fifth) phase of weathering can be seen in the last three photographs below. 

Materials used in the final phase of weathering for the AT-ST
Footpads of the AT-ST and the base, after mud weathering
Mud weathering was applied by blowing air (via airbrush) at a paint brush loaded with enamel paint
Enamel 'mud' paint was also applied onto the base to achieve overall uniformity
Color used in weathering the footpads are akin to fresh mud hence the darker brownish hue

Soon enough the Bandai 1/48 scale AT-ST project will conclude. And while I contemplate what my next Star Wars project is going to be, I plan to keep busy with the MENG King Tiger assembly as well as take tentative steps in airbrushing skin tones with a better airbrush. In the meantime, I hope you enjoy a productive weekend ahead hobby-wise. Cheers and see you next week!

http://shireworks.blogspot.com/p/custom-painted.html

Wednesday, 13 June 2018

Band Mono 1/12 Scale Instrument Models by F-Toys [Unboxing & Review Post plus Videos]

With a lot of my plastic and resin figurine projects - future and present - being in 1/12 scale, I decided to get some accessories in the same scale in order to jazz up the photo shoots. And being a huge fan of music played a part in my choice of accessories. There are, of course, plans to add more variety to my collection of 1/12 scale accessories (e.g. school furniture). But for now here's an unboxing and review post plus videos of the Band Mono 1/12 Scale Instrument Models by F-Toys confect.

Unboxing and review of the Band Mono 1/12 Scale Musical Instrument Models

These 1/12 scale instrument models come only in a set of 10, at least they do if you are purchasing them online. As far as I can tell they are available only from sources in Japan. The Band Mono instrument models are actually shokugan, which is a Japanese term for small toys that are sold with food. It seems shokugan can be found in the snack corner of supermarkets in Japan where sets of both a toy and a snack are sold in small boxes. My set was purchased from HobbyLink Japan.

Band Mono 1/12 Scale Musical Instrument Models by F-toys confect
Packaging of the Band Mono 1/12 Scale Musical Instrument Models ...
... which comes in a set of 10 instrument models

Each shokugan toy is packaged inside its own vividly colored box and as mentioned earlier there are a total of 10 boxes in one set. In the case of Band Mono, the food included looks like a breath mint. My guess is the food was included only so that these small toys could be sold in supermarkets which presumably has a wider distribution network in Japan. Also included in each individual box of the Band Mono shokugan is a 1/12 scale musical instrument, its corresponding accessories such as stand and shoulder strap as well as a simple instruction booklet on how to set up the model. 

Each 1/12 scale musical instrument model is packaged in its own vividly colored box
Art work at the back of the box shows the eight 'guaranteed' models you'll receive in the set of 10
What you can expect inside the average box containing a scale instrument model

Inside this set of 10 instrument models, eight are guaranteed and they comprise two electric guitars, two electric bass guitars, two shoulder synthesizers and two speakers with amplifiers. So with this "8+2" formula you will get a decent enough variety of 1/12 scale instrument models. My personal preference was for the mystery two to be guitars. But what I got was a black and gold electric guitar and a red shoulder synthesizer. While I love the former, I'm not too thrilled with the latter.

Band Mono 1/12 scale instrument models: Electric guitars
Band Mono 1/12 scale instrument models: Electric bass guitars
Band Mono 1/12 scale instrument models: Electric guitar stand
Band Mono 1/12 scale instrument models: Shoulder synthesizers
Band Mono 1/12 scale instrument models: Speakers with amplifiers

Although technically these models are only toys, the details they exhibit are excellent and look simply beautiful. From the bodywork and strings on the guitars to the knobs on the speaker/amplifier to the cute synthesizers, there are enough intricate details on the instrument models to make them excellent accessories for any 1/12 scale figurine you are posing and taking photographs of. My only complaint is that they should've included a miniature drum set to complete a proper band set up.

All the 1/12 scale instrument models found in my particular Band Mono set

To better appreciate the Band Mono 1/12 Scale Musical Instrument Models by F-Toys confect, you might prefer to watch videos of the unboxing and review process. They come in three parts namely Part 1: Unboxing, Part 2: Assembly and Part 3: Conclusion (see below). As always, please visit my YouTube channel FourEyedMonster Miniatures and check out a variety of uploaded videos dealing with other unboxing and reviews, tutorials as well as 360 degree views of fully painted miniatures, model kits and figurines. And be sure to choose the high definition (HD) option for the best view.

PART 1 OF 3: UNBOXING


PART 2 OF 3: ASSEMBLY


PART 3 OF 3: CONCLUSION


Speaking of 1/12 scale projects, my progress on the atelier iT Race Queen has reached a self-imposed impasse. For you see, I've come to the conclusion that my budget airbrush just isn't going to cut it. It doesn't give me the range of control I need to create acceptable skin tone transitions between shadows, mid-tones and highlights on the contours of a miniature human body. So I'm temporarily halting proceedings until I get my hands on a better 0.2 mm airbrush which should be before end of this month. Until then, assembly of the MENG King Tiger gets underway and the Star Wars AT-ST base gets its finishing touches. There's that to look forward to as I bid you au revoir for now. 

https://shireworks.blogspot.com/https://www.facebook.com/shire.works

Saturday, 9 June 2018

Star Wars AT-ST [WIP - Chicken Legs]

As the AT-ST's iconic 'chicken legs' underwent the same weathering process as its upper hull and mid-section, I saw no point in chronicling each every phase again in a series of posts. So without further delay, the following are photographs of the scout walker's legs after panel lining, washes, oil dot filters and micro paint chips had been applied on a light grey basecoat.  

Bandai Star Wars AT-ST work-in-progress: Weathering on 'chicken legs', Phases One through Four
Phases One through Four entails panel lining, washes, oil dot filters and micro paint chips
AT-ST walker's footpad still awaits additional mud weathering

Because the 'chicken legs' have tons of detail that caught the washes and panel lining, they already display a significant amount of depth and contrast prior to the micro paint chipping step. What this entails technique-wise is a more economical and judicious application of micro paint chips. Too much and it would, I feel, overload the senses. So in the end, chipped paint was placed strategically in places few and far between. That in itself was a mind-numbing series of patient and careful work. 

Lower portion of the legs will receive some mud weathering too, just not as much as the footpads
Micro paint chipping was kept minimal seeing this section will receive further mud weathering

Having previously done paint chipping using both the salt technique as well as a chipping medium, I found that actually painting in the micro paint chips with a brush to be just as effective as the first two. Each technique has its place in a modeller's repertoire. In the case of the AT-ST neither of the first two techniques were applicable for two reasons. Firstly, the resulting paint chips would've likely been too big. But more importantly neither technique was practical for a model with so many fragile parts attached to it. That left only one viable paint chipping technique i.e. micro paint chipping.   

Work-in-progress view of both the AT-ST walker's legs
Next for the legs is to attach them to the hull, plonk them onto the base and apply mud weathering

Weathering for the AT-ST's 'chicken legs' isn't actually complete yet though. There's still some mud weathering to be done on both footpads as well as on the lower portion of the legs. That will be done together with the base, which itself will need a fair bit of work to transform it into a clearing in the Forest Moon of Endor. Until then thanks for reading and have yourself a great weekend!

http://shireworks.blogspot.com/p/custom-painted.html

Tuesday, 5 June 2018

MENG German Heavy Tank Sd.Kfz.182 King Tiger with Henschel Turret [Unboxing & Pre-Assembly Review]

With only one finished AFV model kit under my belt namely the Tamiya T-55A, it's perhaps a bit foolhardy of me to attempt a MENG kit that's meant for more experienced modellers. Then again perhaps not because the 1/35 scale German Heavy Tank Sd.Kfz.182 King Tiger with Henschel Turret is one of the company's easier kits, relatively speaking of course, to work on. With that in mind let's take a look inside the box and see what MENG's version of the King Tiger has to offer.        

MENG German Heavy Tank Sd.Kfz.182 King Tiger with Henschel Turret (main box art)
MENG German Heavy Tank Sd.Kfz.182 King Tiger with Henschel Turret (side box art)
Model kit was developed in collaboration with The Tank Museum and British modeller David Parker

MENG took a modular approach to the kit which allows the modeller to decide on how detailed he (or she) wants the build to be. For example, in addition to the basic kit which is reviewed here, MENG also offers a full interior set, workable individual link tracks as well as zimmerit decals for the King Tiger. Another thing of note is that this kit had been developed with the help of The Tank Museum and expert modeller David Parker who is famous for his award-winning 1/16 scale King Tiger. This large scale build is chronicled in Superking, a book published by AFV Modeller.    

Assembly instruction booklet for the MENG King Tiger (Henschel Turret) model kit
Instructions are easy to follow but assumes modeller has experience working with AFV kits

Included are fairly easy to follow instructions. That being said they do assume a certain amount of familiarity working with model kits. For example modellers are expected to know about undergates and how to remove them accordingly from certain parts. If you are a beginner you won't instinctively know when and where you'll need to do this. And when I first started out I didn't. Luckily my experience with Bandai's 'noob-proof' instructions early on stood me in good stead when dealing with MENG's vaguer guide. Meanwhile also included are four different color schemes for the Königstiger.

Color scheme for a King Tiger operating in Hungary during cold (left) and warm weather (right) 
Color scheme for the 'Charging Knight' of S.Pz.Abt.505 (left) and for a King Tiger in the Battle of the Bulge (right)

There are ten sprues that come in a rarely seen red oxide primer color. There have been complaints this hue makes it difficult for modellers to make out the details. Personally I like it as any spots I may miss with the primer or basecoat will spot a natural red oxide hue. This is a likely occurrence due to my planned approach to the assembly/painting of this model kit (to be explained in future posts). Two other plastic sprues come in grey (figures) and clear (vision blocks/periscopes). Finally there are standard polycaps for the road wheels, decals and common in most MENG kits - a photo etch sheet.

Model kit comes in a fairly big box packed to the hilt with sprues

Total parts count is lower than your average MENG kit with a large portion made up of individual link and length tracks (for types of model tracks check out this post). Based on a cursory look at all the sprues, the King Tiger parts are extremely detailed and historically accurate. MENG also provides optional parts for the discerning modeller who wants to build a specific version of the King Tiger. One example of this is the different rear upper hull exhaust covers provided in the sprues. The first production batch included a metal gun barrel. The lack of one in this kit means it's from the subsequent batches. That's the only bummer in an otherwise excellent looking kit.

Sprue/Runner A (2X): Drive sprockets, idlers, track sections and miscellaneous detailed parts
Sprue/Runner B (4X): Road wheels, track sections, individual link and length tracks, and assorted items
Sprue/Runner C: Side skirts, guide for swing arms, engine deck panels, hull mounted tools, front armor, etc.
Sprue/Runner D: Upper hull parts and miscellaneous parts
Sprue/Runner E: Turret parts, jig for assembling the link and length tracks, etc.
Sprue/Runner F: Turret roof, main gun, rear upper hull accessories and other assorted items
Lower hull of the MENG King Tiger
Polycaps, figurines and clear parts of the MENG King Tiger
Decals and photo etch fret for the MENG King Tiger

Another thing I really like about this model kit is that it provides photo-etch bending jig/tools as well as a jig/tool to help assemble as well as shape parts of the link and length tracks. So straight out of the box you are going to have the required special tools to work with.    

Tank 124 of Pz.Abt. 505

At this early stage I'm leaning towards building Tank 124 of Pz.Abt. 505, Poland September 1944 (see above). This version of the King Tiger has the cool looking 'charging knight' emblem on both sides of its turret. Moreover, I like the tri-tonal camouflage scheme that it sports. This is already looking like it's going to be a really fun and interesting build.

https://shireworks.blogspot.com/https://www.facebook.com/shire.works

Related Posts Plugin for WordPress, Blogger...