Momentum is a wonderful thing, more so when it relates to the progress of hobby projects. Not unlike an Evangelion running full tilt towards an Angel, my EVA-01 Test Type custom candy metallic paint project has gathered enough momentum that I'm left with no doubt that, like the aforementioned Evangelion's eventual clash with the Angel, the project will be completed shortly ... at least when it comes to the EVA unit itself sans accessories. With all individual parts of the EVA-01 Test Type already painted and panel-lined, the assembly process begins with its legs.
.jpg) |
Evangelion Unit-01 Test Type work-in-progress: Candy Metallic Legs (isometric view of inner side)
|
.jpg) |
| Evangelion Unit-01 Test Type work-in-progress: Candy Metallic Legs (isometric view of outer side) |
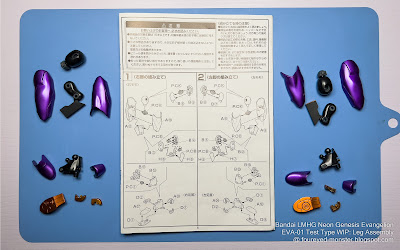
Prior to the painting process, I had already put together some sub-assemblies to make the painting process easier to manage. That means assembly of the legs did not begin from scratch with just the individual painted parts to work with. I also had completed sub-assemblies like the knees, inner thigh frame/joint, and inner foot frame/joint to use in the leg assembly (see below).
.jpg) |
(A) Arranging and sorting out individual parts/sub-assemblies of the thigh, knee, and feet
|
.jpg) |
(B) Assembling both custom painted thighs, knee, and feet of the Evangelion Unit-01 Test Type
|
.jpg) |
(C) Laying out parts of the shin/calf and ankle, together with the assembled feet/thighs
|
.jpg) |
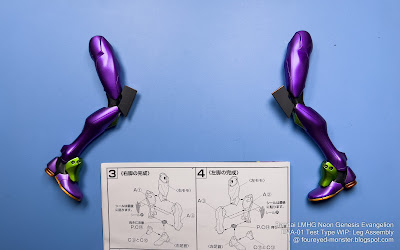
(D) Completed assembly of both legs of the EVA Unit-01 Test Type (light source from top)
|
.jpg) |
| (E) Completed assembly of both legs of the EVA Unit-01 Test Type (light source from bottom) |
One of the reasons I decided to paint a candy metallic finish was due to the pale muted purple hues on the original molded plastic. It gave the kit the kind of washed-out look which I'm not a fan of. As such I decided to convert the color scheme to that of a candy metallic finish. Results so far seem encouraging. I'm optimistic that my choice of changing the color scheme from a flat non-metallic hue to a candy metallic one will be vindicate once the entire kit is assembled. But in the end, beauty is in the eye of the beholder. As long as the modeler himself likes the hues, then it's good enough.
.jpg) |
(F) Assembly of both legs of the EVA Unit-01 Test Type comprised Steps 1 through 4
|
Articulation is extremely good in terms of the level of bend you can obtain at the joints. In fact you can achieve close to a 180 degree bend at the knees - certainly a greater bend than is shown in the photo below. There is also articulation on the feet themselves (not shown here) which is perhaps better demonstrated via action poses once the Evangelion is fully assembled.
.jpg) |
Articulation of the legs with one straightened and the other bend slightly
|
Below is a couple of final top-down views of both Evangelion Unit-01 Test Type custom painted legs. One shows the inner side/half (showcasing the joints which will eventually connect to the pelvic piece) while the other shows the outer side/half of the legs.
.jpg) |
Both legs of the Evangelion Unit-01 Test Type (view of inner half, joints visible)
|
.jpg) |
| Both legs of the Evangelion Unit-01 Test Type (view of outer half) |
Not to belittle the assembly process of scale model kits, but I've always found the painting process to be more difficult or at least more time consuming. No matter how complex the assembly process becomes, for example the latest Bandai Master Grade Extreme (MGEX) product line which incorporates fairly intricate LED lighting into 1/100 scale kits, things almost always becomes much more complicated when you have to paint the parts before you put them together.
So perhaps it's no surprise momentum for this project has gathered the pace it has, seeing that the painting process for the EVA unit itself has been completed. And with the leg assembly now completed, the next step will be to assemble the EVA unit's fully-painted shoulders, arms, forearms, and hands. As such the next work-in-progress blog update for the EVA-01 unit. With that it's time to end this particular blog update. As always, stay safe and be well.
Important Note: Videos showcasing a more in depth view of the Evangelion Unit-01 Test Type assembly process, of which there will also be five parts, will all be released simultaneously only after the blog post updates have all been uploaded. If you are the type who prefers watching instead of reading, then the videos will be more to your liking. Be sure to stay tuned for that.

.jpg)
.jpg)
.jpg)
.jpg)
.jpg)
.jpg)
.jpg)
.jpg)
.jpg)
.jpg)
.jpg)

.jpg)


Excellent work! Love the colour you used :)
ReplyDeleteBest regards
Thank you Michal ... I am just following the recommended color scheme but using a candy metallic finish instead of a flat color.
DeleteWell, you are certainly on a roll, your progress is absolutely ace, keep it coming! :)
ReplyDeleteThank you for Suber, much appreciated :)
Delete