Without any likelihood of LED lighting to illuminate the Bandai Star Wars 1/144 scale Millennium Falcon's cockpit interior, I opted for a high contrast colour scheme. This meant simulating light with bright strips/points of paint (mainly bluish white, red, yellow and blue) against a brownish black grey panel board. I'm hoping once the cockpit's outer hull is fully assembled, the interior will still be reasonably visible from the outside looking in despite the lack of internal lighting.
 |
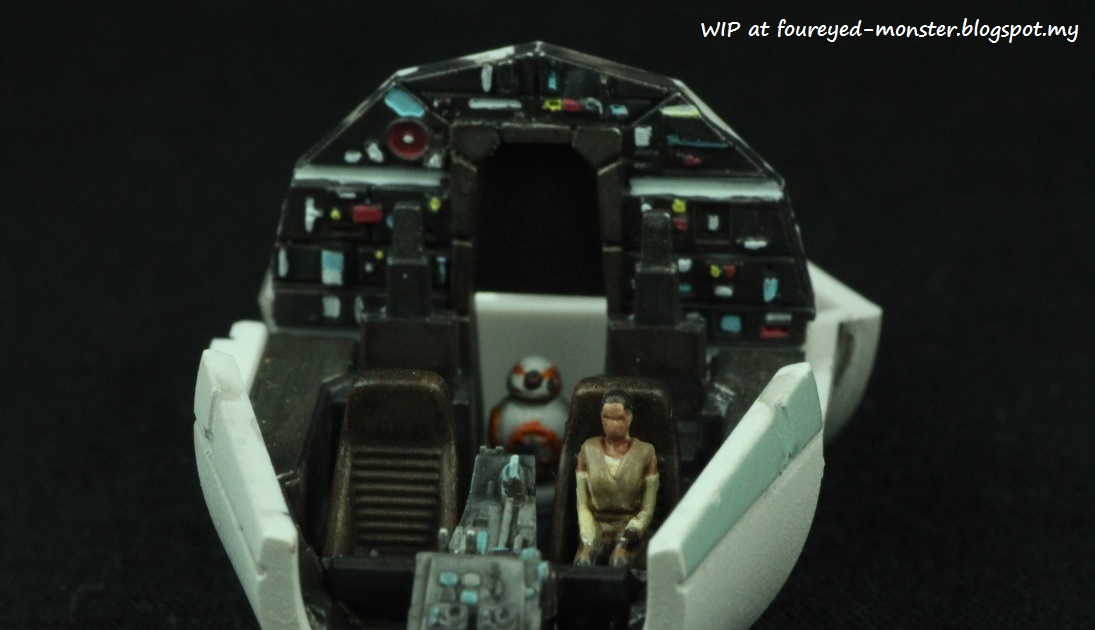
| Initial dry fitting of Rey and BB8 in the Millennium Falcon's cockpit interior |
 |
| Clockwise from top - overhead instrument panel, control panel, seats and back instrument panel |
 |
| Size comparison against a five sens coin and a paperclip |
Photographic references for the cockpit were based on a combination of the actual movie props and the 1/6th scale model cockpit by Hot Toys. The former shows me how the cockpit actually looks like in 1:1 scale while the latter shows me how modellers represented the panel lights at a smaller scale.
 |
| Millennium Falcon cockpit as seen on the movie set |
 |
| Hot Toys 1/6th scale Millennium Falcon Cockpit |
Absence of LEDs also means I won't be able to light up the sublight drives on the back of the Falcon. Nonetheless, the Falcon can still be accurately depicted in a flight diorama without its sublight drive 'powered up'. In
The Force Awakens, there is a scene where Rey switches off the Falcon's engines, plunging it into free fall. Sweet! Now, the model won't look weird sans lighting on its back section.
 |
| Rey was piloting the Millennium Falcon during its first scene in The Force Awakens |
 |
| BB8 hangs on as Rey takes the garbage for a spin |
 |
| Estimated location of BB8 during the first Millennium Falcon scene in The Force Awakens |
In the said scene, Rey was positioned in the pilot's seat while BB8 was anchoring itself to the ship (
see above). So in line with that, the only figures I will be placing in the cockpit are Rey and the smallish rotund astromech droid (
see below). BB8 isn't exactly placed in the correct location in the model kit's cockpit. That being said, I guess a little creative license could be allowed now and again.
 |
| A closeup shot with BB8 in focus instead of Rey |
 |
| A sneak peak of the ongoing assembly of the cockpit - here with the control panels in place |
By the next post I should have finished decaling/painting (sans weathering) and assembling the Millennium Falcon's cockpit interior as well as the exterior hull surrounding the cockpit. It's kind of insane that I'm wasting so much time painting a section of the ship that's going to be barely visible in the eventual gloom of an enclosed interior. But sadly details are my Achilles heel in miniature painting. If I see them I can't not paint them. Even if they barely see the light of day.
Que sera sera.


.jpg)

Insane detail work, really impressive.
ReplyDeleteReally kind words sir. Thank you!
DeleteHow? What? Awesome dude!
ReplyDeleteMuch appreciated Bob. Thank you!
DeleteThanks for the ideas!
ReplyDeleteYou're most welcome DWolve! :)
DeleteAbsolutely astonishing!
ReplyDeleteMany thanks Luca!
DeleteThat's the attitude!! If it's sculpted, it needs to be painted! Absolutely gorgeous work.
ReplyDeleteHa ha ha ... yes, yes indeed. Paint them all ... to the tune of Metallica's song! Thanks Suber! ^_^
DeleteThat looks most excellent! I just hope that you can see some of this detail when the exterior glazing is added.
ReplyDeleteThanks Colgar! Yeah, me too though I have a feeling only Rey will be visible.
DeleteVery, very impressive.
ReplyDeleteThanks so much Finch!
DeleteThis thing is incredibly small ;) Good job so far! How much of it will be visible in a finished model? It would be a shame to hide all the work
ReplyDeleteGood question. I'm using the cockpit cover without the clear plastic 'glass' so that's a start towards better visibility.
DeleteReady for takeoff...Very nice!!
ReplyDeleteHa ha ... it's still a long, long, long way from take off sadly. :)
DeleteTruly stunning work on the cock-pit - I am in awe as ever. :)
ReplyDelete