Saturday, 22 May 2021

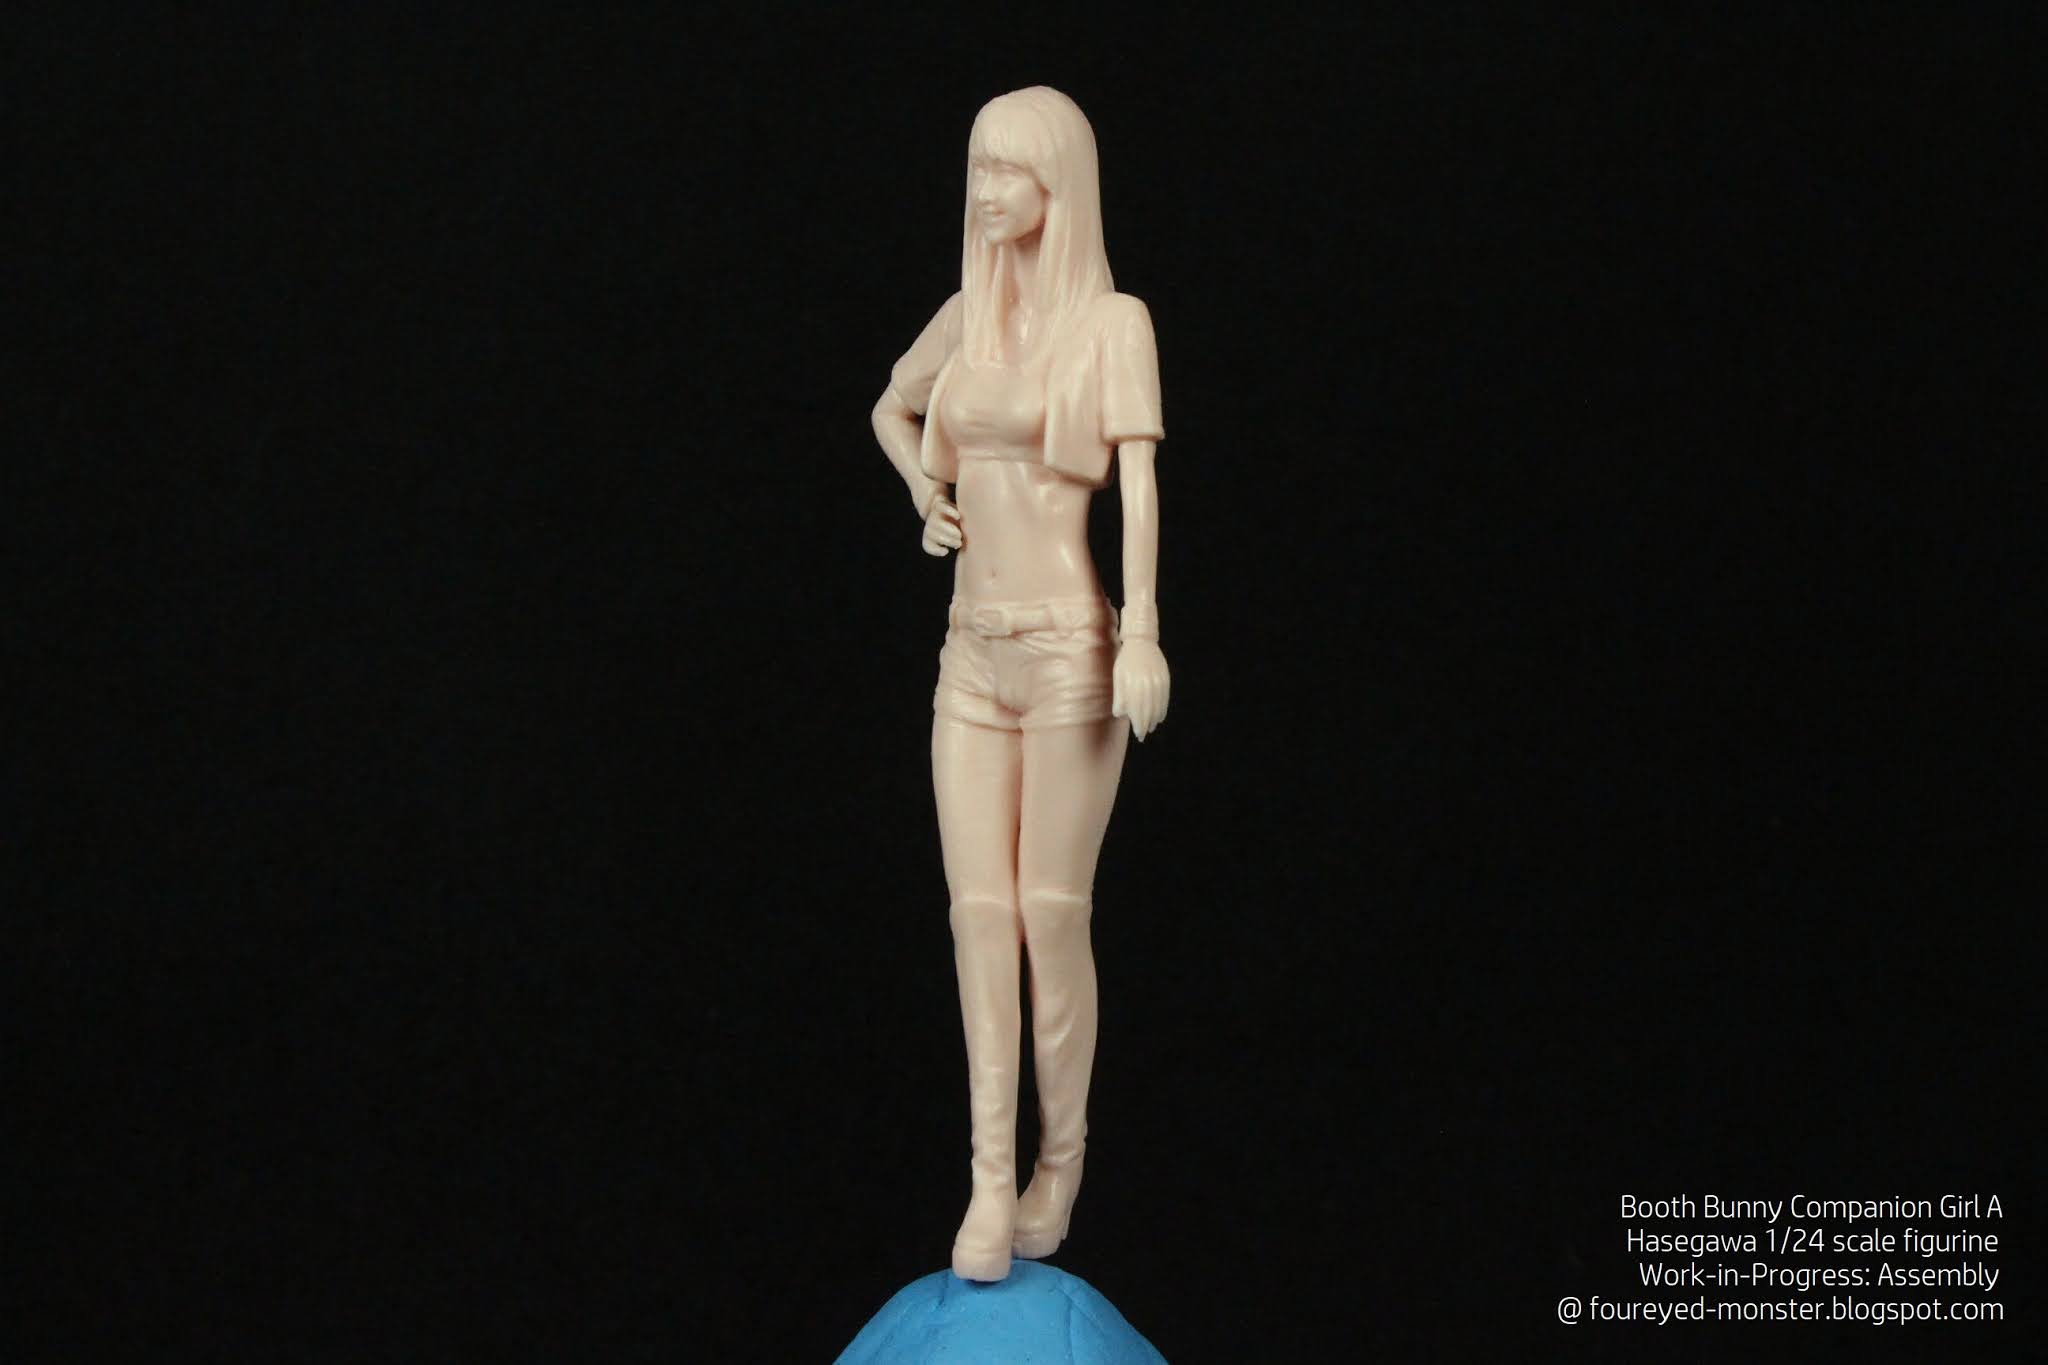
Booth Bunny Companion Girl A [WIP - Assembly]

 Okay, so I know I mentioned that this was going to be a 'simple and uncomplicated' project. Well the assembly of Booth Bunny Companion Girl A was all that, and at the same time not that at all. You might think I'm springing a Schrodinger's Cat situation on you, but I'm really not. It's more a case of the words 'simple' and 'uncomplicated' being mutually exclusive. In other words, the assembly of Booth Bunny Companion Girl A turned out to be uncomplicated but difficult. Let me explain. 


Hasegawa 1/24 scale Booth Bunny Companion Girl A work-in-progress: fully assembled

Booth Bunny Companion Girl A closeup; a slightly angled view from her left

Booth Bunny Companion Girl A closeup; a slightly angled view from her right

 Upon a cursory glance of the instructions laid out for the assembly of Booth Bunny Girl A, the steps looked straightforward and uncomplicated. However, the actual assembly process turned out to be difficult because none of the parts fitted together as say wood joints do. Essentially the separate parts 'fitted together', and I use those words loosely, by contact alone. What this means is that the parts had to be held together in place precariously by hand as glue is simultaneously being applied. Getting parts into their correct positions require feel, visual checks, and pure dumb luck.  


Assembly instructions for the Hasegawa 1/24 scale Booth Bunny Companion Girl A

Pieces of the Booth Bunny Companion Girl A prior to the assembly process

 For example, attaching parts A12 and A13to the main body or A7 (see above) turned out to be a complete nightmare. No guiding grooves existed to ensure the said parts fitted together accurately. Moreover, trying to hold such tiny pieces together while gluing it, and also making sure they were correctly positioned, all at the same time, was nigh impossible. Meanwhile placing parts A9, A10, and A11 onto A7 was slightly easier, helped primarily by the existence of visual cues such as surface details. Lastly, attachment of part A8 to the main body was helped by having part A11 already glued on. Having one leg already attached allowed it to act as a positioning guide of sorts. 


Mr.Hobby's Mr.Cement S was essentially to the assembly process being successful

 Assembly of this figurine would not have been possible without the use of thin plastic glue in the form of the Mr.Hobby Mr.Cement S. There were two reasons for this: one, a thin, watery consistency allowed the glue to seep into the joints during application. This helps greatly when one is trying to hold two tiny parts steady in the correct position while applying glue at the same time. Two, plastic glue is essential in that it serves to melt the plastic pieces together, thus covering over obvious and unsightly gaps when two parts come in contact. These gaps were consistently present prior to gluing. 


To enable the secure positioning of the figurine onto a base for painting ...

... a 0.8 mm hole was drilled into the figurine's foot ...

... and a 0.8 mm brass rod was then inserted to act as anchor of sorts

 An added step was carried out to enable me to paint this figurine without being obstructed as well as to prevent damaging paint already layered on.This step involved anchoring the figurine securely to the base using a brass rod. To this end, I drilled a 0.8 mm hole into the base of the figurine's right high heel, deep enough to insert roughly 2 cm of a brass rod of equal diameter. The rest of the brass rod was secured onto a lump of adhesive tack on a hand-sized container. Although using cork material instead of adhesive tack would've been better, I didn't have the former so I made do with the latter.  


Booth Bunny Companion Girl A; fully assembled [front view]

Brass rod secures the figurine to the base without obscuring any painting surface

Booth Bunny Companion Girl A; fully assembled [side view, right]

Her posture looks a bit stiff, not unlike some models you see in real life car shows

Booth Bunny Companion Girl A; fully assembled [back view]

Positioning of arms and feet turned out well although it was touch and go at times

Booth Bunny Companion Girl A; fully assembled [side view, left]

Figurine has good details and at this scale should present a fair challenge to paint 

 So that's one half of the Bunny Girl duo that has been assembled. With both the help of the missus and a great deal of luck, this particular assembly went as well as I could've hoped in my wildest dreams. In some instances, I held two tiny parts together in my best assumption of the correct positioning while the missus help me apply the initial smattering of thin plastic glue to the joint. While the glue was drying, and with the separate parts still pliable (but attached flimsily together), I then further manipulated the positioning as well as added more glue where needed.


Details on her hair look a bit faded in places, but this can be rectified through paint

Booth Bunny Companion Girl A closeup; back view

Another way to add detail back into the hair could be to carve or sculpt it in

 Before I end this post, I would like to apologize to you, dear readers, especially those you who have been taking the time to comment on my blog. You may have noticed by now that your comments aren't being published instantly as they used to be. Instead comments are now moderated before being uploaded. Again, my apologies for this inconvenience. I had to take this drastic measure because the comment section was becoming inundated with fake messages that caused Google to temporarily  block my site. So as a precaution to prevent it from happening again, I'm moderating the comment section. On that same depressing note, I end with news that the pandemic situation in my country is the worse it has ever been. Only thing left to say is stay safe everyone!   


https://www.facebook.com/FourEyedMonster-313145002078520/

Sunday, 9 May 2021

Booth Bunny Girls - Hasegawa 1/24 scale Companion Girls Figure Collection No.5 [Unboxing and Pre-Assembly Review]

 With so many ongoing projects requiring either a prolonged assembly or a complicated airbrushing process, I decided start something 'simple and uncomplicated'. That brings us to a quick unboxing and pre-assembly review of the 1/24 scale Hasegawa Companion Girls Figure Collection No.5 aka the Booth Bunny Girls. In the grand scheme of things, I intend to use such female figurines in future vignettes involving similarly scaled car model kits like the Volkswagen Beetle


Hasegawa 1/24 scale Companion Girls Figure Collection No.5 plastic model kit

Side view of the box art showcasing completed figurines and the seal of Master Craftsman Takumi

Closeup view of how the figurines could look like after being assembled and painted

 'Simple and uncomplicated' means different things to different scale modelers and miniature painters. To me it means just two things. Firstly, the figurine/model kit is easy to assemble. And secondly, the painting process does not require pieces to be painted separately before being put back together. So in terms of these two conditions, I believe the Hasegawa plastic figurine kit fits the bill perfectly. While the actual painting process itself won't be easy, it's a figurine after all, it at least won't be complicated. 


Hasegawa Companion Girls Figure Collection No.5; first glance inside

Hasegawa's Companion Girls Figure instruction booklet comes with an English translation

In addition to assembly instructions, there is also a color guide for use with Mr.Hobby paints

All parts are found in a single model sprue

Water decals are provided for the figurine's eyes as well as markings for their clothing

 One key characteristic of this plastic model kit that attracted me to it was that it provides eye decals for the use on the painted figurines. At a stage in my 'hobby-career' where I might be getting 'too-old-for-this-shit', any help with a small figurine's eyes is always welcome. However, it'll be interesting to see if I'm able to handle and position the tiny eye decals without destroying them.


Close up view of the facial features of Booth Bunny Girl No.1

Close up view of all the parts that make up Booth Bunny Girl No.1

 Meanwhile, the figurines parts look cleanly moulded with excellent details at this scale (see above and below). They all come in only one model sprue and seem to have minimal mould lines (if any) that needs removing. The parts themselves aren't numerous. Assembly looks to be fairly straightforward, at least based on the instructions given in the mini-booklet provided. 


Close up view of the facial features of Booth Bunny Girl No.2

Close up view of all the parts that make up Booth Bunny Girl No.2

 And with that, another figurine model kit joins the project pipeline. In truth though, I found it difficult to get motivated to do any sort of hobbying at all during this past two weeks. I suppose you could call it 'pandemic depression' as the COVID-19 situation get progressively worse in my country. Apart from having all the deadly variants penetrate the nation's borders, the vaccination process has been extremely slow. All frontliners have been vaccinated (rightly so) as well as politicians and special interest groups selected by said politicians. Sadly majority of ordinary folks have yet to even get an appointment for their jabs. It's getting harder to stay safe. Hopefully, that's not the case for you dear reader. May you and your loved ones be safe and well in these trying times. Au revoir.  


https://shireworks.blogspot.com/https://www.facebook.com/shire.works

Friday, 23 April 2021

Sturmgeschütz III Ausf.B Sd.Kfz.142 [WIP - Assembly of the Towing Hooks, Bulkhead of Fighting Compartment, and Upper Hull; sans Tracks]

 Moving on from the wheels, Steps 6 through 10 of the Sturmgeschütz's assembly process was next and it involved putting together the towing hooks, fighting compartment bulkhead, and upper hull; sans the tracks, which I'll explain later. Up to this point, things are still pretty straightforward. Any complication  so far has been self-imposed i.e. determining which parts to glue and which parts not to, with an eye to the painting stage that will commence after assembly is done.


Sturmgeschütz III work-in-progress: Assembly Steps 6 through 10; sans tracks

Tamiya Sturmgeschütz III Ausf.B Sd.Kfz.142 assembly instructions; Steps 5 through 10

 For example, parts of both tow hooks were completely glued together while a piece of the Fighting Compartment Bulkhead that holds the gun ammo was just snap-fitted onto the bulkhead (see below). The latter was not glued on because I believe it will be easier to paint the ammo if it isn't attached to the bulkhead. This is the case for other parts as well as you'll see later.


Sturmgeschütz III tow hooks (left) and bulkhead of fighting compartment (right)

Other parts of the fighting compartment i.e. structure accommodating the main gun (left) and floor (right)

Parts of the fighting compartment, prior to being attached to the lower hull

 Other unglued (or snap-fitted) parts include various parts of the fighting compartment as well as the drive sprockets, road wheels, and idler wheels; when attached onto the lower hull (see below).  


Fighting compartment and wheels attached to the lower hull

 Next was the initial phase of the upper hull assembly. What you see below is just the beginning as many more parts will be added to the upper hull in later steps. For now, minimal detail was added onto the upper hull e.g. hatches, heat vents, etc. (see below)


Initial assembly phase of the Sturmgeschütz III upper hull ...

... in which hatches, heat vents, etc. were glued on

 Of all the steps in this hobby session, I skipped one i.e. Step 9, which involves gluing the tracks into a closed loop. This I didn't do as it'll be much easier for me to paint and weather both the said tracks in their unassembled form. Only after then will I glue them together into a closed loop. Because of this, Step 10 remains partially completed i.e. the tracks weren't attached to the wheels/lower hull.


Sturmgeschütz III tracks still remain in their sprues; unworked

 Last in this series of steps was the placing of the upper hull onto the lower hull. This I did in the form of a dry-fit only. The reason I didn't want to glue them together was the same as for the wheels. In addition, I feel that with the upper hull attached permanently, it will be that much harder to paint and weather the armored fighting vehicle's interior namely its fighting compartment (and bulkhead).


Sturmgeschütz III lower hull up until Step 7 of the assembly process

Sturmgeschütz III lower hull with the upper hull attached; after Step 10 sans tracks

 Because my painting style generally involves airbrushing parts separately before assembly, most of the parts you see assembled above have not been glued permanently. I know I've said this before but it bears repeating as subsequent posts (especially during the painting process) might seem confusing when the parts come apart again. However, all thoughts of airbrushing the Sturmgeschütz III is still far from my mind as a lot of assembly remains to be done. Incidentally, to get inspired for this project, I have been reading Warhammer 40K novels on the Astra Militarum. It's not that weird if you think about it as there are similarities between the Imperial Guard and the Wehrmacht. Anyways I've babbled on long enough. As always, until we meet again - stay safe, be well and be happy.


https://www.facebook.com/FourEyedMonster-313145002078520/

Sunday, 11 April 2021

Sturmgeschütz III Ausf.B Sd.Kfz.142 [WIP - Assembly of the Drive Sprockets, Road Wheels, and Idler Wheels]

 On the surface, it doesn't seem like I got much done on the Tamiya 1/35 scale Sturmgeschütz III Ausf.B Sd.Kfz.142 this past two weeks. Who am I kidding? I didn't. All I managed to do was Step 5 i.e. the assembly of the armored fighting vehicle's drive sprockets, road wheels, and idler wheels. In my defense, there was a lot wheels. And there was a lot of mould lines to remove from said wheels. 


Sturmgeschütz III work-in-progress: Assembly Step 5

Tamiya Sturmgeschütz III Ausf.B Sd.Kfz.142 assembly instructions, Step 5

 For parts located in an area that'll likely see significant weathering effects, they are incredibly detailed. The wheels sport amazing little details such as the rims, nuts and bolts, metal surface texture, and weld lines. So much so that I still made the effort to remove mould lines from the road wheels, all 12 pairs of them, even if they'll likely be covered with mud effects.    


Sturmgeschütz III idler wheels assembled and prepped for paint

Sturmgeschütz III drive sprockets assembled and prepped for paint

Sturmgeschütz III road wheels assembled and prepped for paint

 Mould lines. A scale modeler's worst nightmare. If there's a task more tedious when prepping a part for paint, I do not know it. A caveat: as I've never had the opportunity to get up close to a real-life Sturmgeschütz III, I am assuming those are mould lines. I stand corrected if they are not.


If that is a weld line, then it's an excellent piece of detail on the road wheels

Except for the occasional oversight, the mould lines on the road wheels were completely removed

Mould lines (and the absence of) on the roads wheels as seen from a different angle

 One would think the never-ending pandemic lock down, in one form or the other, would provide me with more time to work on hobby-related stuff. Surprisingly the opposite has happened. Ah well, at least I haven't hit another period of the dreaded hobby malaise, so I'm grateful for small mercies. The heart is still willing so if all goes well, I'll see you again in two weeks time. Cheers and be well.  


https://shireworks.blogspot.com/https://www.facebook.com/shire.works

Related Posts Plugin for WordPress, Blogger...