Friday, 24 May 2019

MENG Model Sd.Kfz.182 King Tiger [WIP - Micro Paint Chips on selected areas of the Hull and Turret]

Ever been at a point when you're just sick of the sight of the model you're working on? Well, I get the feeling it's happening to me with the King Tiger. That's to be expected when a work-in-progress drags on too long as the German Heavy Tank project has for me. The detailing process of a tank this size is time consuming to say the least. Throw in a perfectionist streak to the work flow and you've all the ingredients for a snail-paced project. And nothing highlights the minutiae of detail work at this scale then the application of micro paint chips on the turret and hull of a large 1/35 scale tank.    

Most obvious area to receive micro paint chips is the commander's turret hatch and its surrounding area
Depending on location, majority of raised surfaces - curved or straight - had micro paint chips applied on them
Another area that would've seen major wear and tear: underside of the secondary hatch

Choice of color for the micro paint chips was dependent on how deep the chips had penetrated into the turret and hull. My final decision was based on pure conjecture combined with an educated guess based on the limited information in hand. Assuming Tank No.124 of the Schwere Panzer-Abteilung 505 had been rushed into operation in late-1944 and knocked out soon after, it would stand to reason that any paint chips on its turret and hull would be minimal. Location of said paint chips should be on areas which saw regular wear and tear or on prominently raised areas. As such, I chose a mixture of Vallejo Red Oxide and German Camouflage Black Brown for the micro paint chip color.

Micro paint chip color was a mixture of Vallejo German Red Oxide and German Camo. Black Brown

On the turret, micro paint chips were concentrated in and around both the command and secondary hatches, the hand rail near the rear hatch as well as any notably sharp edged and raised areas. As for the hull, micro paint chips could be found on the front two hatches and on raised areas towards the rear of the tank. Just for good measure I added some tiny paint chips on the headlight. My reasoning was that the machine gun port would've been shot at and as a consequence some bullets might have grazed the protruding headlight. Where possible, every micro paint chip must justify its existence. 

Red oxide hue implies micro paint chips are shallow, having only penetrated no further than the primer coat
Closeup view of the micro paint chips on the tank commander hatch and its surrounding area
Handle near rear turret hatch would've seen extensive use hence the paint chips

Technically there should also be micro paint chips on the King Tiger's road wheels within the tank tracks and the surrounding areas. But because the road wheels, tracks and the lower bottom hull will be weathered extensively with dirt and dust, I felt it unnecessary to place micro paint chips in placed where they would be covered up by dust and dirt anyway. Truth be told, by the time I had finished the micro paint chips on the King Tiger's turret and hull I was already too jaded to continue on the same for the road wheels and lower bottom hull. If I'm right, I don't need to. Time will tell.    

Micro paint chips were kept to a minimum throughout because at this late stage of the war, the King Tiger would've been knocked out long before getting a chance to undergo an extensive period of operations
Edge of the grille covering the engine cooling vents also had micro paint chips applied on them
Micro paint chips is technically possible as the grille cover is slightly raised thus exposing the edges

Meanwhile, I didn't consider placing micro paint chips on areas of the King Tiger with zimmerit coating. Chips of any kind on the layer of zimmerit would be large by nature as is the case for the few that already exist on the tank (not shown here). That was a huge relief because it meant large swathes of the tank didn't require the tedious process of painting micro paint chips. 

On the front end of the hull, micro paint chips were concentrated on the crew hatches and raised areas
Areas with zimmerit coating were not considered for micro paint chip placement
By my reckoning, any paint chips on the headlight would've been the result of bullets grazing it

Thankfully I haven't reached the stage where I would want to completely shelve the King Tiger project. With mainly the dust/dirt (plus maybe some minor fuel/grease) weathering and tank crew painting left to be done, I believe I can just about get this kit over the finishing line.

My preferred way of staving off hobby malaise is to add yet more scale model kits to the project pipeline. Some might say this is foolhardy as it could all blow up in my face, saddling me with numerous half-finished kits on the worktable and shelves. Yet this is the path I find myself on, consciously or not. So be prepared for more projects to be announced while I inch my existing ones slowly towards that light at the end of the tunnel. That tiny pinprick of light, oh so far away!

https://www.facebook.com/FourEyedMonster-313145002078520/

Wednesday, 15 May 2019

HQ12-02 Race Queen [WIP - Mixing Pantone Color of the Year 2016 and Painting Basecoats for Racing Attire]

At this early stage of the Race Queen attire I sought only to apply the mid-tones of the clothing's color scheme, which in my way of doing things is synonymous with the basecoat layer. As to the colors themselves, I went for a previously used combination namely the Pantone Color of the Year 2016 comprising Rose Quartz and Serenity. The Vallejo Model Color rough equivalents are 70.944 Old Rose and 70.902 Azure respectively (both tinted with 70.951 White).  

atelier iT 1/12 scale Race Queen work-in-progress: Preliminary basecoats for her racing attire
At this stage the racing attire basecoat colors have yet to painted with their shadows and highlight

Shadows for the mid-tones will play a big part in the added accuracy as well as an even closer match to the Pantone Color of the Year 2016. Such shading can be created by adding either small amounts of 70.958 Pink to 70.944 Old Rose and/or an Old Rose/White mixture; and 70.839 Ultramarine to 70.902 Azure and/or an Azure/White mixture. I'll expound on this in the next Race Queen update. At this point in time I applied the mid-tones to see if the general color scheme fits her skin tone. 

A trial and error process towards achieving a close match for the Pantone Color of the Year 2016 

Because of her fairly large size, the 1/12 scale Race Queen tends to react with light much more naturally when compared to the tinier 1/60 or even 1/144 scale figurines I've worked with before. What this essentially means is that the Race Queen will require less contrasting of hues i.e. lighter shadows and darker highlights, and let natural lighting effects take care of the rest. Of course adding different hues to the basecoat colors will make the color scheme more aesthetically pleasing. However care must be taken not to overdo the contrasting, especially in larger scale figurines.     

Pantone Color of the Year 2016 - Rose Quartz and Serenity

As alluded to earlier, I had used this color combination before on an earlier project. But back then I wasn't too particular about how close a match the painted colors were to the real thing. This time I did so I tried my best to get as close to the actual Pantone colors as I could.

All important mid-tone of the Race Queen's attire is now done and it awaits shadows and highlights

Sadly the photos above don't really do justice to how close the painted basecoat colors do indeed match the Pantone Rose Quartz and Serenity hues, to the naked eye. There are just too many variables involved, some controllable some not, ranging from photography lighting to camera settings to PC/laptop color display settings and monitor quality. Even if every aforementioned variable is set to perfection the colors still might not look right to an observer with an uncalibrated electronic display incapable of handling high color accuracy. So you will just have to take my word for it.      

https://shireworks.blogspot.com/https://www.facebook.com/shire.works

Saturday, 11 May 2019

Transformers Bumblebee in Volkswagen Beetle form [WIP - Finding a Close Match of the Bumblebee Yellow]

In this latest stage of my work on the Volkswagen Beetle form of Transformers Bumblebee, no assembly of parts was carried out at all. Instead, I began looking for a close approximation of the iconic Bumblebee Yellow using the paints I had in my possession. The closest I had was a yellow lacquer paint from the Mr. Color GX series which is supposed to be brighter in tone, stronger in coating and greater in coverage. It can be argued that a lighter shade of yellow wouldn't have been out of place too but it's this particular tone of yellow (see below) I decided to go with.

Tamiya 1/24 Volkswagen 1300 Beetle (1966 Model) work-in-progress: First layer of Bumblebee Yellow

Any online research for colors can never rally be 100% accurate. There are too many uncontrollable variables at play such as the image might have been edited, the display monitor may have low color space (sRGB/Adobe RGB) accuracy, etc. So short of being physically next to the actual vehicle used in the movie set, you just never know for sure. So after a fair bit of research, I came across three reasonably consistent images of the Bumblebee Beetle under three different lighting conditions namely cloudy, sunny and artificial light (see below). The yellow in question is both bright and light.

A Volkswagen Beetle on the Bumblebee film set during what looks like a cloudy day
Said Volkswagen Beetle, this time located in arid conditions on a sunny day
Last but not least, the Bumblebee Volkswagen Beetle indoors under artificial lighting

For variations in the yellow I decided to play around with the underlying primer coat instead of mixing different tints of the hue. With this objective in mind, I used the Mr. Finishing Surfacer 1500 (Black), Tamiya Fine Surface Primer (Light Gray) and Tamiya Fine Surface Primer (White).

Primers used in  color test: Mr Finishing Surfacer 1500 Black, Tamiya Fine Surface Primer Light Gray and White 
Color test using plastic spoons primed with the aforementioned primer spray cans (see photo above)

Meanwhile as to the yellow itself, I used the Mr. Color GX 4 Chiara Yellow thinned with Mr. Color Leveling Thinner at a ratio of 1:1. This was subsequently sprayed onto the spoons with different colored primer coats. As expected, the spoon with the white primer coat had the brightest yellow while the one with the black primer coat had the most muted yellow. On the spoon with a light gray prime coat, the yellow had a mid-range brightness but seem to be the most light. It seemed closest to the Bumblebee Yellow I was after. It made sense too as most real-life cars are primed in gray.

Closet hue to the Bumble Yellow I had was the Mr Color GX4 Chiara Yellow
Chiara Yellow painted on top of plastic spoons with (from left to right) black, light gray and white primer

One disadvantage to airbrushing is the tedious need to mask areas that require or have been painted with other colors. For this I used Tamiya masking tapes and some cheap cling wrap.

Masking of the assembled part thus far using a combination of masking tape and cling wrap
Only this half-hexagonal shaped flat surface will received a coat of Mr.Color GX Chiara Yellow

To be frank I suck at masking, at least for now. It would seem like a no-brainer task but like all techniques they require some trial and error as well as experience to get right. I'm not there yet. Even after covering up everything with cling wrap and masking tape, some holes still inexplicably existed that allowed the paint to get in as far as to the engine at the back. Luckily the damage caused by the paint overspray wasn't overly bad. I managed to fix the issues with some brush painting by hand. 

A light gray version of the Tamiya Fine Surface Primer was chosen as the primer coat
Despite my best efforts at masking, some overspray of paint unfortunately seeped inside to the parts
Light reflecting of the yellows seem to give the surrounding background surface a yellowish green tint
Despite my best efforts at masking, paint overspray unfortunately still seeped inside
Thankfully effects of the paint overpsray wasn't too bad and I could hand paint over the resulting damage
First section of the Volkswagen Beetle painted with yellow and now awaiting weathering
So the first yellows have been laid down. And things are only going to get tougher from here on out as Bumblebee in Beetle form slowly takes shape. But challenges should be relished if we are to enjoy our hobby and I definitely intend to. So much so that I plan to pile even more projects onto my already cluttered worktable. The rationale being to keep myself so busy that I don't have the time to think and unnecessarily fuss over minute details like only a silly perfectionist can. Anyway, the weekend is here so here's wishing you get to spend it the way you want it. Cheers!

https://www.facebook.com/FourEyedMonster-313145002078520/

Friday, 3 May 2019

HQ12-02 Race Queen [WIP - Hair & Early Work on Face]

What is past is prologue ... so goes the oft quoted Shakespearean line from The Tempest. While in modern times this phrase has frequently taken on a meaning different from that intended in the play, it is the original interpretation which applies in my case. For it seems whatever technique I had learned and applied in the past had almost no bearing on the painting of the Race Queen's skin tone. I say almost because her eyes, lips, teeth and fingernails will still see the application of old acrylic painting methods. But hitherto the rest of her skin tone had been largely painted using new techniques like airbrushing of lacquer paints; dry-brushing of pastel hues; and hand painting of oil paints.          

1/12 scale Race Queen work-in-progress: Her hair and early stages of her face
Skin tone is on the fair side, exaggerated black hair, dark background and unpainted clothes ...
... but her skin tone should look relatively less fair once her facial features and clothes are painted in

Building on earlier firsts with lacquers and pastels, this session saw oil paints added to my existing repertoire of skin tone painting techniques. In the past, I usually used acrylic paints to paint the blush hues on a female figurine's cheekbones. But because acrylic paint dries extremely fast it's difficult to correct mistakes. Alternatively, I found the use of oil paints more flexible due to its slower drying time and the ease in which mistakes can be corrected with careful use of white spirit. Blush hues on the Race Queen's face comprised a mix of Winton Oil Color Flesh Tint and Permanent Rose

For her blush, a Winton Oil Color mixture of Flesh Tint and Permanent Rose was used
For her lips a mix of Vallejo Carmine Red and Salmon Pink was used; for her eye sclera and teeth Reaper Leather White
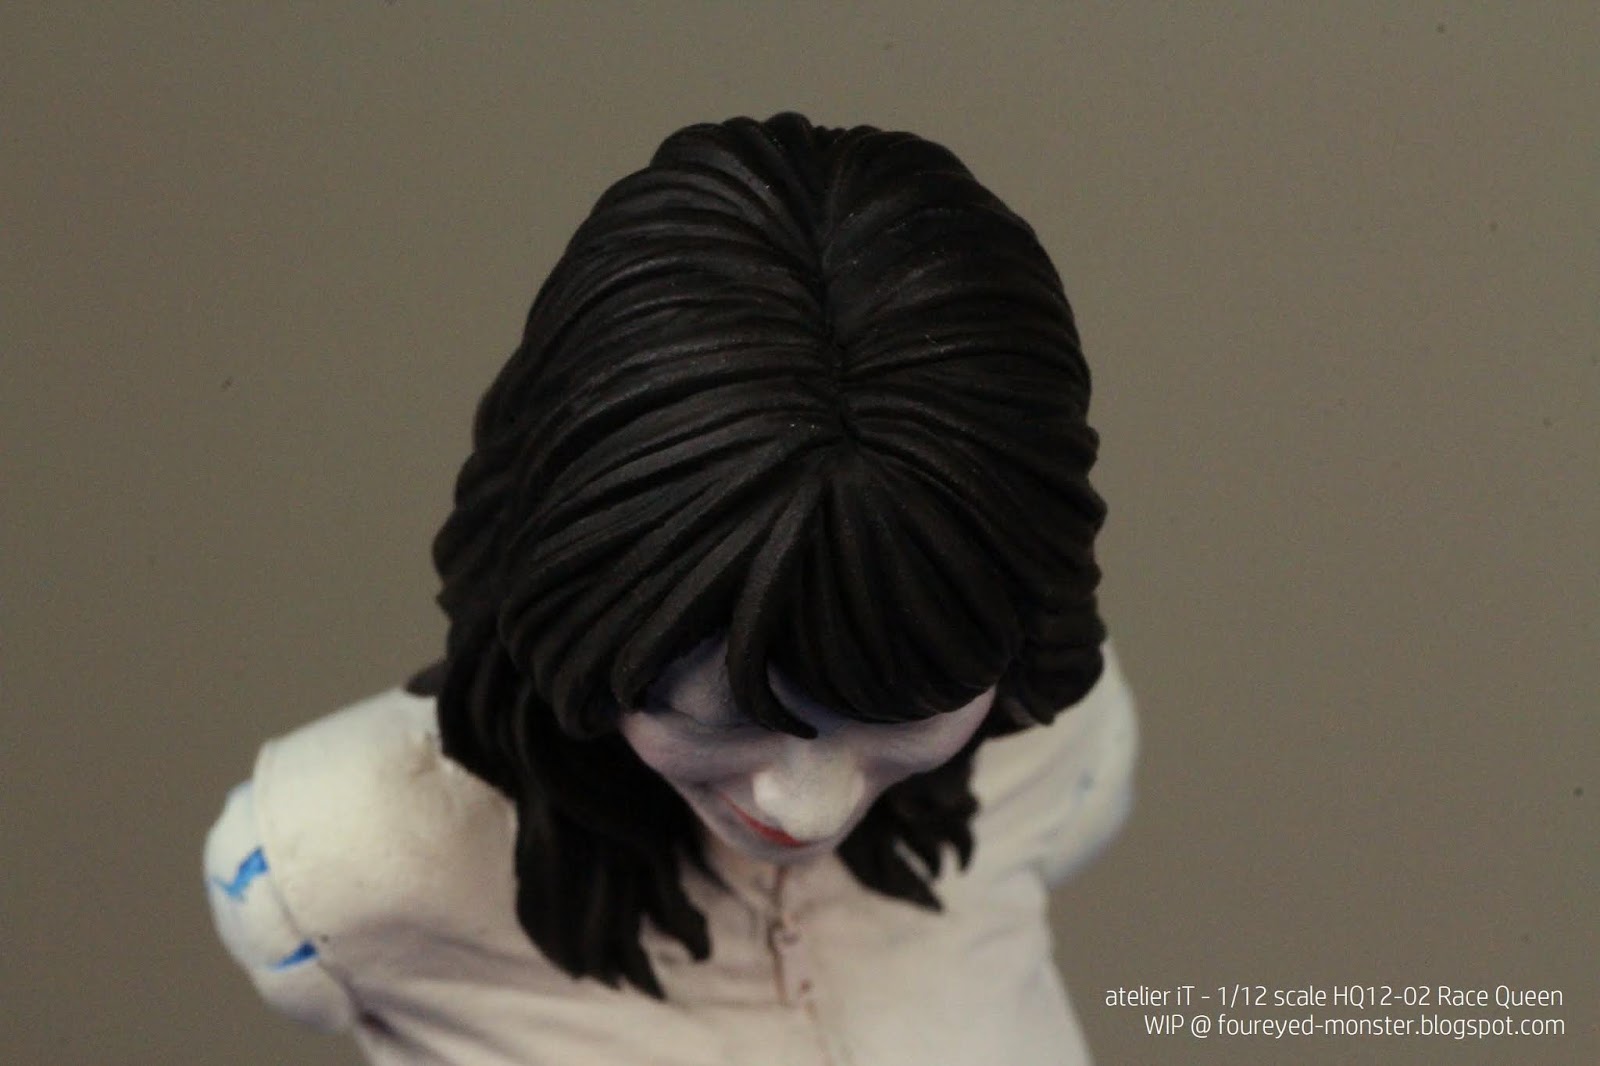
For her hair, various layers of Vallejo Model Color Black, German Camouflage Black Brown and Burnt Umber was used

A previous attempt at painting black hair gave rise to plenty of misgivings as I wasn't entirely happy with the final outcome. This time around aided by both an arguably better sculpt of a head of hair and the use of black paint as a basecoat (versus a lighter black brown in the earlier attempt). The former allows the contrast in colors to stand out more while the latter prevents the black hair from becoming too brownish. Acrylic paints used for her hair comprised Vallejo Model Color 70.950 Black, 70.822 German Camouflage Black Brown and 70.941 Burnt Umber.

Random strands of the Race Queen's black hair received extra highlights ...  
... which help to create a sense of volume in her hair
Contrast between the hair and clothes will lessen once her outfit is painted
Hair on top of her head received the least highlights ...
... which essentially means the main source of light isn't from above but instead it's coming from the sides

As you can see from the photos above and below, the Race Queen has an extremely fair complexion. Now there's a reason for this. I needed her skin to be fair in order to suitably contrast against the color scheme of her clothes, which odds-on should be light pastel hues incorporating skin-like hues.  

As this is still early stages of her face, some red from her lips had bled into the teeth
While there is more work to be done on her lips, I'm happy with the color of her lipstick
A light pink blush seems suited to her fair facial skin tone, for now

As much as I enjoy working on sci-fi and military vehicles, it's the time I spent on figurines that most invigorates me. On that note I hope to add more miniature figurines into my project pipeline in the near future. For reasons I'll explain later, there is a high likelihood that I'll add up to five new projects (two anime figurines and three anime mechas) to the existing five on my work table. It seems crazy if you think about it but there is a method to my madness. All will be made clear, eventually. For now it's good bye and thanks for checking out my progress on the Race Queen. Cheers! 

https://shireworks.blogspot.com/https://www.facebook.com/shire.works

Related Posts Plugin for WordPress, Blogger...