As how sometimes things pan out in this hobby, the way the Nurgle Rhino Dozer/Destroyer blades were eventually painted is far removed from how I initially envisioned them to be. At first, I had primed the blades with a smooth almost glossy black primer in the expectation I would be laying on a metallic coat before weathering them. I soon realised this would unnecessarily waste a lot of metallic paint that would not see the light of day. So I did a 180 and instead applied a dark basecoat of
Vallejo Rust Texture, followed by midtones of dry-brushed rust hues and ending with metallic pigments.
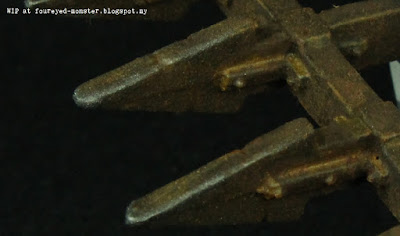 |
| Rhino Dozer/Destroyer Blades, suitably weathered as per Papa Nurgle's requirements |
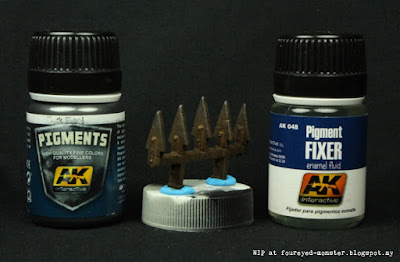 |
| For the metallic shine, a combination of AK Dark Steel Pigment and Fixer was used |
If you are on a very tight budget, a simple graphite pencil can be used as an alternative to the
AK Interactive Dark Steel Pigments. Yet another alternative would be graphite powder from art supply shops although truth be told these are kinda expensive too. For the Nurgle Rhino, I applied AK pigments on the sharp edges of its 'blade' using a cotton bud. And then, I fixed the pigments in place using, well, an enamel-based pigment fixer also by
AK Interactive. The reasoning behind this step is that even rusted metal contains parts that face wear and tear hence the exposed metallic shine.
 |
| Colour Scheme for blades - dark rust base with fresh rust on grooves and metallic shine on edges |
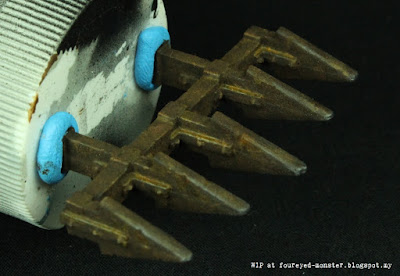 |
| Fresh rust (bright orange hues) are concentrated on areas where water may pool |
Because I had initially primed the blades with a glossy black primer (
Mr Finishing Surfacer 1500 Black), I had to improvise in order to reduce surface tension thus allowing the
Vallejo Rust Texture to stick better. This I did by first applying a coat of
Vallejo Polyurethane Matt Varnish. It's important to note that this varnish coating would've been unnecessary if I had applied a black matt primer such as
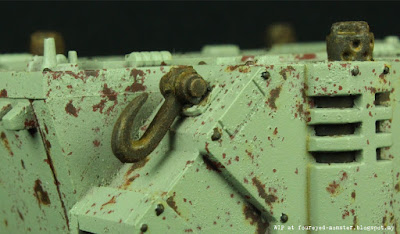
Citadel Chaos Black. Meanwhile, other 'metal' parts of the vehicle worked on include the exhaust outlets on its upper hull, tow hooks, searchlight, poison gas tank, tri-skull emblem and chains.
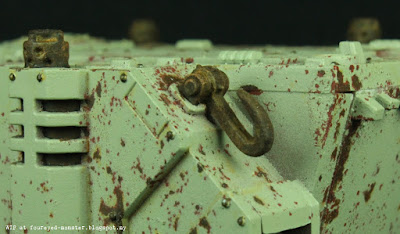 |
| Tow hooks on the rear were weathered in a similar way to the other 'metal' parts |
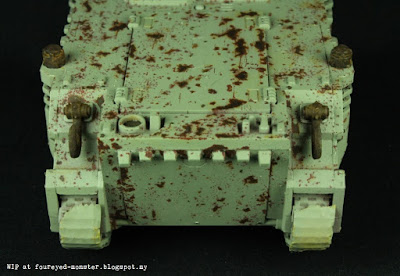
 |
| Exhaust outlets on the upper hull, all four of them, were also weathered |
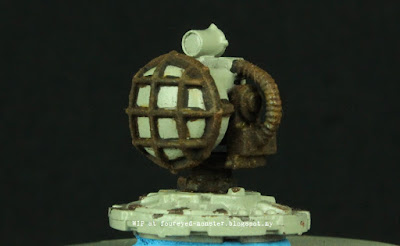 |
| Nurgle Rhino Searchlight, with the rusted metal bits all done up |
At this stage of the build I am besiege by ambivalent feelings due
primarily to a hobbyist's greatest (arguably so) bugbear - patience. I
feel that more scale model kits are ruined by lack of patience rather
than lack of skill, although there is a fine line between the two in
miniature painting/modelling. As things stand, I'm pretty chuffed with
my progress so far. However, the Nurgle Transport is still so far from
the picture I have imagined that it's mind-blowingly infuriating. Let me explain ...
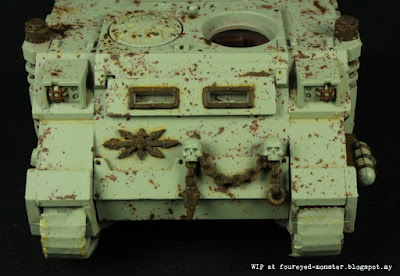 |
| Nurgle Rhino (front end) work-in-progress: metals parts weathered and rusted |
 |
| Bits weathered include the exhaust outlets at the upper hull and the tow hooks on the back |
 |
| Nurgle Rhino (side hull, left) - metal parts include the poison gas tank and the tri-skull emblem |
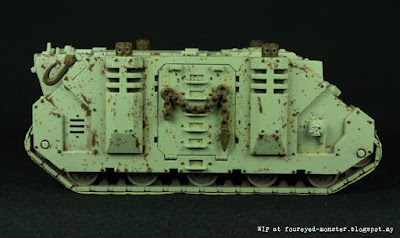 |
| Nurgle Rhino (side hull, right) - metal part comprised only the chain on the hatch door |
Photographs of the Nurgle Rhino as you see above lacks two key ingredients that will ratchet up the realism exponentially. One is subtle, the other not so much. The former are panel line washes while the latter, rust streaks. I'll be tackling panel lining in the upcoming post as well as the Nurgle Rhino's organic bits such as the skulls and poor Lucy i.e. the rotting head on the hull. Rust streaks will only come in after these are done. And now you can see why the Nurgle Rhino has a long way to go yet.


.jpg)

Oh, I'm a gig fan of your plague art. Looking amazing!
ReplyDeleteThank you Michał. And thank you for patiently following my progress on this scale model kit.
DeleteIncredible attention to detail!
ReplyDeleteThank you Phil ... I think this hobby is bringing out the worse OCD behaviour in me.
DeleteThis is insanely good detailing.
ReplyDeleteVery kind words indeed Michael and humbly appreciated. Thank you.
DeleteFantastic work my friend !
ReplyDeleteCheers !
Many thanks Mario for your kind comments.
DeleteLovely work on the latest plague-infected parts. :)
ReplyDeleteThank you pulpcitizen! To be honest the amount of weathering here is a tad overwhelming for me but it's a Nurgle vehicle and I need the practice LoL :)
DeleteBit by bit its coming together nicely dude.
ReplyDeleteThank you Simon. Now I know why my Chaos army never got off the ground. The crazy amount of details each miniature/vehicle had caused me to spend way too much time completing the paint job. O_O ^_^ LoL
DeleteWell, I can hardly imagine a better way of handling this project, so the results are certainly worth of the time you are investing!
ReplyDeleteThank you Suber :) Even if the end result isn't good, the amount of weathering practice I'm getting is worth it!
DeleteVery convincing already!
ReplyDeleteThank you sir! I'm cramming all the weathering practice I can into this poor vehicle.
DeleteYou're not rushing through this for sure 😊, instead you're taking your time to get every detail right. This is going to be a masterpiece.
ReplyDeleteVery kind words Wouter, thank you. The amount of practice I'm getting itself is priceless. :)
Delete