Sunday, 3 April 2022

Space Battleship Yamato 2199, Cosmo Reverse Ver. [WIP - Hangar Bay & Cosmo Falcon Space Fighters]

 For the longest time, roughly about 19 months to be exact, the Space Battleship Yamato 2199 Cosmo Reverse Version project had laid dormant due to an oxymoronic reason of a miniature painting taking a dislike to painting small things. If a miniature or scale model kit hits 1/1000 scale or lower, and it's real world size falls roughly within one-to-three-times that of an average-sized human being, there is a high chance that I'll hate painting it. Unfortunately, this was the case for the 1/1000 scale Cosmo Falcon Space Fighters that comprised part of the battleship's hangar bay.  


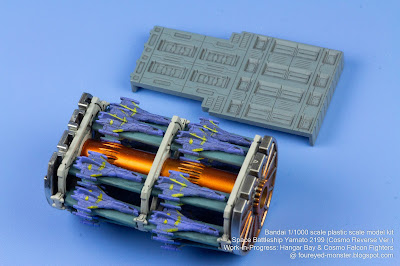
Space Battleship Yamato 2199 (Cosmo Reverse Ver.) work-in-progress: Hangar bay & docked fighters

Hangar bay with the docked space fighters displayed next to the chamber it's supposed to slot into

 So essentially the halt in progress for the Space Battleship Yamato project all boiled down to my reluctance to paint these tiny space fighters. For a miniature painter to have a peeve about painting extremely small things is atypical to say the least. But if you consider the scales commonly available in this hobby range widely from 1/6 to 1/1000, then you have a myriad of sizes for a miniature painter to develop a preference or dislike for. Moreover the subject matter being miniaturized matters e.g. a battleship in 1/1000 scale is easier to paint than a human figure in a similar scale.     


Cosmo Falcon Space Fighters at 1/1000 scale was a pain to paint

At 1/1000 scale, the space fighters were smaller than a paperclip and a five sen coin

Space Battleship Yamato 2199 Hangar Bay parts were painted prior to assembly

 While I felt uneasy in having to assemble painted parts due to the fear I would chip the paint, my fears were unfounded. I believe the clear gloss top coat I had applied on the painted-but-yet-to-be-assembled Hangar Bay parts prior to panel-lining them played a part in protecting the paint from being chipped. That and the fact that lacquer paints are fairly strong and resistant to rough handling, the paint on the Hangar Bays parts thankfully did not chip during the assemble process.  


Cosmo Falcon Space Fighters comprised a version lifted from the floor, and one fused into the floor

Cosmo Falcon Space Fighters prior to being attached onto the Hangar Bay framework

Cosmo Falcon Space Fighters after being attached onto the Hangar Bay framework

Roof structure of the Hangar Bay has yet to be attached at this stage of the build

 There are two ways to install a fully built Hangar Bay with all the Cosmo Falcon Space Fighters docked inside it. One way is to insert the whole structure into a hollow chamber located within the rear of the Space Battleship Yamato. Another is to place the said structure onto a mini-display stand next to the battleship (see first two photos above). As things stand for now, it's likely I'll opt for the latter because I want to show the innards of the battleship i.e. the wave motion engine.   


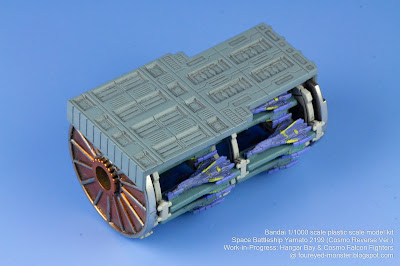
Roof structure after being attached onto the Hangar Bay framework with the docked fighters

Hangar Bay's roof structure was painted in a light neutral grey scheme ...

... which helps to distinguishes it from the darker blue grey scheme of the hull plates

Side of the Hangar Bay that will be hidden from view when placed on the display stand

To avoid a monotone color scheme on the Hangar Bay ...

... both outer ends were painted in a metallic orange and silver combo ...

... while the inner framework was painted in an ivory-like color

Isometric view of the Hangar Bay in the orientation it will be in, on the display stand

 To give you a better view of the fighters as well as interior, a series of photos with the Hangar Bay flipped upside down onto its roof is displayed below. And because not all the fighters will be in a viewer's line of sight once the Hangar Bay is placed onto the mini-display stand, I tried where possible to place fighters that weren't so well painted in such hidden-from-view areas e.g. on the battleship-facing side, bottom-facing side, and the space deep inside the hangar bay. 


Hangar Bay flipped on its back to display how it looks like from underneath

Fighters that are noticeably less well painted were all ...

... strategically placed in areas of the Hangar Bay that will be ...

... hidden from view once the Hangar Bay is placed on the display stand

When zoomed in with a dedicated macro lens, details on the space fighters looses some sharpness   

Tubular metallic orange pillar at the center of the Hangar Bay can be seen from this isometric view

At such a small scale, there is a trade-off between the paint job quality of space fighters ...

... and the time one is willing to spent in order to get a high level of detail and accuracy

 Overcoming this obstacle of having to paint 1/1000 scale space fighters is an extremely big deal for me. Going forward, I don't foresee any obstacle that's going to be as obstructive as the fighter were. While not plain sailing from now on, the Space Battleship Yamayo 2199 Cosmo Reverse Version project (yes I know, it's a real mouthful just to say) should progress smoothly towards completion in the coming weeks. The same is expected for my other two active projects namely the Girl's Rider figurine and Star Wars Speeder Bike model kit. It's shaping up to be the best first quarter I've had for the hobby in years. And on that note, I bid you au revoir. Stay safe, and be well.    


https://www.facebook.com/FourEyedMonster-313145002078520/

https://shireworks.blogspot.com/https://www.facebook.com/shire.works

Sunday, 27 March 2022

Star Wars Speeder Bike [WIP - Weathering the Hull Plating & Steering Vanes]

 Because of the nature of the Speeder Bike's dark metal alloy (aka black metal), metallic scuff and scratch marks were painted as well as dry-brushed onto the the chassis and main frame structure (see previous post) in order to bring out both details and structural lines. A similar concept was applied to the Speeder Bike's hull plating. However, because the brownish hull plating wasn't as dark as the black metal, more weathering than just metallic scuff/scratch marks were needed to bring out the details and structural lines in addition to increasing depth. This came in the form of dirt/soot streaks and simple panel-lining, results of which you can see in the photos below.  


Star Wars Speeder Bike work-in-progress: Fully-weathered Hull Plating & Steering Vanes

 This process of additional weathering picks up from where the Speeder Bike's hull plating and steering vanes was last worked on and its progress updated ... more than 15 months ago. As the relevant parts had already been top-coated, they were already prepped for the first step of the weathering process i.e. panel-lining. Ever since I started using it, Mr.Weathering Color Multi-Black has become my go-to paint for panel-lining. It has replaced my previous preferred panel-liner i.e. Tamiya Panel Line Accent Color. I still use the latter as it's a good product, just not as much as I used to.


Star Wars Speeder Bike early work-in-progress: Panel-lined Hull Plating & Steering Vanes

 As for next steps in the weathering process namely the application of streaks of dirt as well as metallic scuff marks and scratches, the steering vanes were the first parts to be worked on. This was because in comparison to the hull plates, it was relatively easier to envision where dirt streaks, metallic scuff marks and scratches should be placed on the steering vanes. After all it would be the latter that takes the brunt of any airborne detritus (e.g. sand in the Tattoine desert) or straggling branches (e.g. trees in the forests of Endor) in the way of a moving Speeder Bike.


Fully-weathered Speeder Bike Steering Vanes (view from the rider's seating position)

Fully-weathered Speeder Bike Steering Vanes (view from the front of the bike)

 From the start, my aim was to maintain a relatively minimalist approach to the weathering process. This meant I applied as little weathering as possible - be it streaks of dirt or metallic scuff/scratch marks - to the Speeder Bike as I could get away with. Admittedly though, going by this benchmark, it could be argued that I may have applied a little too much weathering to the steering vanes, and the protruding hull plating that protects the thrust arrays and repulsor projection units (see last photo in this blog). Then again, this are the same parts that would be most exposed to erosive particles/matter. So I guess it's a subjective call, and I'll know better once the bike is fully assembled.


Fully-weathered Speeder Bike main Hull Plating, nose section (isometric view, front right side)

Fully-weathered Speeder Bike main Hull Plating, nose section (isometric view, front)

Fully-weathered Speeder Bike main Hull Plating, nose section (isometric view, front left side)

 This minimalist approach is heavily influenced by the concept of the umbrella project, which involves Star Wars Empire figurines and/or vehicles that are relatively new-looking because they are being used in propaganda shoots. It wouldn't do to have dirty Empire soldiers and vehicles gracing the propaganda photos. On the other extreme I felt that if they were presented in pristine conditions as if in a parade, then it would be unrealistic. So on a spectrum of heavily weathered to marching parade pristine, I choose somewhere in the middle but biased towards the pristine end of things. 


Fully-weathered Speeder Bike main Hull Plating, mid-section (isometric view, left side)

Fully-weathered Speeder Bike main Hull Plating, tail section (isometric view, left side)

Fully-weathered Speeder Bike main Hull Plating, tail section (isometric view, back)

Fully-weathered Speeder Bike main Hull Plating, tail section (isometric view, right side)

Fully-weathered Speeder Bike main Hull Plating, mid-section (isometric view, right side)

 While in the previous Speeder Bike update I alluded to the fact that there were more black/dark metal alloy parts to be painted and assembled, this is not the case for the hull plating. All you can see here is all there exists of the hulll plating. There are additional non-dark metal stuff to paint and fix onto the hull plating itself such as the seat, the tarp for wilderness shelter, as well as miscellaneous switches and buttons. But as far as I can tell there won't be any more brown hull plates to worry about. 


Fully-weathered Speeder Bike main Hull Plating (isometric view, right side)

Fully-weathered Speeder Bike main Hull Plating (isometric view, left side)

 With the core components of the Speeder Bike (i.e. Chassis/Main Frame Structure, Hull Plating, and Steering Vanes) painted and weathered, the time has come for these individual/sub-assembled parts to be in turn assembled into a larger whole thus allowing a recognizable silhouette of the Speeder Bike to take shape. This I'll attempt soon. And to prepare for this latter stage assembly process, I also have to figure out the best way to prop up the entire bike as pieces are being put together.  


Fully-weathered Speeder Bike bottom Hull Plating

Fully-weathered Speeder Bike Hull Plates covering the thrust arrays and repulsor projection units

 As such, before further assembling, painting, and weathering is done for the Speeder Bike project, I plan to first put together all the pieces that have been painted/weathered so far. I'm looking forward to it partly because it's an indication that this project is progressing again at a good pace. As I'm not naive enough to think this fast pace is going to last forever, I'm milking it for all it's worth. I plan to channel what I term as an 'excess of hobby energy' into reviving a third project (i.e. Space Battleship Yamato) in the midst of the two (i.e. Girl's Rider and Speeder Bike) in progress. Am I pushing myself towards a premature burnout? Let's hope not. Until next time, stay safe and be well.  


https://shireworks.blogspot.com/https://www.facebook.com/shire.works

http://shireworks.blogspot.com/p/custom-painted.html

Saturday, 19 March 2022

Quick Update: Restoration of Girl's Rider Denim Jeans

 Tempted as I was to strip the Girl's Rider miniature figurine's denim jeans down to its primer coat and begin painting from scratch, I felt it was too drastic a step to take. I couldn't bring myself to just write-off the untarnished areas of the denim texture, which had taken hours to paint. So I set out to salvage what I could, and repaint what I couldn't. At the risk of sounding like an egotist looking through rose-tinted glasses, I thought the denim jeans restoration turned out quite well; better than expected at least. Results can be seen in the photos below, so do let me know if you agree with me, or not.    


1/12 scale miniature figurine Girl's Rider denim jeans restoration work (front view)

 Key to the whole heartache in the first place was the application of a water-based matt coating agent i.e. the Mr.Hobby Mr.Premium Top Coat Flat on the denim jeans. As such the logical question to ask is whether my attempt to matt the denim texture was worth it. In short, the answer is yes! It would've been clearer to compare before and after matting photos, but this being just a quick update meant I left them out. Pinky swear I'll add the before/after shots and upload them once I finish work on the leather. And there's actually more work to do on the leather accessories now as I'll explain later.      


1/12 scale miniature figurine Girl's Rider denim jeans restoration work (back view)

 To refresh your memory on how bad the denim jeans was previously, below are some before and after restoration photos that I did manage to upload. It was easier for me to fix the front compared with the back of the jeans, simply because the buttocks area was more severely damaged. 


Girl's Rider denim jeans, front view: after restoration (above), before restoration (below)

Girl's Rider denim jeans, back view: after restoration (above), before restoration (below)

 There were some spillover damage to the leather accessories. But because fixing the denim texture took a lot out of me, there wasn't anything left in the tank to extend restorative work to the leather boots and belt as well. It's not all bad though as I have yet to actually complete work on the leather, so you could say the damage occurred when about 80% of the work have been completed, not 100%. I guess that's one way of seeing the glass as half full, not empty. 

 Once I complete work on the leather accessories, I will upload photos of the results together with the before/after matting effects on the denim jeans. This I'll do concurrently with two other revived projects i.e. the Star Wars Speeder Bike and Space Battleship Yamato 2199 Cosmo Reverse Version. So in the coming weeks I'll be uploading posts about these three projects. For a quick update I've rambled on for too long now. So I shall stop and bid you, as always, to stay safe and be well.    


https://www.facebook.com/FourEyedMonster-313145002078520/

Related Posts Plugin for WordPress, Blogger...