Sunday 27 March 2022

Star Wars Speeder Bike [WIP - Weathering the Hull Plating & Steering Vanes]

 Because of the nature of the Speeder Bike's dark metal alloy (aka black metal), metallic scuff and scratch marks were painted as well as dry-brushed onto the the chassis and main frame structure (see previous post) in order to bring out both details and structural lines. A similar concept was applied to the Speeder Bike's hull plating. However, because the brownish hull plating wasn't as dark as the black metal, more weathering than just metallic scuff/scratch marks were needed to bring out the details and structural lines in addition to increasing depth. This came in the form of dirt/soot streaks and simple panel-lining, results of which you can see in the photos below.  


Star Wars Speeder Bike work-in-progress: Fully-weathered Hull Plating & Steering Vanes

 This process of additional weathering picks up from where the Speeder Bike's hull plating and steering vanes was last worked on and its progress updated ... more than 15 months ago. As the relevant parts had already been top-coated, they were already prepped for the first step of the weathering process i.e. panel-lining. Ever since I started using it, Mr.Weathering Color Multi-Black has become my go-to paint for panel-lining. It has replaced my previous preferred panel-liner i.e. Tamiya Panel Line Accent Color. I still use the latter as it's a good product, just not as much as I used to.


Star Wars Speeder Bike early work-in-progress: Panel-lined Hull Plating & Steering Vanes

 As for next steps in the weathering process namely the application of streaks of dirt as well as metallic scuff marks and scratches, the steering vanes were the first parts to be worked on. This was because in comparison to the hull plates, it was relatively easier to envision where dirt streaks, metallic scuff marks and scratches should be placed on the steering vanes. After all it would be the latter that takes the brunt of any airborne detritus (e.g. sand in the Tattoine desert) or straggling branches (e.g. trees in the forests of Endor) in the way of a moving Speeder Bike.


Fully-weathered Speeder Bike Steering Vanes (view from the rider's seating position)

Fully-weathered Speeder Bike Steering Vanes (view from the front of the bike)

 From the start, my aim was to maintain a relatively minimalist approach to the weathering process. This meant I applied as little weathering as possible - be it streaks of dirt or metallic scuff/scratch marks - to the Speeder Bike as I could get away with. Admittedly though, going by this benchmark, it could be argued that I may have applied a little too much weathering to the steering vanes, and the protruding hull plating that protects the thrust arrays and repulsor projection units (see last photo in this blog). Then again, this are the same parts that would be most exposed to erosive particles/matter. So I guess it's a subjective call, and I'll know better once the bike is fully assembled.


Fully-weathered Speeder Bike main Hull Plating, nose section (isometric view, front right side)

Fully-weathered Speeder Bike main Hull Plating, nose section (isometric view, front)

Fully-weathered Speeder Bike main Hull Plating, nose section (isometric view, front left side)

 This minimalist approach is heavily influenced by the concept of the umbrella project, which involves Star Wars Empire figurines and/or vehicles that are relatively new-looking because they are being used in propaganda shoots. It wouldn't do to have dirty Empire soldiers and vehicles gracing the propaganda photos. On the other extreme I felt that if they were presented in pristine conditions as if in a parade, then it would be unrealistic. So on a spectrum of heavily weathered to marching parade pristine, I choose somewhere in the middle but biased towards the pristine end of things. 


Fully-weathered Speeder Bike main Hull Plating, mid-section (isometric view, left side)

Fully-weathered Speeder Bike main Hull Plating, tail section (isometric view, left side)

Fully-weathered Speeder Bike main Hull Plating, tail section (isometric view, back)

Fully-weathered Speeder Bike main Hull Plating, tail section (isometric view, right side)

Fully-weathered Speeder Bike main Hull Plating, mid-section (isometric view, right side)

 While in the previous Speeder Bike update I alluded to the fact that there were more black/dark metal alloy parts to be painted and assembled, this is not the case for the hull plating. All you can see here is all there exists of the hulll plating. There are additional non-dark metal stuff to paint and fix onto the hull plating itself such as the seat, the tarp for wilderness shelter, as well as miscellaneous switches and buttons. But as far as I can tell there won't be any more brown hull plates to worry about. 


Fully-weathered Speeder Bike main Hull Plating (isometric view, right side)

Fully-weathered Speeder Bike main Hull Plating (isometric view, left side)

 With the core components of the Speeder Bike (i.e. Chassis/Main Frame Structure, Hull Plating, and Steering Vanes) painted and weathered, the time has come for these individual/sub-assembled parts to be in turn assembled into a larger whole thus allowing a recognizable silhouette of the Speeder Bike to take shape. This I'll attempt soon. And to prepare for this latter stage assembly process, I also have to figure out the best way to prop up the entire bike as pieces are being put together.  


Fully-weathered Speeder Bike bottom Hull Plating

Fully-weathered Speeder Bike Hull Plates covering the thrust arrays and repulsor projection units

 As such, before further assembling, painting, and weathering is done for the Speeder Bike project, I plan to first put together all the pieces that have been painted/weathered so far. I'm looking forward to it partly because it's an indication that this project is progressing again at a good pace. As I'm not naive enough to think this fast pace is going to last forever, I'm milking it for all it's worth. I plan to channel what I term as an 'excess of hobby energy' into reviving a third project (i.e. Space Battleship Yamato) in the midst of the two (i.e. Girl's Rider and Speeder Bike) in progress. Am I pushing myself towards a premature burnout? Let's hope not. Until next time, stay safe and be well.  


https://shireworks.blogspot.com/https://www.facebook.com/shire.works

http://shireworks.blogspot.com/p/custom-painted.html

Saturday 19 March 2022

Quick Update: Restoration of Girl's Rider Denim Jeans

 Tempted as I was to strip the Girl's Rider miniature figurine's denim jeans down to its primer coat and begin painting from scratch, I felt it was too drastic a step to take. I couldn't bring myself to just write-off the untarnished areas of the denim texture, which had taken hours to paint. So I set out to salvage what I could, and repaint what I couldn't. At the risk of sounding like an egotist looking through rose-tinted glasses, I thought the denim jeans restoration turned out quite well; better than expected at least. Results can be seen in the photos below, so do let me know if you agree with me, or not.    


1/12 scale miniature figurine Girl's Rider denim jeans restoration work (front view)

 Key to the whole heartache in the first place was the application of a water-based matt coating agent i.e. the Mr.Hobby Mr.Premium Top Coat Flat on the denim jeans. As such the logical question to ask is whether my attempt to matt the denim texture was worth it. In short, the answer is yes! It would've been clearer to compare before and after matting photos, but this being just a quick update meant I left them out. Pinky swear I'll add the before/after shots and upload them once I finish work on the leather. And there's actually more work to do on the leather accessories now as I'll explain later.      


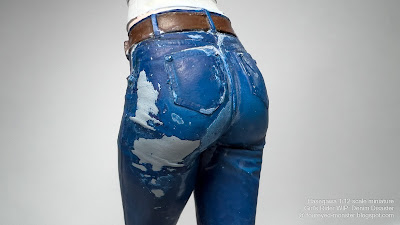
1/12 scale miniature figurine Girl's Rider denim jeans restoration work (back view)

 To refresh your memory on how bad the denim jeans was previously, below are some before and after restoration photos that I did manage to upload. It was easier for me to fix the front compared with the back of the jeans, simply because the buttocks area was more severely damaged. 


Girl's Rider denim jeans, front view: after restoration (above), before restoration (below)

Girl's Rider denim jeans, back view: after restoration (above), before restoration (below)

 There were some spillover damage to the leather accessories. But because fixing the denim texture took a lot out of me, there wasn't anything left in the tank to extend restorative work to the leather boots and belt as well. It's not all bad though as I have yet to actually complete work on the leather, so you could say the damage occurred when about 80% of the work have been completed, not 100%. I guess that's one way of seeing the glass as half full, not empty. 

 Once I complete work on the leather accessories, I will upload photos of the results together with the before/after matting effects on the denim jeans. This I'll do concurrently with two other revived projects i.e. the Star Wars Speeder Bike and Space Battleship Yamato 2199 Cosmo Reverse Version. So in the coming weeks I'll be uploading posts about these three projects. For a quick update I've rambled on for too long now. So I shall stop and bid you, as always, to stay safe and be well.    


https://www.facebook.com/FourEyedMonster-313145002078520/

Thursday 10 March 2022

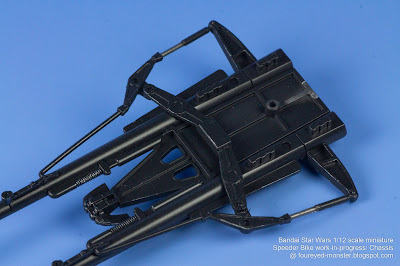
Star Wars Speeder Bike [Work-in-Progress: Pseudo-Metallic Chassis / Main Frame Structure]

 As I take a temporary step back from the recent denim disaster (of which restorative works should be completed before end of this month), momentum for the hobby continues unabated. Perhaps for the first time since I began this hobby more than 10 years ago, I find myself devoid of the apathy that has been a recurring thorn in my side. So instead of project after project being shelved midway through its progress, the reverse is happening. Stalled projects are either being revived (e.g. Space Battleship Yamato 2199, Sturmgeschütz III, Neon Genesis Evangelion EVA-01, Volkswagen Beetle, etc.) or have been revived i.e. the Star Wars Speeder Bike project you are going to see here.   


Star Wars 1/12 scale Speeder  Bike work-in-progress: Chassis/Main Frame Structure

 Because a shiny metallic chassis/main frame structure would not have been consistent with a movie-accurate representation of the Speeder Bike, a different route was taken to make the relevant parts look like metal components without completely covering them with metallic paint. What I did was to first airbrush a semi-gloss dark grey (almost black) basecoat on the chassis/main frame structure. Following this, I painted on as well as dry-brushed metallic acrylic paints in strategic locations. This I did to mimic scuff/scratch marks that reveal/hint at a shinier metallic surface underneath. This then creates an optical illusion of a completely metal chassis/main frame structure.       


Acrylic paints applied onto the dark grey basecoat comprised metallic gunmetal and silver colors

 In my years of painting metallic colors by hand with a brush, I have found Citadel Boltgun Metal to be the acrylic paint with the best coverage in terms of smoothness and opaqueness. And although I would've preferred to use Citadel Boltgun Metal as the sole metallic paint for my purposes here, I only have two bottles of the old recipe (and no longer in production) paint left in my possession. As such, I use it sparingly. To paint the Speeder Bike chassis/main frame structure, I also used a mixture of Vallejo Model Color 70.863 Gunmetal Grey and 70.997 Silver to complement the metallic hues.   


Speeder Bike outriggers with multi scanner array (bow), tracking sensor/comlink (amidships), and steering linkages (stern); the bottom facing side is shown in the image above

Speeder Bike multi scanner array (bottom facing side)

Speeder Bike tracking sensor/comlink, and steering linkages (bottom facing side)

 To be fair the Vallejo Model Color metallic paints aren't that bad, especially if you dilute the paints with Vallejo Airbrush Thinner instead of water even if you are hand-painting with a brush. However if given a choice I will still choose Citadel Boltgun Metal over the Vallejo metallic paints.


Speeder Bike outriggers with multi scanner array (bow), tracking sensor/comlink (amidships), and steering linkages (stern); the top facing side is shown in the image above

Speeder Bike multi scanner array (top facing side)

Speeder Bike tracking sensor/comlink, and steering linkages (top facing side)

 Dirt and grime weathering on the Speeder Bike is non-existent, and it'll likely stay that way if I am to paint it for the Join-the-Empire umbrella project. To recap, this project comprises a series of vignettes combining a 1/12 scale Bandai Star Wars figurine/scale model kits with a 1/12 scale non-brand-specific female miniature figurine. Because the scene intends to depict figurines posing for a propaganda poster, it wouldn't do to have a dirtied up Speeder Bike in the background.  


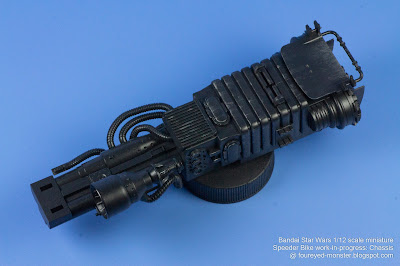
Speeder Bike repulsor block housing the engine, power plant, power converter, and power cell

To simulate the look of an all-metal repulsor block, metallic acrylic paint was painted and dry-brushed in strategically selected areas onto a semi-gloss layer of dark grey lacquer paint

Speeder Bike engine (of which no molded part exists) is theoretically housed within the repulsor block

Power cell (turbine-like contraption) and fuel lines (segmented hoses) connected to a fuel cell

A view of the repulsor block from an isometrically opposite angle, with the repulsor projection units (exhaust nozzle-like contraption) as well as repulsor deflectors at the (far left) end

 It should be noted that the chassis/main frame structure isn't the only part of the Speeder Bike that sports the "black metal" look. Other components such as the handlebars, rocker-pivoted footpads, repulsor deflectors (air brakes), blaster cannon, power/sensor management controls will also be painted to have that "black metal" look. Those will be painted later after I had a go at the weathering the bike's already basecoated armor/hull plating and steering vanes.   


Back of the Speeder Bike (bottom facing side) with the repulsor projection units at each side

Metallic paint scratches give an optical illusion that the repulsor block is made out of metal

A closeup view of the Speeder Bike's power cell (turbine-like contraption)

 It's early days yet for this renewed vigor for all things hobby-related, and I don't want to jinx it. For now the revival rolls on with yet another shelved project about to be resurrected, namely the Space Battleship Yamato 2199 Cosmo Reverse scale model kit version. So with the ongoing Girl's Rider figurine and the recently revived Star Wars Speeder Bike, this means I'll have three projects running simultaneously as the first quarter of 2022 draws closer to an end. Let's hope this isn't a false dawn as I don't think I can get through another malaise filled hobby period so soon after the disastrous last two years. Anyway there are worse things happening in the world right now, so I'll keep it simple as this blog draws to an end. Stay safe, and be well! 


http://shireworks.blogspot.com/p/custom-painted.html

https://shireworks.blogspot.com/https://www.facebook.com/shire.works

Thursday 3 March 2022

A moment of inattention brings denim disaster upon the 1/12 scale Girl's Rider miniature figurine

 Ever had that nanosecond of wool-gathering while you were in the midst of a painting session that just absolutely ruins days of meticulous work. Well I have, almost too many times. And this particular fubar was an absolute horror show! So what happened was during the application of a water-based matt coating agent i.e. the Mr.Hobby Mr.Premium Top Coat Flat on the Girl's Rider figurine's denim jeans, I mentally switched off and kept my finger depressed too long on the spray trigger. Even after I noticing my mistake it still took me a further second or so to react. By then the jeans was covered in too much coating agent and showing the dreaded whitening effect. But it gets worse ...


Denim disaster, the tragic consequences of applying too much matt coating agent 

 To compound my mistake, I panicked and tried using running water to remove the still dripping wet coating agent. When that failed I started to inexplicably rub frantically at the denim jeans, thus peeling off the layers of acrylic paint all the way down to the primer coat. And if you thought the front view was bad, the back was even worse (see below). That's days of hard work gone in a puff of aerosol spray.


Paint damage at the back of the miniature figurine was even worse

 Now, I feel the need to reiterate that the horror show that you see above and below isn't the fault of the aforementioned water-based matt coating agent. Not really. I have used the Mr.Premium Top Coat Flat before, on surfaces covered with acrylic paint without any problems. In fact, if you look at the lower half of the denim jeans - disregarding the blobs of matt coating agent caused by an overzealous spray can trigger finger - you would've noticed the paint is largely unscathed. 


Lower half of the denim jeans weren't as badly affected as the upper half

 After coming to terms with this humongous fubar - which involved swearing like an out of control potty mouth for an extended period of time - I calmed down enough to start restorative work on the denim jeans. And when it's eventually finished I won't hesitate to use the Mr.Premium Top Coat Flat on the jeans again. That's how confident I am that this is just a case of user misuse rather than product unsuitability. Misplaced bravado or confident optimism? I guess we'll find out in the week ahead. 

 In the meantime work has resumed on the Star Wars Speeder Bike and momentum is building to such an extent that it will likely be completed at the same time or soon after the Girl's Rider figurine. Both projects as well as the completed Scout Trooper are part of an all-encompassing Star Wars: Join-the-Empire umbrella project comprising a series of mini-vignettes that depict how a propaganda recruitment photo shoot may have looked like in the scifi universe. Concurrently with the Girl's Rider denim jeans restoration, I'll also be working on the chassis/main structure of the Speeder Bike. One or the other should make it into the upcoming post. Until then, stay safe and be well. 


https://www.facebook.com/FourEyedMonster-313145002078520/
Related Posts Plugin for WordPress, Blogger...