Sunday 26 June 2022

Custom Candy Coated Evangelion Unit-01 Test Type [Assembly Part 1 of 5: Legs]

 Momentum is a wonderful thing, more so when it relates to the progress of hobby projects. Not unlike an Evangelion running full tilt towards an Angel, my EVA-01 Test Type custom candy metallic paint project has gathered enough momentum that I'm left with no doubt that, like the aforementioned Evangelion's eventual clash with the Angel, the project will be completed shortly ... at least when it comes to the EVA unit itself sans accessories. With all individual parts of the EVA-01 Test Type already painted and panel-lined, the assembly process begins with its legs.   


Evangelion Unit-01 Test Type work-in-progress: Candy Metallic Legs (isometric view of inner side)

Evangelion Unit-01 Test Type work-in-progress: Candy Metallic Legs (isometric view of outer side)

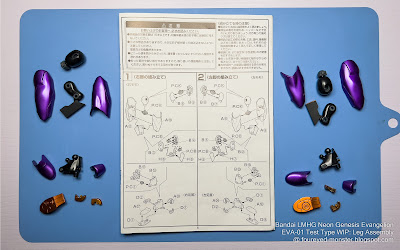
 Prior to the painting process, I had already put together some sub-assemblies to make the painting process easier to manage. That means assembly of the legs did not begin from scratch with just the individual painted parts to work with. I also had completed sub-assemblies like the knees, inner thigh frame/joint, and inner foot frame/joint to use in the leg assembly (see below). 


(A) Arranging and sorting out individual parts/sub-assemblies of the thigh, knee, and feet

(B) Assembling both custom painted thighs, knee, and feet of the Evangelion Unit-01 Test Type

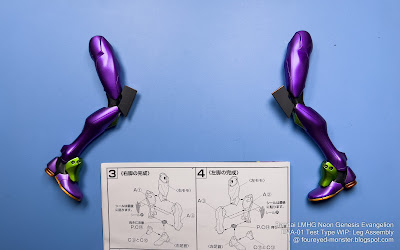
(C) Laying out parts of the shin/calf and ankle, together with the assembled feet/thighs

(D) Completed assembly of both legs of the EVA Unit-01 Test Type (light source from top)

(E) Completed assembly of both legs of the EVA Unit-01 Test Type (light source from bottom)

 One of the reasons I decided to paint a candy metallic finish was due to the pale muted purple hues on the original molded plastic. It gave the kit the kind of washed-out look which I'm not a fan of. As such I decided to convert the color scheme to that of a candy metallic finish. Results so far seem encouraging. I'm optimistic that my choice of changing the color scheme from a flat non-metallic hue to a candy metallic one will be vindicate once the entire kit is assembled. But in the end, beauty is in the eye of the beholder. As long as the modeler himself likes the hues, then it's good enough.


(F) Assembly of both legs of the EVA Unit-01 Test Type comprised Steps 1 through 4

 Articulation is extremely good in terms of the level of bend you can obtain at the joints. In fact you can achieve close to a 180 degree bend at the knees - certainly a greater bend than is shown in the photo below. There is also articulation on the feet themselves (not shown here) which is perhaps better demonstrated via action poses once the Evangelion is fully assembled. 


Articulation of the legs with one straightened and the other bend slightly

 Below is a couple of final top-down views of both Evangelion Unit-01 Test Type custom painted legs. One shows the inner side/half (showcasing the joints which will eventually connect to the pelvic piece) while the other shows the outer side/half of the legs.


Both legs of the Evangelion Unit-01 Test Type (view of inner half, joints visible)

Both legs of the Evangelion Unit-01 Test Type (view of outer half)

 Not to belittle the assembly process of scale model kits, but I've always found the painting process to be more difficult or at least more time consuming. No matter how complex the assembly process becomes, for example the latest Bandai Master Grade Extreme (MGEX) product line which incorporates fairly intricate LED lighting into 1/100 scale kits, things almost always becomes much more complicated when you have to paint the parts before you put them together. 

 So perhaps it's no surprise momentum for this project has gathered the pace it has, seeing that the painting process for the EVA unit itself has been completed. And with the leg assembly now completed, the next step will be to assemble the EVA unit's fully-painted shoulders, arms, forearms, and hands. As such the next work-in-progress blog update for the EVA-01 unit. With that it's time to end this particular blog update. As always, stay safe and be well.

  Important Note: Videos showcasing a more in depth view of the Evangelion Unit-01 Test Type assembly process, of which there will also be five parts, will all be released simultaneously only after the blog post updates have all been uploaded. If you are the type who prefers watching instead of reading, then the videos will be more to your liking. Be sure to stay tuned for that. 


https://shireworks.blogspot.com/https://www.facebook.com/shire.works

https://www.facebook.com/FourEyedMonster-313145002078520/

Sunday 19 June 2022

Evangelion Unit-01 Test Type [WIP - Candy Coat for the Shoulders, Neck, Arms, Hands, Legs, Feet ... & more]

 Once a key mental hurdle for a project had been overcome, the floodgates to progress tend to open as a consequence. It certainly took awhile but after the Bandai LM-HG Grade EVA Unit-01 Test Type model kit's high inertia-coefficient was sufficiently countered, my first Evangelion project has tasted progress. If anything, the only thing slowing down this project is that it's a tiring endeavor for an old scale modeler like yours truly to paint so many small parts in so many steps. It took me four days to reach this stage as parts needed to dry overnight at each step. And yet this candy coating process wasn't even for the whole EVA-01 unit. Its head, torso and lumbar pieces have yet to be painted.


Evangelion Unit-01 Test Type work-in-progress: Metallic purple and green candy finish

Evangelion Unit-01 Test Type work-in-progress: Metallic light green candy finish closeup

Evangelion Unit-01 Test Type work-in-progress: Metallic orange, green, and purple candy finish

 To achieve the candy coat finish or metallic candy gloss effect, first the parts were primed in black using the Mr.Finishing Surfacer 1500 Black primer. Secondly, a highly reflective paint layer in the form of Mr.Super Metallic 2 (Super Chrome Silver 2) was airbrushed onto the black primer coat. Finally the respective Mr.Clear Color GX hues of purple, orange, and green clear color pigments were airbrushed onto the chrome 'plated' EVA-01 parts. End result is the candy coat you see here.


Step 01: Prepped Evangelion Unit-01 parts in their original molded colors

Step 02: Evangelion Unit-01 parts after receiving a black primer coat

Step 03: Evangelion Unit-01 parts after receiving Mr.Color Super Chrome Silver 2 paint

Step 04: Evangelion Unit-01 parts after receiving their respective clear paint colors

 One key ingredient of the candy coating process is the reflective paint layer. For the candy coat to shine, the reflective layer needs to be extremely shiny. In the Mr.Hobby website, it is recommended that painters use Super Fine Silver 2 as the base metallic coat. Because I had not read Mr.Hobby's tutorial recommendation beforehand, I had to figure out what paint to use based on my own limited knowledge. What I decided upon was a different paint in the Mr.Hobby Super Metallic Line 2 namely the Super Chrome Silver 2. Results seem satisfactory although to know which of the two is better I will have to eventually do a test paint using both aforementioned metallic lacquer paints.


Key to the candy coating process is the reflective basecoat layer ...

... which in this case is the Mr.Hobby Mr. Color Super Metallic 2 ...

... or specifically the Super Chrome Silver 2, a shiny lacquer metallic paint.

 Because the EVAs are living organic creatures with cybernetic components grafted onto them, I didn't want the pieces to be too glossy hence the exclusion of a final gloss top coat. If the Evangelion unit was a mechanical robot then perhaps the use of a gloss top coat would be justified. Since they are not, the gloss top coat won't be used in the Evangelion Unit-01's painting process.


EVA Unit-01 work-in-progress: parts chrome 'plated' in preparation for the clear paints

EVA Unit-01 work-in-progress: parts with the metallic candy finish via a clear color layer

 Although there will be no gloss top coat, the pieces you see here are not yet finished. There is still the panel lining and decals to be applied to the painted parts above. Once that is done, the EVA Unit-01's shoulders, arms, hands, legs, and feet can finally be assembled. The neck parts won't be assembled yet as they are part of the main body. They were included in this painting phase because I wanted to paint all the candy metallic orange parts together in one go. I could not do that with the candy metallic purple parts because I don't have enough Model Painting Alligator Clips/Stand Base. In essence, extremities of the EVA unit is nearly complete. Good progress for a week's work.

Short Update: Soon after I completed the candy coat for the EVA-01 unit's shoulders, necks, arms, hands, legs, and feet (as chronicled in the blog paragraphs above), I was so buoyed by the progress that I actually went on to quickly candy-coat (as well as paint) the rest of the parts/sub-assemblies. So below are the before and after photos for the EVA-01 unit's body, lumbar section/spine, head, and entry plug innards (i.e. the surrounding structure into which the plug inserts).   


EVA Unit-01 Test Type work-in-progress: remaining parts/sub-assemblies to be primed/painted

EVA Unit-01 Test Type work-in-progress: remaining parts/sub-assemblies after painting

So the hobby train continues to chug along slowly but surely. Knowing how I always procrastinate on hobby projects, I am surprised by how quickly this one is progressing. As mentioned earlier, once the panel lining and decals are applied, the final assembly process can then begin. Aside from ongoing projects, up to five new projects are about to begin. Crazy right? For a hobbyist whose projects tend to progress at a snail-pace, starting on so many new ones at the same time is kinda insane. This time though, it feels different. For the first time in a long while, I feel really good hobby-wise. It may yet all end in tears, but hope springs eternal. I plan to sustain this newfound enthusiasm by maintaining a healthy variety in the type of kits I work on. More details to follow. Until then, stay safe and be well.   


https://www.facebook.com/FourEyedMonster-313145002078520/


https://shireworks.blogspot.com/https://www.facebook.com/shire.works

Saturday 11 June 2022

Star Wars 1/12 scale Aratech 74-Z Military Speeder Bike (Completed: fully-painted plus water decals)

 Even with engagement of hobby activities at an all time high, it still has taken me the better part of the year to complete my first project. Because of how my projects usually stack up, the completion rate tends to rise towards the end of the year. And that's providing no hobby malaise has set in. Taking the Scout Trooper into account, this Star Wars Speeder Bike project actually began two years ago. As such, it's technically a long overdue project that's finally complete. So here then is the fully painted 1/12 scale Aratech 74-Z Military Speeder Bike, inclusive of water decals.


1/12 scale Aratech 74-Z Military Speeder Bike - Completed: fully painted plus water decals

 Prior to work on the Speeder Bike, I had used only one water decal for the Scout Trooper. And although I did use more for the bike, about 13 decals, I also did not use all the available decals for it. On some key areas of the Speeder Bike, for example the red triangular symbols and the large round red button on the center command console, I had painted the details rather than use water decals. As a rule of thumb, if I can paint the details then I usually do not use the water decal equivalents on the model kit. This was the case for the Speeder Bike you see here as well as the Scout Trooper.


Remaining water decals after limited use on the Scout Trooper

Remaining water decals after limited use on the Speeder Bike

 Weathering on the Speeder Bike was kept to a minimum. Most of it comprised scratches on the steering vanes, hull, and, black metal parts as well as some soot and grime on parts of the hull. Adopting this minimalist approach suits what I intend to eventually do with the Speeder Bike. It gives the bike just enough wear and tear to look realistic but not to look decrepit. That makes the bike, in my opinion at least, suitable to be used in a propaganda shot in my Join-the-Empire vignettes


Closeup view of the Speeder Bike's front end, specifically the Steering Vanes

Tiny decals with red letterings reside on both the outrigger and base of the handlebar

Apart from the red lettering decals, there is an equally tiny decal with white letterings (see side of the Speeder Bike's hull, towards the right end of the picture)

Center control panel comprises mainly painted details and a tiny reddish orange decal

 All the water decals that were used on the Speeder Bike consisted of two type. It was either red or white letterings against a black background. There were other type decals such as the triangular and square red shapes, of which I used the latter on the center command console. For the former i.e. the triangular red shaped decals, I decided to paint the parts instead of using decals. 


Towards the rear of the Speeder Bike there are two tiny decals ...

... one on the left side armor, and the other at the back between the two air brakes.

 Some decals had a shiny look to them, especially the tiny one located at the nose section of the Speeder Bike. I am fairly comfortable leaving things alone. But if I were to do something to mitigate the glossy shine of the decals, then I may used flat/matte topcoat over the said decals.


Decals with red letterings are located on the right side of the bike's Repulsor Block ...

... as well as on the Power Cell (the contraption that looks like an engine turbine).

Identical decals are located on the side of the hull and base of the handlebar

A tiny decal (white letters/black background) can be found on the nose of the Speeder Bike

Closeup view of the Speeder Bike's Steering Vanes, this time from the other side

 Do the decals make the Speeder Bike look better? While the answer to that is subjective, I feel that the water decals do make the bike look that little bit better. Enough to make the effort worthwhile.


Star Wars Speeder Bike: Fully painted including water decals (isometric view, front)

Star Wars Speeder Bike: Fully painted including water decals (isometric view, back)

 Below is a YouTube video showcasing the Bandai Star Wars 1/12 scale Aratech 74-Z Military Speeder Bike in all its glory - fully-painted together with most of the water decals applied.


 So as this blog post nears its end, does this means it will be the last you see of the Speeder Bike? Nope. I'm gonna milk it for all its worth. The bike is going to be showcased in two additional blog posts and videos: one together with the Scout Trooper, and another together with both the Scout Trooper and Girl's Rider figurine once she is completed. The latter is part of my Join-the-Empire vignettes. Meanwhile, two other projects are gathering pace i.e. the Space Battleship Yamato as well as the Evangelion Unit-01 Test Type. More on both projects soon, I promise. Until then stay safe and be well.


http://shireworks.blogspot.com/p/custom-painted.html

FourEyedMonster Miniatures YouTube Channel

https://www.facebook.com/FourEyedMonster-313145002078520/

Related Posts Plugin for WordPress, Blogger...