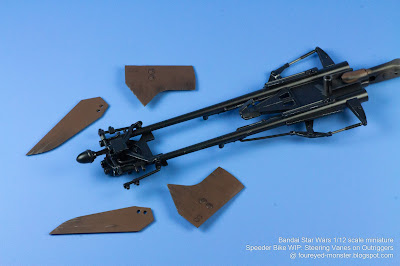
In the final few assembly/painting phases of the Aratech 74-Z Military Speeder Bike, work will progress from the bike's bow/front to its stern/rear, with the upper-facing sections worked on first before the bottom facing ones. Sounds confusing? Well, hopefully things will be clearer as the next few post updates are uploaded to the blog, beginning with the bow or front end of the Star Wars Speeder Bike i.e. the Steering Vanes attached to the Outriggers.
.jpg) |
Star Wars Speeder Bike work-in-progress: Steering Vanes attached to the Outriggers
|
For the assembly process of the Speeder Bike's Steering Vanes onto the Outriggers, I had initially expected the parts and sub-assemblies to all fit together nicely in a snap-fit sort of way. But things never really turn out the way you expect them to, and it turned out that the fittings were too loose and glue was required. Ordinarily this is would be a straightforward process, but I was gluing together parts that were already painted, and glue is damaging to painted parts. Thankfully I was able to apply the glue in places that were relatively hidden from sight. Couple with a light-handed approach, I managed to put everything together without any significant damage (if any) to the paint.
.jpg) |
Speeder Bike Steering Vanes and Outriggers fully painted parts prior to assembly
|
.jpg) |
| Speeder Bike Steering Vanes after being attached to its Outriggers |
.jpg) |
As for the Outriggers themselves, they will eventually be attached to the main body
|
Upon an extremely closeup view of the Steering Vanes of the Speeder Bike, I can't help but feel that I could have overdone the metallic scratches and scuffs a bit. On the bright side it's not too overdone, but perhaps a few less scratches and scuffs may have improved the overall look.
.jpg) |
Closeup view of the attached Steering Vanes; isometric view from bike's left side
|
.jpg) |
Closeup view of the attached Steering Vanes; isometric view from bike's front
|
.jpg) |
| Closeup view of the attached Steering Vanes; isometric view from bike's right side |
Assembling painted parts for the Speeder Bike is turning out to be much difficult than for my previous outing involving the Space Battleship Yamato hangar bay and its docked space fighters. I believe this is partly dues to the fragility of the parts and sub-assemblies of the Speeder Bike that is being put together. Apart from glue potentially damaging the paint, there was also the danger of paint chipping during the assembly process. The latter arose out of the rather rough handling of parts/sub-assemblies when trying to put together fragile parts in hard to reach places.
.jpg) |
Visibility of the metallic scratches and scuff marks on the Steering Vanes become ...
|
.jpg) |
... much more apparent at certain angles of lighting (compare this photo and the one above)
|
When viewed from underneath (see below), it's easy to spot that the Steering Vanes have not been weathered. It was a conscious decision on my part not to weather the underside of the vanes because I felt it's a viewpoint that one rarely notices. However, if I turn out to be wrong then I guess it shouldn't be too hard to apply some mild weathering on the underside of the vanes.
.jpg) |
Steering Vanes and Multi Scanner Array (located at the tip of the Outriggers) viewed from underneath
|
Progress on the Speeder Bike should gain enough momentum to see it completed in the coming weeks. The bike forms part of my second Join The Empire vignette project. The other parts are the already finished Scout Trooper and the yet to be completed Girl's Rider figurine. The latter has hit a temporary snag in that I have yet to repair and paint the leather accessories. Moreover there is the ever present mental block I have to overcome whenever I paint figurines. It involves me slowly building up the courage to paint her eyes. Mess up the eyes, and all the work I've done on the figurine up to now will have been wasted. No pressure then. So as I chip away at my fear of painting miniature eyes, the interim will see me finally complete the Speeder Bike. Until then, stay safe, and be well.
.jpg)
.jpg)
.jpg)
.jpg)
.jpg)
.jpg)
.jpg)
.jpg)
.jpg)
.jpg)


.jpg)
Lovely progress! Can't wait to see more works!
ReplyDeleteThank you for following my progress on this project Michal.
DeleteImpressive brushwork, Kuan. Love the weathering on the fins.
ReplyDeleteThank you very much Dean. Appreciate the feedback :)
DeleteI keep on learning from your work. You are of course way ahead, but you make it all really educational, I love it.
ReplyDeleteYou are way to modest Suber, in a good way of course. You are the master of so many hobby techniques that I don't even dare to try :) As always thank you for your kind words Suber :)
Delete