Friday, 25 June 2021

Booth Bunny Companion Girls [WIP - Primed in light grey and Re-based with cork material]

 Many a painting project has been undermined by sloppy prep work on my part, and so lest I fail again at the first hurdle I thought I had better make a better go of it with the 1/24 scale Booth Bunny Companion Girls. This I approached using a two-pronged strategy. First was to re-base both girls by using a slightly larger pinning rod onto cork material instead of adhesive tack base. Second was to continue with the prep work after an initial light layer of primer coating before subsequently adding the final primer coat. To understand the rationale behind this two-pronged strategy, please read on.


1/24 scale Booth Bunny Companion Girls primed and re-based (front view)

1/24 scale Booth Bunny Companion Girls primed and re-based (back view)

 After assembly, there were a few issues that needed to be resolved before the foundations of an effective painting session could be established. Chief among those was to solve the inherent instability in both figurines's existing set-up. Not only were the figurines loosely rotating around the pinning rods, they were also tilting frequently because the rods themselves often sagged due to the blue tack's inability to hold them securely. This resulted in both figurines moving uncontrollably and unexpectedly when being handled, a situation that had to be rectified before painting began.   


Both figurines were re-based, first by attaching a slightly larger pinning rod into them ...

... which was then inserted into a base made out of cork material (top down view) ...

... all in all providing a more secure anchoring of the figurines for painting purposes

 To ensure both figurines did not move unnecessarily during painting I first replaced the existing pinning rods with slightly larger ones. While more force was needed to push the 0.09 mm diameter pinning rods into the 0.08 mm holes I had drilled into the figurines, it could be done and resulted in a preferably tighter fit. This together with the insertion of said pinning rods into a firmer base material (namely cork vs adhesive tack) successfully eliminated the instability that was a concern to me.   


Booth Bunny Companion Girls posed facing slightly inwards towards each other (front view)

Booth Bunny Companion Girls posed facing slightly inwards towards each other (back view)

 It took me quite awhile to wrap my head around the idea that more than one layer of primer coat may be required, with further prep work in between the coats. But I am getting better at this with each project. In the case of the Booth Bunny Companion Girls, I initially applied a thin coat of primer to highlight possible areas that needed additional prep work. And lo behold, there was indeed further work to be done. For example, parts of the skin required sanding down with fine grade sandpaper to remove unsightly blemishes I had missed the first time round. Tamiya Fine Surface Primer is especially suited for this use. Subsequently I applied the final layer of primer,  although technically you could still apply yet another light coat and do even more prep work before the final coat.  


Booth Bunny Companion Girls posed facing slightly outwards from each other (front view)

Booth Bunny Companion Girls posed facing slightly outwards from each other (back view)

 And maybe I should have done additional prep work over light coats of primer because even after all the care I took, there seemed to be a slight blemish that I missed (see below). But here is the weird thing. Try as I might, I cannot visibly locate the unsightly mark that seems so clear in the photograph taken using a macro lens. And at certain angles, the blemish cannot be seen even in the photos. What I suspect is that the molded shape of the figurine's face has too hard an edge that is highlighted under certain lighting conditions. How this will play out when I eventually start airbrushing paint on the figurines, well, your guess is as good as mine. What could go wrong? Right? Right?


A potential blemish on one of the figurine's face remains elusive to detection via the naked eye 

 As you may well have inferred from my insanely slow progress on my painting projects, nowadays the heart is not entirely in it when it comes to scale modeling and miniature painting. I suppose it must be the pandemic depression bleeding into my creative subconscious. The missus and I had registered for vaccinations way back in February but everyday it seems a new special interest group gets to cut queue. It's disheartening to say the least. Anyway this brings to mind a Valhallan proverb from the fictional memoirs of Commissar Ciaphas Cain ... 'Things can always get worse'. On that miserable note, I bid you au revoir and hope that you and your loved ones continue to stay safe.  


https://shireworks.blogspot.com/https://www.facebook.com/shire.works

Sunday, 13 June 2021

Booth Bunny Companion Girl B [WIP - Assembly]

 And then there were two ... Booth Bunny Companion Girls that is (click here to see the other girl). With the Hasegawa 1/24 scale Booth Bunny Companion Girl B fully assembled, the pair of car show models can now move on to the next stage namely the priming process and subsequent first layers of paint. For now, lets take a quick look at the fully assembled Girl B.  


Booth Bunny Companion Girl B, freshly assembled and posing next to a bottle of glue

 Not for the first time, the DSLR camera has helped me spot a flaw in my prep work, a flaw in which the naked eye could not detect (see third photo in the series immediately below). Look closely at her face and you might notice a hideous 'scar' or mould line running from the corner of her left eye across the cheek to the left corner of her mouth. So now I've to figure out an effective and clean way to remove this 'scar' before applying the primer coat. Speaking of which I had better give Girl A a once-over again to make sure I didn't overlook any similar flaws after her prep work.   


Hasegawa 1/24 scale Booth Bunny Companion Girl B work-in-progress: fully assembled

Booth Bunny Companion Girl B has a more interesting pose compared to Girl A

Flaw discovered via photographic observation: not the 'scar' i.e. mould line on her left cheek

A closeup view of Booth Bunny Companion Girl B, from the front

 Assembly of Booth Bunny Companion Girl B was comparatively easier than for Girl A, primarily because the former model's arms were already moulded in place thus only her hands required gluing to the body. However, similar issues affected Girl B's legs as with Girl A, and some calculated risks had to be taken to get the positioning of her legs as accurate as possible. I used the curvature of the left buttock as a positioning guide to first attach the left leg. Then the glued on left leg was used as a positioning guide for the gluing of the lower half of her right leg.


Assembly instructions for the 1/24 scale Booth Bunny Companion Girl B

Pieces of Booth Bunny Companion Girl B prior to her assembly process

Front view of Booth Bunny Companion Girl B; lying flat on her back

Back view of Booth Bunny Companion Girl B; lying prone, face downwards

 Similar to what was done to her companion, the Booth Bunny Girl B figurine had a 0.8 mm hole drilled into her foot, before a similarly sized copper rod was inserted into said hole. This functions to anchor the figurine securely onto the base as well as prevent any painting surfaces from being obscured during the airbrushing/hand-painting process. Previously I had incorrectly stated that a brass rod was used. Upon closer inspection, I believe that it is a rod made primarily from copper. 


Booth Bunny Companion Girl B [front view]; fully assembled and anchored to the base

A copper rod (not brass) secures the figurine to the base without obscuring any painting surface

Booth Bunny Companion Girl B; fully assembled [side view, from her right]

Her posture looks more interesting in that the 's-curves' are more prominent

Booth Bunny Companion Girl B [back view]; fully assembled and anchored to the base

The plan is to prime her and her companion in light grey, and work from there

Booth Bunny Companion Girl B; fully assembled [side view, from left]

Positioning and gluing of the arms and feet to her body was easier this time around

As with her fellow model, the details on Booth Bunny Companion Girl B are well moulded

 In terms figurine detail, Girl B is equally as good as her companion, in fact more so in a way. One example of this is the way you can see her shoulder blades hunched in towards her spine, in a naturally occurring way due to her posture. Of course to be fair to Girl A, this only comes about because Girl B has more skin exposed or is more scantily clad if you will.


With the arms moulded in place and only her hands needing to be glued on, the assembly process was far easier

Shoulder blades hunched inwards is an example of the realistic moulded details

Only complaint is that details on her hair are a bit sparse, especially near the crown

 Next on the hobby agenda would be either a continuation of the Booth Bunny Companion Girls project or a resumption of previously on-hold projects such as the Speeder Bike, etc. Incidentally, anything Star Wars related should get an inspirational boost now that I've subscribed to the Disney+ hotstar streaming service. Just watching The Mandalorian alone has gotten me all excited about Speeder Bikes again. It's nice to have that small silver lining in the undulating mass of dark clouds I find myself in. Inspiration begets work actually being done on my projects. This is the way.  


https://www.facebook.com/FourEyedMonster-313145002078520/

Saturday, 29 May 2021

Pandemic Meltdown 2.0

 As the rest of the world heads to some form of normality, my country sadly, is heading in the opposite direction at full steam. With ICU occupancy beyond 100%, cases per capita higher than India, special storage containers being used for the dead, front-liners overworked and way past their breaking point, as well as covidiots running rampant, the worst I fear is yet to come. Much worse.


 Well, long before this the science was already there for all to see, at least for those without their head in the sand. And I could go through a long list of why this is happening but to do so would be pointless as it's the same human stupidity repeated ad nauseam. But enough of this pithy, rambling 'woe is me' monologue. If you are in the same boat as me, wherever you may be, I hope you and your loved ones stay safe and well. Always think of others (and not just yourself). Assume you are an unknowing, asymptomatic carrier, and mask up (or even double-mask up) before you go out. In that way, you stay safe and at the same time also keep others safe. Think safe, be safe, and stay safe!


https://shireworks.blogspot.com/https://www.facebook.com/shire.works

Saturday, 22 May 2021

Booth Bunny Companion Girl A [WIP - Assembly]

 Okay, so I know I mentioned that this was going to be a 'simple and uncomplicated' project. Well the assembly of Booth Bunny Companion Girl A was all that, and at the same time not that at all. You might think I'm springing a Schrodinger's Cat situation on you, but I'm really not. It's more a case of the words 'simple' and 'uncomplicated' being mutually exclusive. In other words, the assembly of Booth Bunny Companion Girl A turned out to be uncomplicated but difficult. Let me explain. 


Hasegawa 1/24 scale Booth Bunny Companion Girl A work-in-progress: fully assembled

Booth Bunny Companion Girl A closeup; a slightly angled view from her left

Booth Bunny Companion Girl A closeup; a slightly angled view from her right

 Upon a cursory glance of the instructions laid out for the assembly of Booth Bunny Girl A, the steps looked straightforward and uncomplicated. However, the actual assembly process turned out to be difficult because none of the parts fitted together as say wood joints do. Essentially the separate parts 'fitted together', and I use those words loosely, by contact alone. What this means is that the parts had to be held together in place precariously by hand as glue is simultaneously being applied. Getting parts into their correct positions require feel, visual checks, and pure dumb luck.  


Assembly instructions for the Hasegawa 1/24 scale Booth Bunny Companion Girl A

Pieces of the Booth Bunny Companion Girl A prior to the assembly process

 For example, attaching parts A12 and A13to the main body or A7 (see above) turned out to be a complete nightmare. No guiding grooves existed to ensure the said parts fitted together accurately. Moreover, trying to hold such tiny pieces together while gluing it, and also making sure they were correctly positioned, all at the same time, was nigh impossible. Meanwhile placing parts A9, A10, and A11 onto A7 was slightly easier, helped primarily by the existence of visual cues such as surface details. Lastly, attachment of part A8 to the main body was helped by having part A11 already glued on. Having one leg already attached allowed it to act as a positioning guide of sorts. 


Mr.Hobby's Mr.Cement S was essentially to the assembly process being successful

 Assembly of this figurine would not have been possible without the use of thin plastic glue in the form of the Mr.Hobby Mr.Cement S. There were two reasons for this: one, a thin, watery consistency allowed the glue to seep into the joints during application. This helps greatly when one is trying to hold two tiny parts steady in the correct position while applying glue at the same time. Two, plastic glue is essential in that it serves to melt the plastic pieces together, thus covering over obvious and unsightly gaps when two parts come in contact. These gaps were consistently present prior to gluing. 


To enable the secure positioning of the figurine onto a base for painting ...

... a 0.8 mm hole was drilled into the figurine's foot ...

... and a 0.8 mm brass rod was then inserted to act as anchor of sorts

 An added step was carried out to enable me to paint this figurine without being obstructed as well as to prevent damaging paint already layered on.This step involved anchoring the figurine securely to the base using a brass rod. To this end, I drilled a 0.8 mm hole into the base of the figurine's right high heel, deep enough to insert roughly 2 cm of a brass rod of equal diameter. The rest of the brass rod was secured onto a lump of adhesive tack on a hand-sized container. Although using cork material instead of adhesive tack would've been better, I didn't have the former so I made do with the latter.  


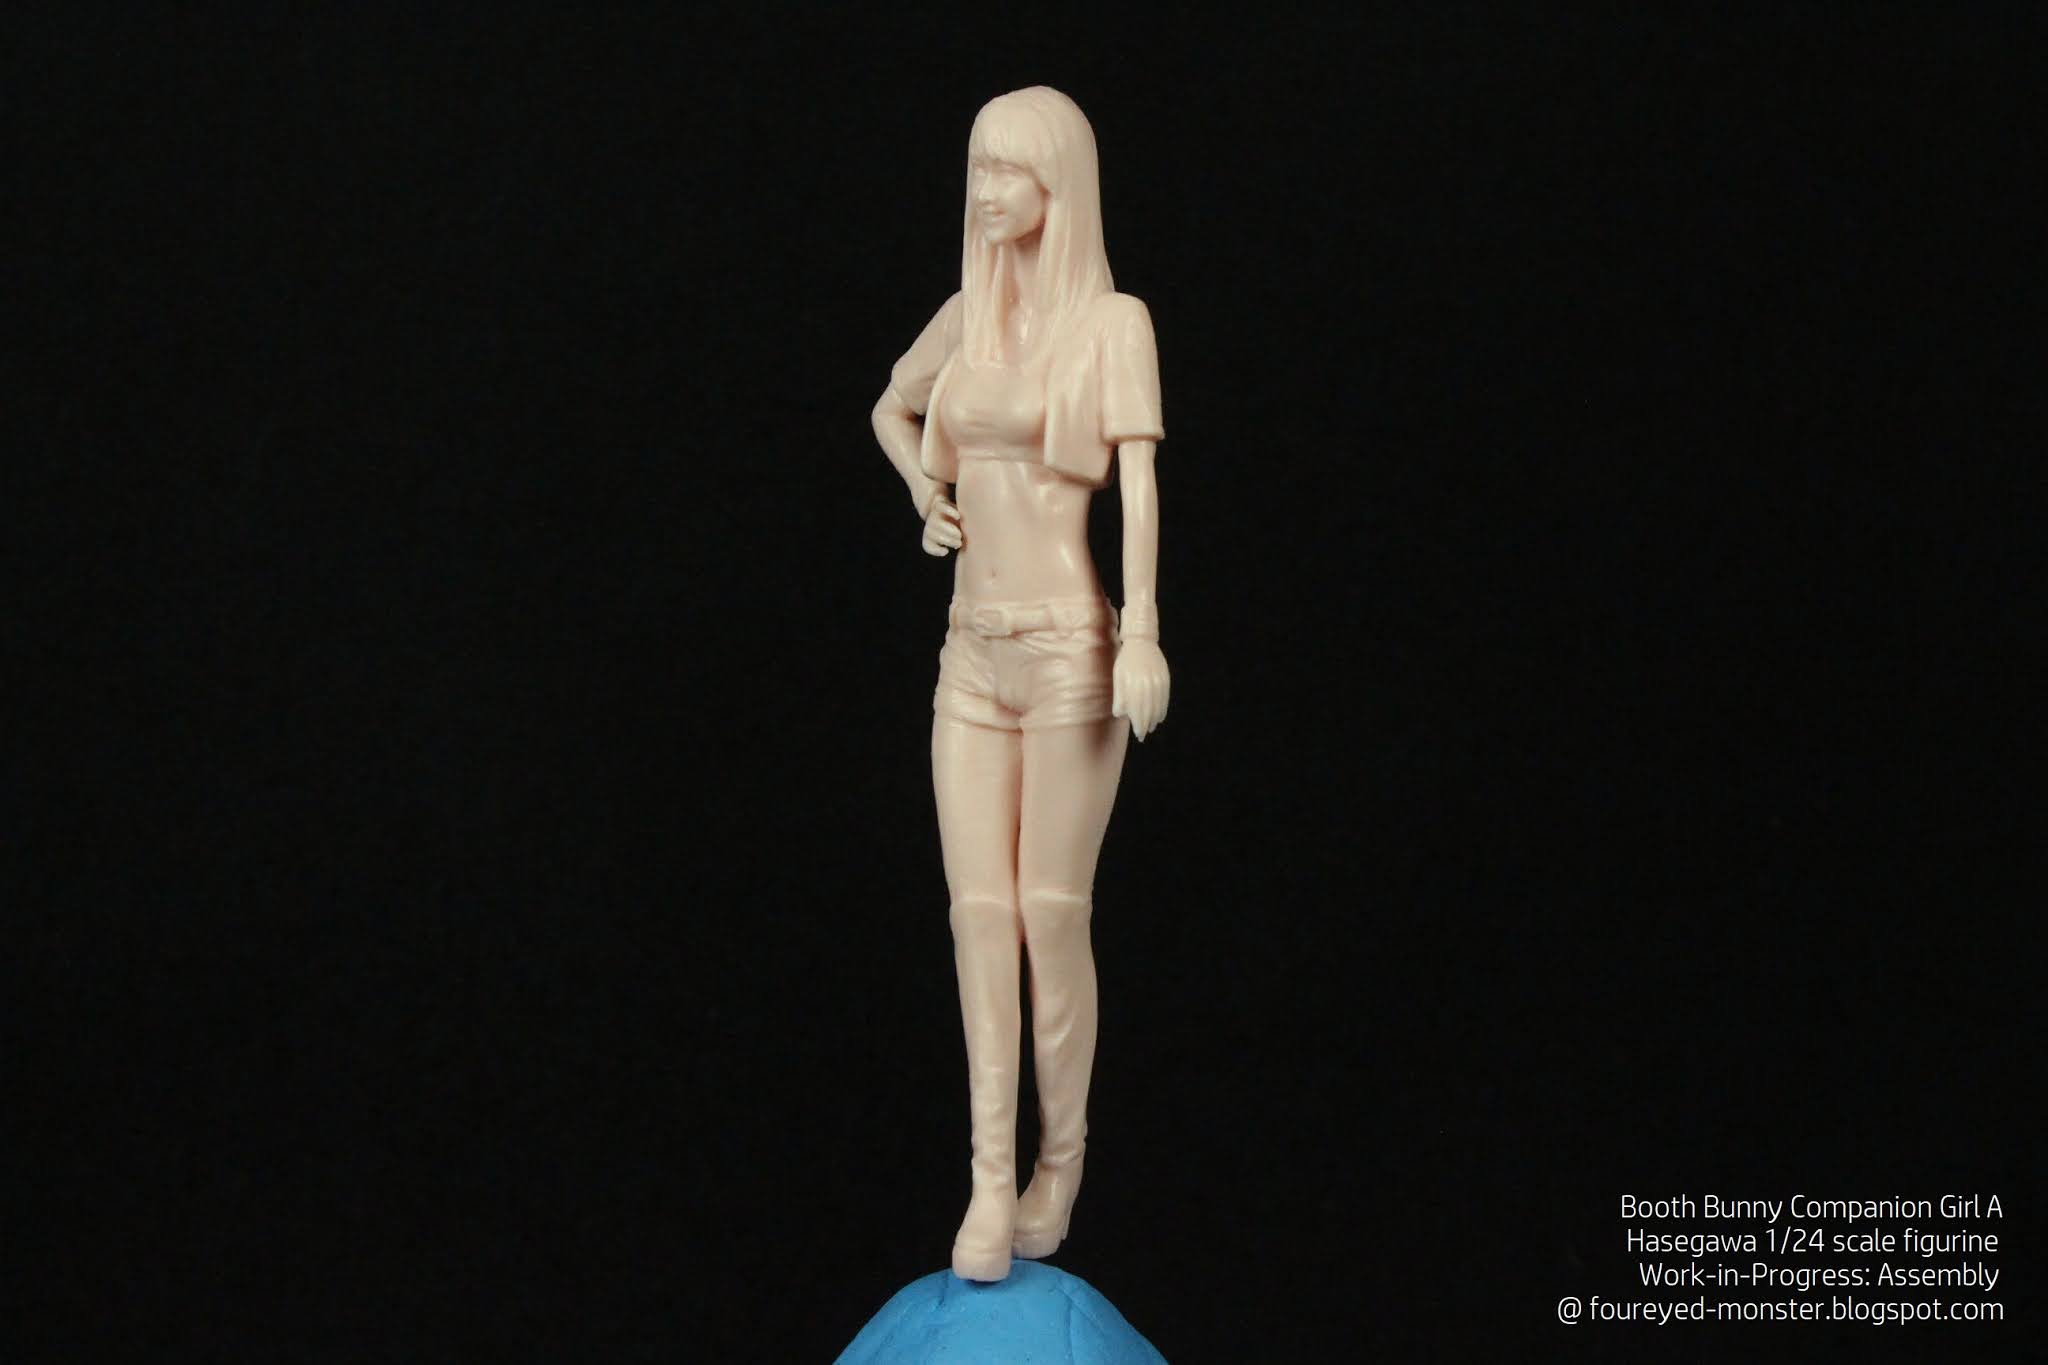
Booth Bunny Companion Girl A; fully assembled [front view]

Brass rod secures the figurine to the base without obscuring any painting surface

Booth Bunny Companion Girl A; fully assembled [side view, right]

Her posture looks a bit stiff, not unlike some models you see in real life car shows

Booth Bunny Companion Girl A; fully assembled [back view]

Positioning of arms and feet turned out well although it was touch and go at times

Booth Bunny Companion Girl A; fully assembled [side view, left]

Figurine has good details and at this scale should present a fair challenge to paint 

 So that's one half of the Bunny Girl duo that has been assembled. With both the help of the missus and a great deal of luck, this particular assembly went as well as I could've hoped in my wildest dreams. In some instances, I held two tiny parts together in my best assumption of the correct positioning while the missus help me apply the initial smattering of thin plastic glue to the joint. While the glue was drying, and with the separate parts still pliable (but attached flimsily together), I then further manipulated the positioning as well as added more glue where needed.


Details on her hair look a bit faded in places, but this can be rectified through paint

Booth Bunny Companion Girl A closeup; back view

Another way to add detail back into the hair could be to carve or sculpt it in

 Before I end this post, I would like to apologize to you, dear readers, especially those you who have been taking the time to comment on my blog. You may have noticed by now that your comments aren't being published instantly as they used to be. Instead comments are now moderated before being uploaded. Again, my apologies for this inconvenience. I had to take this drastic measure because the comment section was becoming inundated with fake messages that caused Google to temporarily  block my site. So as a precaution to prevent it from happening again, I'm moderating the comment section. On that same depressing note, I end with news that the pandemic situation in my country is the worse it has ever been. Only thing left to say is stay safe everyone!   


https://www.facebook.com/FourEyedMonster-313145002078520/

Related Posts Plugin for WordPress, Blogger...