Sunday, 2 February 2020

Bandai Action Base 1 Black: Unboxing & Quick Review

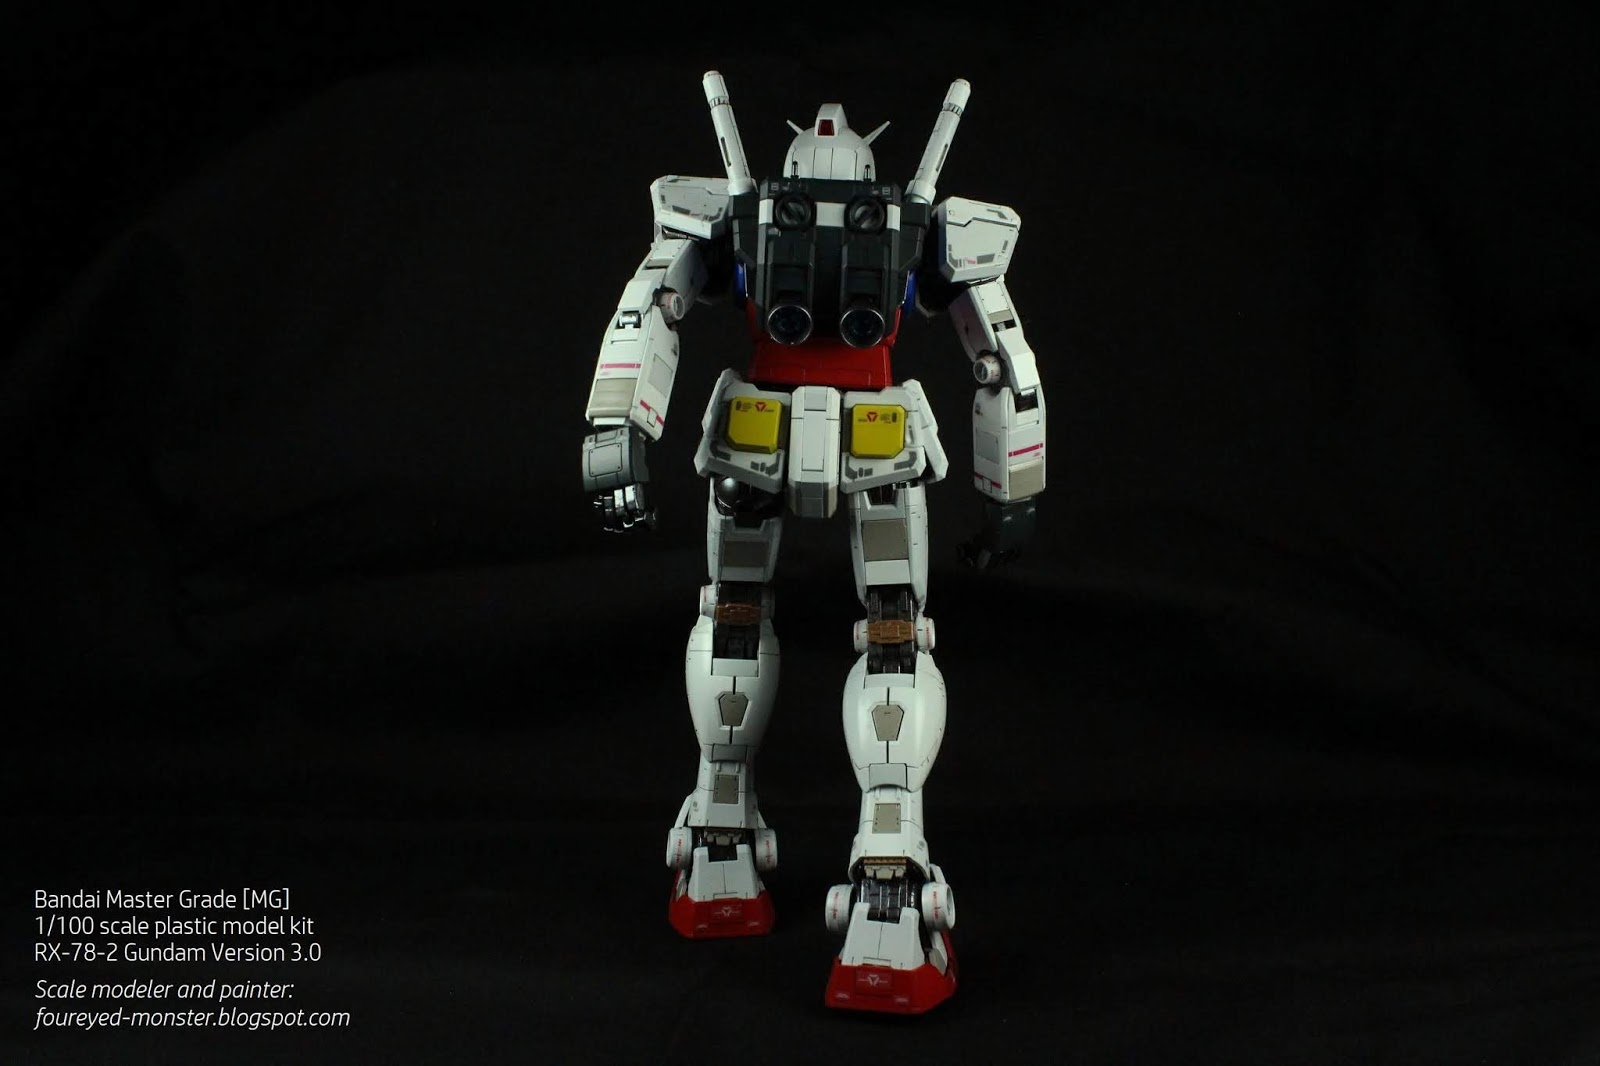
Prior to uploading my final shots of the Master Grade RX-78-2 Gundam Version 3.0 in various poses with its shield and weapons in tow, I first had to assembly and paint a suitable base for the mecha. Cue the Bandai Action Base 1 Black, a stabilizing platform from which Grandpa Gundam will strike all his action poses and hopefully not tip over and fall apart in the process.      


Cost-wise the Bandai Action Base is reasonably priced at the mid-twenties (in Ringgit terms) or lower during a sale. While it could be assembled and used as is, there are enough details molded into the plastic parts to satisfy the painter in your average scale modeler. In short, if you wanted to you could paint up a decent and fairly detailed looking mechanical-tech-like base.     


Unsurprisingly, Bandai made the base itself a kit that must be assembled by the hobbyist. Instructions (see top, right) are in Japanese only but are intuitive enough that a translation isn't needed. But if like me you need to know absolutely everything before starting off the assembly process, then a quick use of the Google Translate App or an online search for an English language equivalent (hint: Google "Mech9 Action Base" should give you the appropriately translated set of instructions.   

Sprue BA3-A: Main platform of the base, which comes in a hexagonal shape
Sprue BA3-B1: Primary display stand plus a selection of connectors for attachment to a model kit
Sprue BA3-B2: Primary display stand, base extension and middle piece, plus a name plaque
Sprue BA3-C: Secondary display stand as well as joints/connectors of both display stands
Metals screws and a square piece of double-sided tape

Assembly was supremely straightforward and easy; completed with minimum fuss. There were almost no mold lines to deal with and the parts snap-fitted together securely without the need for any glue. I did, however, come across an irritating anomaly but more on that later on in this post.

From left to right: Secondary display stand, hexagonal and square bases combined, and the primary display stand
Bandai Action Base 1 Black (fully assembled sans connector pieces)

What's unique about this Action Base is that it provides the scale modeler with many posing options via a pivot point as well as height and positional adjustments (see photo montage below). If you refer to the white arrows on the image below, from left to right they indicate the adjustments that can be made to the display stand's height, a roughly 180 degree pivot point, and finally the holes on the base allow for different positioning of the display stand. 

White arrows shows sections of the base that can be adjusted to vary the poses of your model kit 

As I mentioned in passing earlier, all wasn't rosy with the assembly of the Action Base. There was a rather wide gap on the display stand (see below) that shouldn't be there in the first place. Now despite being a reasonably seasoned miniature painter and scale modeler, I can't entirely rule out a mistake on my part. That said I still have a sinking feeling the kit could be at fault because I had bought this one at a sale. It seemed to have been repackaged after being opened up (the packaging you see above was actually from a similar but newer kit). This could mean an itchy-handed shopper had somehow warped the plastic or a knockoff sprue could've been mixed in with the originals. Admittedly the latter is unlikely and I don't completely discount user error i.e. not assembling the kit properly.  

Only gripe I had with the Bandai Action Base was my inability to close the gap shown above

To secure the Gundam to the Action Base, a multitude of connectors were provided in the sprues itself. Some of the connectors are meant for smaller scaled model kits while others are specific towards certain Gundam designs. But because the Master Grade RX-78-2 Gundam Version 3.0 has a specialized connector of its own, I may not need any of the connectors supplied in the sprues. Whether it is sufficient enough for my purposes will be made know when I try to display Grandpa Gundam in more challenging poses i.e. ones involving him wielding his shield and weapons. 

To cope with the different scales of Bandai model kits, a multitude of connector options are available on the sprue ...
... however I will be using the one provided by the Master Grade RX-78-2 Gundam Version 3.0 kit ...
... which is supposed to securely connect to the underside of the RX-78-2 Gundam's waist area

On a side note, I found an interesting part - at least I found it to be so - on one of the sprues, in the form of a small plague (see below). For modelers who wish to paint and weather the base, the plaque could be used to display the model name or even become part of a mini diorama. 

Piece of plastic plaque whose use is to incorporate names of the model kit on display

Going forward, I do not intend to paint and weather the base. That being the case, I went ahead to spray the Action Base with a flat clear coat in order to get rid of the existing plasticky gloss sheen. This will actually help me when I take photos of Grandpa Gundam against a black background. One of the reasons I do not plan to paint/weather the base is because I only want to use it to securely hold the mecha in place while it's being posed for photos. In fact I want the base to blend into the black background thus making the mecha look like it's being suspended in space. For this to work, I'll need the base's surface to reflect as little light as possible, which is why I coated it with a clear flat coat.

Bandai Action Base 1 Black: Before Flat Clear Coat (left) and After Flat Clear Coat (right)

So I guess in terms of prep work, there is nothing more I need to do for the Action Base. It's ready to be used with Grandpa Gundam in the next series of photos i.e. poses with the shield and weapons. For that I'll have to think up some cool poses for the RX-78-2 Gundam. Until I've figured that out it's entirely possible that my next few posts won't be Gundam related. Heck at this moment I don't even know myself what I'm going to write about. What a great way to kick-start the hobby year, eh?

https://www.facebook.com/FourEyedMonster-313145002078520/

Saturday, 25 January 2020

Happy Lunar New Year 2020

It's the new year! Well, it is anyway for the Chinese all over the world. So here's wishing everyone a prosperous and healthy Lunar New Year. May all your hobby projects see completion this year.


Technically I'm still not celebrating the new year on the account of my dad's passing over a year-and-a-half ago. However to those who are, please stay safe on your journey back to your hometowns. And so I leave you with a quote from the creator of the world's most famous mouse (this is the Year of the Rat after all). When you're curious you find lots of interesting things to do - Walt Disney.

Sunday, 19 January 2020

A belated look back at 2019

Ironically, as I am hit by the umpteenth mid-life crisis brought about by my birthday, I sought to look back belatedly at what I had actually achieved back in 2019. It wasn't much. In fact it was a pretty meager return for what seemed like a lot of effort put in. Mitigating circumstances abound, well two anyway, saw one project coming extremely close to completion towards the tail-end of last year while another project had actually been finished but I had forgotten to post the final photos. Duh and duh.

Bandai 1/12 scale Star Wars The Force Awakens' First Order Stormtrooper
MENG Model 1/35 scale German Heavy Tank Sd.Kfz.182 King Tiger (Henschel Turret)

I'm almost embarrassed to post the following in my look back at last year's projects but things being as lean as they are I was pretty desperate. There were two "semi-finished" mini-projects in the form of the 1/100 scale FF-X7 Core Fighter and pilot figurine Amuro Ray, both of which are part of a larger project namely the Bandai Master Grade RX-78-2 Gundam Version 3.0 scale model kit. On the plus side, Grandpa Gundam will be a bonus project I can add to the 2020 list. So, yay ... right?

Bandai 1/100 scale FF-X7 Core Fighter (forms part of the RX-78-2 Gundam kit)
Bandai 1/100 scale Amuro Ray standing figure in a pilot suit (part of the RX-78-2 Gundam kit)

Moreover in the dotage of my middle age years, I had a face palm moment upon realizing I had forgotten to post the final photos of the atelier iT 1/12 scale Race Queen resin figurine project that I had already completed. (The photo you see below is one of her in the final work-in-progress stage.) At least she will be another project that I get to add to my 2020 list of completed projects. Silver lining, clouds, and all that positive unicorn over the rainbow stuff. Hey, when life give you lemons ...

atelier iT 1/12 scale Race Queen resin figurine work-in-progress

Looking back, one key advancement I pride myself in having achieved last year was improving my airbrushing skills. I'm feeling increasingly more comfortable with an airbrush. Hopefully that will eventually result in works of better quality. Now that's something I can look forward to this year. 

https://shireworks.blogspot.com/https://www.facebook.com/shire.works

Sunday, 12 January 2020

MG RX-78-2 Gundam Ver.3.0 [Part 1 of 2: Completed]

Relief more than elation, although the latter feeling is definitely present, greets me at the journey's end for the Bandai Master Grade RX-78-2 Gundam Version 3.0 scale model kit project. Relief that I could pull off the task of airbrushing and putting together a kit with so many small parts; something I sincerely doubted I could do before this project began. Here then are photos of Grandpa Gundam sans his weapons (that comes in Part 2). Apart from the standalone shots of just the RX-78-2 Gundam, there were also some taken with Amuro Ray (the pilot) and the FF-X7 Core Fighter.  

Bandai Master Grade RX-78-2 Gundam Version 3.0 [Completed, sans weapons]

With hindsight, I cannot believe I had actually contemplated just clear coating the plastic model kit without doing any painting at all. I'm sure doing so would have resulted in pretty decent results depending on the quality of the clear coat used. However, trust me on this, there is just no way a clear coated plastic kit can look just as good or better than a painted plastic kit. Now this might seem to be a no-brainer but the temptation to be lazy and go the former route is so strong that you'll start giving excuses to try and convince yourself to not paint the kit. I certainly did. But I'm glad I resisted the urge to take the easy route and went ahead to paint each and every part of this kit.

Main sub-assemblies of the RX-78-2 Gundam prior to final assembly

Below is a series of photos showing a 360 view of the fully painted RX-78-2 Gundam.

If you were to nitpick, you could say the RX-78-2 Gundam was bottom heavy ...
... but despite that it still looks pretty awesome on the whole, in my opinion
Joints on the RX-78-2 Gundam are extremely flexible thus allowing for various poses
Bandai Master Grade RX-78-2 Gundam Version 3.0 (back view)
Exposed metallic innards of the RX-78-2 Gundam (e.g. back of knees) give it a cool look
Bandai Master Grade RX-78-2 Gundam Version 3.0 (side view, from the left)
Pose adopted by the RX-78-2 Gundam is one of the mecha taking a step forward

Most important in any scale model display is to give it proper context in terms of an appropriate reference object for scale comparison purposes. In this case, the objects came in the form of the 1/100 scale pilot Amuro Ray and the similarly scaled Core Fighter. When displayed next to Grandpa Gundam, both showed how big the mecha is when compared to a human and a fighter plane.

Grandpa Gundam holds Amuro Ray in the palm of his right hand
What's that on the ground? Why it's the FF-X7 Core Fighter
Flexibility of its leg joints allows the RX-78-2 Gundam to get down on one knee ... 
and reach out its left hand for the FF-X7 Core Fighter on the ground
Like Amuro Ray before this, the Core Fighter represents a readily identifiable object for scale comparison purposes
When folded up, the FF-X7 Core Fighter actually fits into the hollow torso of the RX-78-2 Gundam
  
Long forgotten perhaps is the LED gimmick (see below) that lights up Grandpa Gundam's eyes and his headpiece. Unfortunately, the LED lights were too dim for my taste and were near unnoticeable when the whole mecha was placed under strong photography lighting (aka plain IKEA lamps). Access to the LED switch was via the back of the mecha. And this switch was only accessible when the Ransel (Backpack) was removed from the kit. All in all, the LED gimmick held no wow factor for me because the lights were too dim to be seen unless you were looking for it in the first place.   

Total blackout except for the LED lights shining through the eye and headpiece of Grandpa Gundam
With the camera lighting back on, the LED lights are still visible but less so
LED lights from the headpiece is more noticeable when Grandpa Gundam's head is tilted slightly forward
To access the LED light switch, the Ransel (Backpack) had to be removed first
Zoomed out view of Grandpa Gundam with its back exposed and the Ransel on the ground
RX-78-2 Gundam aka Grandpa Gundam cuts an imposing figure even without its weapons

Bear with me though as I'm not yet done with Grandpa Gundam. He still has pose with his weapons and shield à la the scene in Ready Player One, which made me want to start the project in the first place. Although the weapons and shield have been painted, decaled and assembled, it will be difficult to pose them with the RX-78-2 Gundam without some stabilizing anchor. This said anchor comes in the form of a specialized display base. I plan to assemble this base and cover it with a high quality flat clear coat before using it for poses. (And yes, I know that sounds contradictory seeing that I said clear coating can never beat painting. But there is a reason I'm doing in this way and all will be explained in the next post.) So that's next for this project. A final lull before the last storm. 

https://www.facebook.com/FourEyedMonster-313145002078520/

Sunday, 5 January 2020

MG RX-78-2 Gundam Ver.3.0 [WIP: Shield]

A shield is perhaps a fitting subject for my first blog post of the year seeing that I plan to safeguard the exhaustive effort put into this hobby, preventing time wastage. In the spirit of the KISS principle, what all this entails is that I stop working on too many projects concurrently, lest I end up finishing none. It also requires me to stop buying too many new scale model kits before I even complete the ones I have. That, I guess, is my 2020 hobby resolution. But I digress. Below then is the last sub-assembly post for the Bandai Master Grade RX-78-2 Gundam Version 3.0 plastic model kit.

Master Grade RX-78-2 Gundam Version 3.0 Work-in-Progress: Shield

Parts count for the shield was relatively low with good separation, at least that how I see it for modelers who want to paint each and every part. Color scheme comprised white, red, yellow and silver. The metallic parts were intended to be dark grey but I sprayed on a metallic color instead.

Fully painted parts of the Shield: before assembly and before decal application

Putting it all together was as easy a task as it was to paint the separate parts. Everything fit extremely well and the actual task of assembly was an effortless one. No glue was needed. That's how good the fit was. Most importantly, it all looked good to me once it was fully assembled.

Only the red colored section of the Shield required the application of sticker decals
Good parts separation meant the yellow cross and metal sections could be painted first before assembly
At this point all parts of the Shield had been assembled sans the metal sections ...
... which were to be attached to the white colored, back of the Shield
RX-78-2 Gundam Shield, fully painted [back view]
RX-78-2 Gundam Shield, fully painted [front view]

In comparison to the other weapon accessories of the RX-78-2 Gundam, the shield lies in between the Hyper Bazooka and Beam Rifle in terms of size (see below).

Clockwise from the top: the RX-78-2 Gundam Hyper Bazooka, Shield and Beam Rifle

With the shield completed the RX-78-2 Gundam is ready for its final photo shoot. Well, there is a special stand-alone base to be clear coated and used to help in posing the mecha. But I will be posting a full set of photos with just the RX-78-2 Gundam with minimal posing and sans weapons so there will be no more delays to the mecha's final reveal. That being said, I plan to split the final reveal into two parts ... the first as mentioned, and the second of the mecha with weapons and more complicated poses courtesy of the said stand-alone base. So I leave you, my dear readers, with a quote from Ruth Bader Ginsburg ... "So often in life, things that you regard as an impediment turn out to be great, good fortune." And with that I wish you a belated Happy New Year!

https://shireworks.blogspot.com/https://www.facebook.com/shire.works

Related Posts Plugin for WordPress, Blogger...