Tuesday, 10 May 2016

Star Wars TIE Fighter [WIP - External parts of command pod and wing attachment pylon]

This being The Empire Strikes Back version of the TIE Fighter, the colour grey or more specifically blue grey dominated the Star Wars vehicle's overall colour scheme. At least for this particular TIE Fighter build. The next one will take on the more famous light grey colour scheme as seen in A New Hope. But that's a story for another day. For now, below are the results of some painting and decaling.

TIE Fighter; external hull of command pod and wing attachment pylon [front view]
TIE Fighter; external hull of command pod and wing attachment pylon [back view]

Other than the main command pod and wing attachment pylon, miscellaneous items of the TIE Fighter's central hull (excluding wings) comprised its power/fuel/laser system, various small hull plates, fuel tank cap, upper hatch and front viewport. Work on these items involved mainly painting in various shades of greys as well as in metallic colours. All this painting was complemented with panel lining using enamel wash and some delicate decal application of the fighter's markings. 

TIE Fighter power, fuel and laser system
Other small hull plating components (left) of the TIE Fighter

In an ultimate face palm moment, I painted the TIE Fighter's power/fuel/laser system (see third picture from top) without realising the whole section will eventually be covered up by the fuel tank cap (sixth picture from top, far left). Ouch! But then again, I have a feeling I would've painted that section anyway even if I had known of the fuel tank cap. Painting unseen details seem to be a hard habit to break. Thankfully though, the cap can be opened easily to expose the painted innards.   

Laser cannons (left) and upper-back hull plating (right)
TIE Fighter parts (from left to right) - fuel tank cap, upper hatch and front viewport

A good approximation of the blue grey colour scheme can be replicated using the Tamiya TS-32 Haze Grey colour spray paint. The paint technique used was the same as that of the Millennium Falcon i.e. a primer followed by the basecoat colour and then a gloss clear coat. This preps up the hull for a wash using the enamel-based Tamiya Panel Line Accent Color. Having a higher surface tension, the glossy surface makes it easier for the black enamel paint/wash to flow into the hull plating grooves. 

Phase 1: Primer, Haze Grey spray paint, and gloss clear coat; in that order
TIE Fighter hull plating prepped for panel lining

Choice of panel liner was a toss-up between pure black and a 2:1 black/grey mixture. In the end, I chose the former mainly because I felt that the TIE Fighter's dark blue grey colour scheme would be better served with panel linings that were as dark as I could make them.

Phase 2: Enamel-based panel liner with the corresponding thinner to wash away excess paint
TIE Fighter hull plating after panel lining with enamel paint/wash

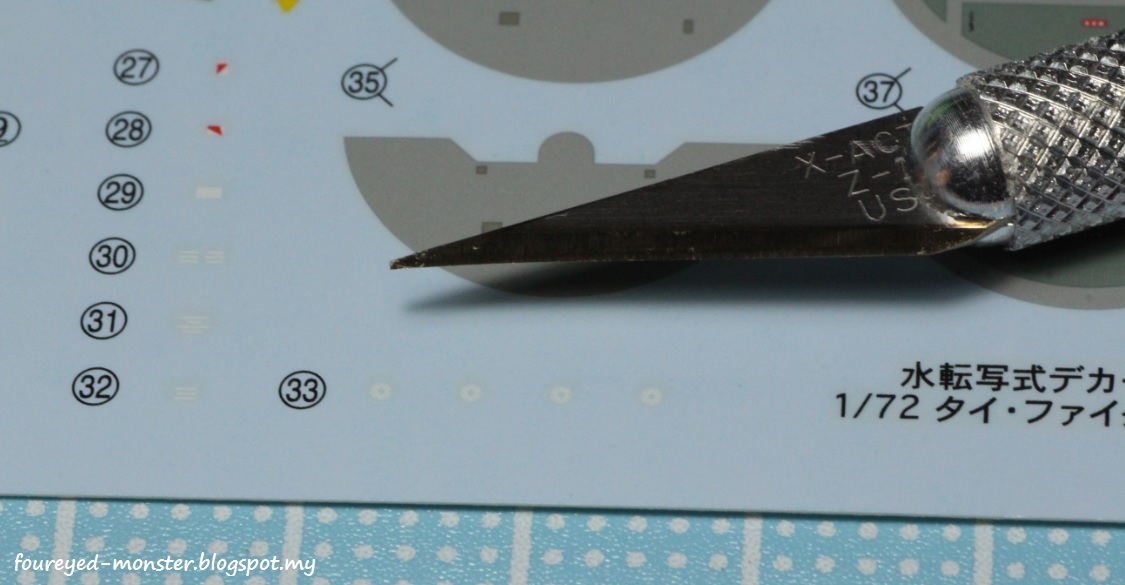
With a fairly flat colour scheme that varies only in its grey tonal values (with a dash of red for the twin ion engines and orange for the laser cannons), the main consideration of how the TIE Fighter would turn out was the decals. There were quite a few decal markings whose size were just as small as those found on the pilot's helmet. Regardless, it's definitely worth the effort applying the decals because the tiny hull markings breathed life into what would've been a dull, flat grey colour scheme.

Phase 3: Applying parts/whole of the decal and finishing it off with a matte coat
TIE Fighter; external hull of command pod and wing attachment pylon [after paints and decals]

With various parts of the TIE Fighter's external hull completed, it's time to combine them with the cockpit interior containing the seated pilot. I can foresee potential paint chipping problems if the assembly process requires excessive force to push the parts together. But I'm confident the two layers of clear coat (gloss then matte) should afford enough protection against such an occurrence. Thanks for reading about my progress in this fun kit. Definitely more progress before the week's end.


http://shireworks.blogspot.com/https://www.facebook.com/shire.works

Tuesday, 3 May 2016

Star Wars TIE Fighter [WIP - Pilot and Cockpit]

In what is a first for me, my painting skills (or lack thereof) was largely irrelevant when working on the Bandai 1/72 scale TIE fighter pilot. Minimal colours were applied on the pilot. It comprised just a few dabs of white, grey, blue and red in addition to painting matt black on the uniform while leaving his (or her) helmet, life support pack and gas transfer hose in gloss black. In the final scheme of things, the only thing that truly mattered was the two extremely tiny decals on the pilot's helmet.    

Enlist Today! The Imperial Navy Needs Your Help (to rid the galaxy of Rebel Scum)

To appreciate just how detailed the decals were, you had to view it under the magnification of a DSLR camera's dedicated macro lens. Only then could you make out the intricate Empire logo design that wasn't visible to the naked eye. Looking at the water decals as they are, without help from any form of magnification, is to see only a decal of a white blob with barely a hint of a design. But that's just me, an old guy whose 20/20 vision had long deserted him more than three decades ago.

[Before decals and paint] Both pilot options at 1/72 scale for the Bandai TIE Fighter 
Eventually only Mr.Mark Softer, a sharp hobby knife and a toothpick were needed for proper decal application

Plainly obvious from the immediate photo below, the helmet decal is small. So small in fact it's barely bigger than the tip of a hobby knife. Applying such tiny decals require patience. But that alone wasn't enough. I found out the hard way that two other items were needed: a decal softening solution (e.g. Mr.Mark Softer) and a toothpick. The former made the decal pliable enough to adhere to the plastic surface while the latter was the smallest tool I could find to manipulate the decal without getting it stuck to the said tool. Add a healthy dose of patience and ... wa-lah ... mission accomplished.  

No.33 decals are the Imperial symbols on the pilot's helmet; pictured next to a hobby knife blade
Bandai 1/72 scale TIE Fighter pilot, standing version
Bandai 1/72 scale TIE Fighter pilot, seated version

Decals also played a prominent role in the TIE Fighter's cockpit interior. While not as small as the helmet decals, the red-on-black-instrument-panel decals weren't that much bigger. Moreover, the uneven concave surface of the interior complicated what would've been a straightforward task. 

Initial steps in the assembly of the Bandai TIE fighter
This angle gives a clear view of the TIE fighter pilot's helmet decal
Eleven instrument panel decals were applied to the back, and another four in front (not shown here)
Once fully assembled, the cockpit interior will darken considerably thus reducing visibility
Red LED lights shining from the bottom would've been the perfect final touch ... if only

One thing I took out of this hobby session was the amount of practice I got in water decal application. I no longer hold any fear of using/applying water decals, at least Bandai ones. It's actually quite fun to be honest and a job well done gives almost as much satisfaction getting a paint job done right. Soon, I'll be starting work on the TIE Fighter's central hull. This one is going to be the Empire Strikes Back/Return of the Jedi version which means a blue gray colour scheme. Updates soon ... I hope.

http://shireworks.blogspot.com/https://www.facebook.com/shire.works

Tuesday, 26 April 2016

Star Wars Tie Fighter - Bandai 1/72 Scale Model Kit [Unboxing and Pre-Assembly Review]

As a young kid in kindergarten trying to replicate the Star Wars universe as seen on the big screen onto the drawing pad, I quickly developed a deep appreciation for the Galactic Empire's Twin Ion Engine Starfighter i.e. the Tie Fighter. Not only was it relatively easy to draw, it also had the coolest engine roar imaginable to a five-year-old way back then. It was my favourite Star Wars vehicle up until Empire Strikes Back came out and with it the All Terrain Armoured Transport (AT-AT) walker. But the Tie Fighter remains my favourite space faring vehicle in the Star Wars franchise so far.    

Bandai Star Wars Tie Fighter 1/72 Scale Model Plastic Kit, front view of box art
Side views of the Bandai Tie Fighter box art

Instructions came in the usual Japanese language only booklet. However they look straightforward with easy to follow diagrammatic step-by-steps. The Japanese phrases/sentences are short enough that Google Translate should be able to work its magic without losing too much in translation. 

Front and back cover of the Bandai Tie Fighter instructions
Simple diagrammatic instructions with the occasional Japanese phrase/sentence

The Tie Fighter seems to be one of the simpler vehicle model kits in Bandai Star Wars line. One thing is for sure, it's going to take a lot less time to put one together and paint it up compared to the Millennium Falcon. My gut feeling tells me this build will be more about bringing out the small details (either through decals or paint) as the colour scheme of the piece is rather monotone and dull. Both the cockpit interior and main central hull of the Tie Fighter have great details (Sprue A2 and B).

Sprue A2: Cockpit, top access hatch, viewport, laser cannons, fuel tank cap and miscellaneous stuff
Sprue B: Central hull, laser power system, and wing parts

On sprues E1 and E2, the solar array panels have been separated from the wing braces.This is great mainly because it does away with the need to mask off the panels before priming/spray painting the braces. Similar to the rest of the Tie Fighter, the details on the wing braces is equally excellent.

Sprue E1: Outer wing braces for the Tie Fighter
Sprue E2: Inner wing braces for the Tie Fighter
Sprue F: Solar array panels and pilot options i.e. one standing and the other seated

There is an alternative option in which the top access hatch and front viewport comes in clear plastic (Sprue G). With proper masking/painting, the final completed pieces will have a more authentic look than say the same pieces that come with just empty holes (see Sprue A2). That being said, I will likely use the latter for a better view into the cockpit interior (as was the case for the Millennium Falcon).

Sprue G: Clear plastic options for the Tie Fighter's top access hatch and front viewport
Sprue SWE1: Energy discharge from laser cannons (left); Sprue SWB4: Death Star base (right)

Meanwhile, the base is meant to be part of the Death Star's surface. It looks the part too which is cool. And in a nice touch that's replicated in many of Bandai's other Star Wars model kits - there is a pair of green plastic pieces simulating the laser canon shots/energy discharge. Also included are extremely detailed markings for the Tie Fighter and its pilot, in sticker as well as water decal form. Use of these should enhance the overall look of the model kit, especially in combination with paints.  

Bandai Tie Fighter markings in sticker (left) and water decal (right) form

This is one Star Wars vehicle that warrants more than one version. Actually, I do have plans for two i.e. light grey and blue grey colour schemes from A New Hope and Empire Strikes Back respectively. On top of that, I would love to eventually do a Trench Run Diorama. But first things first. For now, I plan to work on the blue grey version before adding a light grey one to my collection. Personally I like both colour schemes so I'm looking forward to how they'll turn out. Can't wait to get started.


http://shireworks.blogspot.com/https://www.facebook.com/shire.works

Friday, 22 April 2016

Bandai Millennium Falcon [WIP - Cockpit interior, external hull and canopy; assembled sans weathering]

It has been an extremely slow week for hobby-related activities as I've an ongoing writing deadline to meet. It took every little bit of precious free time I had just to glue together the Millennium Falcon's cockpit interior and external hull, except for the final 'windowed' canopy piece which was dry fitted just in case I needed to make changes to the interior. Two canopy options were available i.e. one with clear plastic 'windows' while the other had empty holes for 'windows'. I went with the latter choice. 

Bandai Millennium Falcon, cockpit sans weathering

Interesting bit of trivia - Industrial Light and Magic had used the same 'empty-holes-for-windows'  canopy during filming of the Millennium Falcon scale model in the original trilogy. From what I gathered, they did so to prevent light reflections from ruining any shots of the cockpit interior (and the actors seated inside) when it was in space. However, during the first Falcon scene on planet Jakku in The Force Awakens, the canopy with 'glass' windows was used. This made sense though as it was a desert scene and not having light reflecting of the canopy would have looked wrong.  

Without the final cockpit piece obstructing light, the interior is still highly visible at this stage
BB8 is not visible from a head-on angle, even in an 'opened-up' cockpit
Decals on the hull plating blended quite well into the paint job, thanks to a layer of matt clear coat

Prior to the final 'windowed' piece being attached, I took some shots of the assembled cockpit interior to show how things should look like if there were some LEDs lighting up the interior. You can check out those shots of the assembled interior in the three photos above and two below this paragraph. 

A last view of the cockpit ceiling before the final piece is attached
Millennium Falcon cockpit area (top view) prior to the final piece being attached

Only after the final canopy piece was dry-fitted onto the rest of the cockpit/exterior hull did I finally have an idea of how the whole thing really looked like without any interior LED lighting in place. And enough of the cockpit remained visible to the naked eye to dampen any misgivings I may have had of not lighting up the interior with LEDs. Hooray for the empty-holes-for-windows canopy!     

Millennium Falcon cockpit area (top view) with the final piece assembled
Use of the 'empty-holes-for-windows' front cockpit piece allows more light into the interior
At the moment, the final piece of the cockpit has only been dry-fitted not glued on
Rey's face is surprisingly still visible from this side-on view

Even at this early stage in the Millennium Falcon project, I'm already pretty happy with the results achieved using a combination of Tamiya/Mr.Hobby spray paints and Bandai water decals. It goes to show that a decent vehicle paint job can still be had, even without an airbrush and compressor kit .

Rey is thankfully still highly visible through the cockpit
BB8 peers out from the depths of an unlit Millennium Falcon cockpit

With the Millennium Falcon shaping up to be a long-term project, it looks like I'll be working on (and likely completing) some of Bandai's other less complicated Star Wars model kits in-between. One of their simpler kits is the 1/72 scale Tie Fighter from the original trilogy and that's the one I'll start on while still working on the Falcon. More on that in my next post. Until then, stay well and happy.

http://shireworks.blogspot.com/https://www.facebook.com/shire.works
Related Posts Plugin for WordPress, Blogger...