Thursday, 28 November 2013

Picking a Baratheon king to paint

Next up on my Game of Thrones miniature painting project is House Baratheon. But which brother do I choose? Right off the bat, I have ruled out Robert for now as his colour scheme is too similar to my recent Ser Gregor Clegane piece. So that leaves Renly and Stannis, both of which I plan to work on. To kick-off work on House Baratheon, I will paint Renly Baratheon whose yellow-on-green colours is the most different from what I have done so far i.e. House Lannister and House Clegane.   

Robert, Renly and Stannis Baratheon (from left to right)

A beautiful piece of fan art by 'saracennegative' on devianART pretty much sums up the different colour schemes involved for separate branches of House Baratheon as led by the three siblings.

Colours of House Baratheon for Robert, Renly and Stannis (from left to right) by saracennegative

For this miniature, I did a very minor re-sculpting of the Bretonnian Knight by cutting out the sword hilt so that it looks like only the scabbard is attached to the knight's left leg. This was done because the knight (or in this case, a temporary king in the form Renly) was already holding up a sword. It would have looked odd and unrealistic to still have a sword in the scabbard. So the hilt had to go.

Renly Baratheon - all primed in white and ready for the initial basecoats
Minor miniature re-sculpting to remove sword hilt and show just the scabbard

So far, I have only managed a few thin layers of the basecoat colours. I have kept the initial layers thin because I plan to do some washes on the warhorse before building up the basecoat colours again going on to mid-tones and highlights. The bright greens here won't be too far off from a Space Marine Salamander colour scheme. Meanwhile, the bluish band on the warhorse is based on a photo of Renly (see below) although I haven't quite got the correct hue yet which is teal so I need to add more green and/or turquoise to the bluish mix I painted ... that's what I think will work anyway.

Renly Baratheon's warhorse - early stages with a few thin layers of basecoat
Teal-colour of Renly's gloves will be incorprated into the warhorse

If you recall, I still have another version of Ser Gregor to do, a Nocturna Models miniature painted in Clegane colours. That one is still progressing slowly as I intend to spent a much longer time blending colour transitions so no worthwhile photos yet. Work should progress faster with Renly ... I hope.  

http://shireworks.blogspot.com/

Tuesday, 26 November 2013

My first Kolinsky paint brush

Thanks to the missus who bought me this as a gift during her work assignment in Singapore, I am now the proud owner of a Kolinsky Sable-hair paint brush or more specifically the Raphael Kolinsky Red Sable Fine Pointed Round Series 8404. Up until now, all my paint brushes have been of the cheap nylon variety which have served me well and will continue doing so for many more projects to come. However, by having the 6/0 Kolinsky brush I hope to finally paint better eyes on the miniatures. The sharp point that such brushes are famed for should be of great help in this regard.

Raphael Kolinsky Red Sable Fine Pointed Round Series 8404

Ever since I started out in this hobby, the workhorses in my painting table have been the cheap Artpac nylon brushes sized 0, 2/0 and 3/0. Although I would love to have an array of Kolinsky Sable-hair as well as airbrushes at my disposal, the sad reality is that only nylon brushes are within my budget. It was awfully nice of the missus to get me the Kolinsky brush considering it cost a whopping US$10 or thereabouts. I am super stoked but would most likely use it very sparingly to make it last longer.

Current workhorses of my painting table

Well it seems truly silly of me to get so excited over a brush but I can't help it. It's a Kolinsky. No more blaming the brush for the horribly painted eyes on my miniatures then. Heh heh ... sigh.

Saturday, 23 November 2013

Marvel project begins with an introvert and an extrovert

To add to the considerable pipeline of miniature painting projects on my workstation, I will be starting yet another long-term project in the form of superheros and villains from the Marvel Universe. This new endeavour will take centre stage along with my current Game of Thrones project which I am enjoying immensely due to the myriad of colour schemes and freehand heraldry designs involved. Other stuff in my to-do list are some stand-alone character pieces, possibly board game minis as well as my badly ignored W40K armies. Phew, talk about having your cake and eating it too.

Iron Man and The Hulk

My journey into the Marvel Universe, in particular assembling and painting the Avengers, begins with a contrast of two characters namely an extrovert in playboy Tony Stark aka Iron Man versus an introvert in the mild mannered and soft spoken Bruce Banner aka The Hulk. With the Iron Man movies into their third iteration, it is widely accepted among Marvel fans on how well Downey carries the Stark character. On the other hand, Mark Ruffalo is the third actor to play the movie version of Bruce Banner. And in my honest opinion. Ruffalo is by far the best Banner yet.   

Mark Ruffalo (left) as Bruce Banner and Robert Downey Jr (right) as Tony Stark

So where do I stand in terms of progress in assembling the Avengers? Using miniatures from Knight Models for both The Hulk and Iron Man, the former has yet to be assembled. The Hulk from the Knight Models Marvel Universe range comes with a few assemble options which includes three heads as well as two left and right hands each. It allows for three versions of Hulk - Red Hulk, Grey Hulk and Green Hulk. In line with the movie versions, I am planning to paint a green Hulk.

Knight Models The Hulk - a 1:22 scale resin model kit

At first glance, both Iron Man and Hulk seem like easy projects but the actual size of both miniatures - The Hulk stands at 90 mm from the base to the top of  his head while Iron Man comes in at 75 mm - as well as an intention on my part to paint both Iron Man's armour and Hulk's skin in extreme detail and hopefully with depth means it will be harder than it looks.

Knight Models Iron Man primed with Tamiya Fine Surface Primer

As for Iron Man, I have managed to get a few initial layers of basecoat on the miniature after priming him with Tamiya Fine Surface Primer. My current painting style is fairly fluid with repeated shifts between basecoats, shadows and highlights so even now the basecoat layers are incomplete. My starting point tends to be the mid-tones which will be blended accordingly with the shadows and highlights. Meanwhile, Iron Man will also see me try to paint Non-Metallic Metal for the first time.

Iron Man - Very early work-in-progress with initial basecoats done (front view)
Iron Man - Very early work-in-progress with initial basecoats done (back view)

Constantly shifting from one colour scheme to the next (as well as challenging myself with different miniature types) helps to stave off the monotony that sometimes plagues me in this hobby. Keeping things fresh also helps me to improve my painting skills ... one miniature at a time.

http://shireworks.blogspot.com/p/knight-models.html

Tuesday, 19 November 2013

House Clegane Knight & Warhorse [Completed]

Completing the second knight in my Game of Thrones was a very enjoyable experience. I not only got to practice painting freehand heraldry designs, but also managed to experiment further with getting smoother blends and transitions for the colour yellow. It helped that I have started using a wet palette to paint miniatures. This made the blending of colours so much easier.  

House Clegane knight on a warhorse aka Ser Gregor
Side view (left) of the House Clegane Knight
Banner tied to the lance was intentionally left free of any heraldry designs

Although the bluish grey headband and horse reins which accompanied the predominantly yellow colour scheme are not officially present in House Clegane colours, I added them in because I felt that they made the yellow stand out more (in a complementary colours kind of way). The overall colour scheme for my version of Ser Gregor Clegane is largely inspired by X-Men of the Marvel universe.

Lance was set an a 45 degree angle to add some dynamism to the miniature
Side view (right) of the House Clegane Knight
Boar with a knife in its back was coincidentally rather symbolic of the king's passing
Front and back view of the House Clegane Knight (or Ser Gregor)

House Clegane heraldry revisited
Differing slightly from my freehand heraldry paintings on the warhorse, the House Clegane symbol on the shield was based on a particular scene from the Game of Thrones TV series. This necessitated a more detailed painting of the heraldry in two colours - black and grey - with the latter used to finely paint the eye, eyebrow and muscle definitions of the hound.   

House Clegane heraldry on the shield
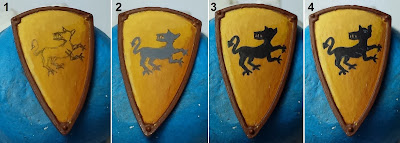
Four step process on painting the House Clegane shield heraldry

As shown in the photo montage above, the House Clegane shield heraldry was painted in a simple four-step process detailed below:
1) Rough sketch using a pencil
2) Area blocked out using grey paint
3) Area filled in using black paint
4) Eye, eyebrow and muscle definition done using grey paint

360 view of the House Clegane Knight
For a 360 degree view of the House Clegane Knight, please check out the YouTube video (see below) of the miniature. For other videos, check out my YouTube channel FourEyedMonster Miniatures.


Thanks for checking out the latest work on my Game of Thrones miniature painting project. More miniatures are in the works for this project, including a bigger version of Ser Gregor, so stay tuned!


http://shireworks.blogspot.com/

Friday, 15 November 2013

House Clegane warhorse, complete with heraldry

Barring some final touch ups to the House Clegane warhorse especially on the metal studs and leather reins, Ser Gregor's equine ride is largely finished. Just a year ago if you had told me that I would be painting freehand on a more regular basis I would have called you crazy. But a desire to paint and bring something one has read (or seen) to life can sometimes override the mental block that prevents a painter from trying out new techniques whether due to lack of confidence or pure laziness. 

Painting the House Clegane heraldry, an alternate version in freehand

Although I am not entirely happy with the final results due to an annoying inability on my part to paint the hounds in a consistent manner, there are still some positives that I can take from this experience. For example, I am slowly coming to grips with my paint brush handling skills and learning to mix paints in a way that facilitates freehand painting. It also provides me with a foundation towards painting more complex freehand designs that contain more than just one colour.  

House Clegane warhorse (side view, right)
House Clegane warhorse (side view left)

So the stage is now set for the Clegane knight (there is only one I know of and he is Ser Gergor) to be seated atop the warhorse. All I have to do is paint the knight and arm him with a shield that contains yet another House Clegane heraldry. However, this time the freehand painting design I have in mind is different from what you see on the warhorse. I am planning to paint just one hound but in more detail as depicted in the Game of Thrones TV series. Pulling that off will be easier said than done.

http://shireworks.blogspot.com/
Related Posts Plugin for WordPress, Blogger...