Monday, 27 February 2012

Yo ho ho ho ...

Other than having One Piece's little sailing ditty stuck in my head for the last few months, all my free time this past week has been occupied by watching episodes in One Piece's Impel Down and Marineford story arcs with my son. Needless to say, that means zero progress in my Ork miniatures. It did, however, get me started on some anime-related hobby stuff I had shelved for over a year.

Going Merry ... unboxed and unwrapped
One anime miniature project in the works is Bandai's One Piece pirate ship model kit, Going Merry. As the ship's parts generally come in the correct colour scheme, one quick way to assemble this model is by just snapping the pieces together and applying appropriately coloured stickers provided with the kit onto the relevant pieces.

But in my opinion, the quick way would look horrible so I plan to either:
a) Undercoat all the parts white and repaint the entire ship.
b) Undercoat parts that are not in the correct colour scheme and repaint only those pieces.

Having heard horror stories of paint easily peeling off Bandai's glossy plastic pieces, I am not sure if GameWorkshop's water-based paints can properly adhere to the parts. Well, no pain no gain I suppose.  Once it's finished, I hope it will look something akin to the picture below.
Going Merry's bright colour scheme

While looking for the pirate ship model kit, I also came across an old One Piece jigsaw puzzle I had gotten in a sale sometime early last year. That became a quick two-day family (missus included) project and is now ready for framing.

  
After more than 500 episodes and with its 15th anniversary under its belt, One Piece seems to be going from strength to strength. Long may author Eiichiro Oda's superb writing continue.  

Saturday, 18 February 2012

Citadel Finecast ... a noob's first impression

Till now, I have only ever worked with plastic miniatures, though that's not really saying much for someone with less than six month's experience in painting miniatures. As Games Workshop seems to have decided Citadel Finecast is the way forward, more miniatures will be resin-based. So now seems a good time as any to try my hand at dealing with these resin miniatures.   

Looking for a reasonably sized miniature in which to tackle this new material, I decided on an ork warboss, and who better than Ghazghkull Mag Uruk Thraka.
   
Washed and cleaned up ... in all its unassembled glory.
The good ... 
  • As repeated in many other websites ad nauseam, details on the resin miniature model is fantastic. You can't really appreciate the level of detail these models have until you have worked with plastic. It's going to be a joy to paint such details.
  • Parts snapped off very easily and cleanly from the sprue. And on occasion, it seemed to be the better option compared with removing them using plastic cutters.
  • There seemed to be less mould lines on the resin model. 
... and the bad.
  • Bubbles, bubbles and more bubbles. It may just be a case of bad luck but the resin model I worked with had lots of imperfections in the form of air bubbles that formed during the moulding process. Fortunately, the bubbles did not damage any major detail that could not rectified using Game Workshop's Liquid Green Stuff.     

Currently, Ghazghkull Thraka lies semi-assembled and ready for an undercoat of Chaos Black.


To make this project a more productive one, I plan to paint five Ork Nobz from the Assault on Black Reach set together with Ghazghkull Thraka. The Nobz are a step ahead in the painting process with their black undercoat all done up.


Let there be Waaagh!

Thursday, 9 February 2012

Khorne Berzerkers are ready for war!

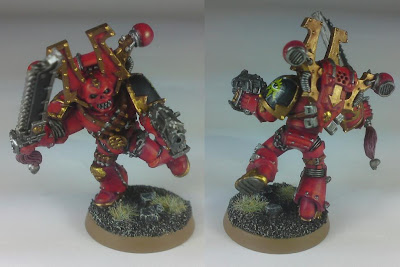
After what seems like forever, the Khorne Berzerkers are finally finished. Highlights comprised Blood Red for the armour, Chainmail for the metal parts and Burnished Gold for the gold parts. Weapon tassels were washed with Thraka Green (on top of a Mechrite Red basecoat) and highlighted with a mixture of 1:3 Scab Red:Fortress Grey. Basing was inspired by GameWorkshop's Warptainted Lands colour scheme while a Black Legion decal was applied to the zerkers' left shoulder.


Can the zerkers be improved upon? Most undoubtedly. But for now, I guess I will leave them as they are. A wash of Devlan Mud was in the works but I decided against it at the end. A detailed 'How to paint Khorne Berzerkers' as well as colours used for the base will be posted in an upcoming blog. 

View from all angles
A detailed look
 With these new additions, the Black Legion army was soon looking for trouble. 

Courage and honour?


Ugg and Ogg in trouble?

Well, based on that last picture above, it seems like the lovable Ugg and Ogg  are in serious trouble. They need help. So I will need to start my Citadel Finecast project soon and get Ghazghkull Thraka into the fray. I plan to use 'Heavy Metal's Masterclass guide to help paint this massive Ork Warboss. 


It has been a crazy week hobby wise ... but I am loving every minute of it.

Tuesday, 31 January 2012

Khorne Berzerker Rhino interior ... humble beginnings

Should I ... shouldn't I ... after having grappled for a few days with the question of whether to paint the interior of my zerkers' armoured transport, I decided to go for it. Time to make up for loss time due to indecision and paint, paint, paint.

First, all areas of the interior which did not require a basecoat were masked with Scotch Tape. Additionally, movable parts such as the backdoor hinges and parts that will be slotted into a groove during assembly were masked with or some rubber mastic adhesive (more commonly known as Bluetack) to ensure that paint does not add thickness and cause problems during later assembly.

Prepped up for basecoating

Then, parts forming the Rhino's interior were sprayed with Skull White. Ideally, the distance between the spray can and the figure should be around 12 inches, according to Games Workshop. Here it was slightly less but thankfully no clumping of paint occurred.

Basecoating the pieces
Pieces with Scotch Tape and Bluetack removed
Skull White was used as the basecoat paint to ensure a 'brighter' canvas for the subsequent paint layers. I plan to glue shut both the side doors as well as the top hatch, so it will be rather dark in the interior as only the back door can open to allow light in.

Now all that's left to do is to paint the interior before assembling it. Haven't decided on final colour-scheme of the interior yet but I am getting inspiration from some cool pieces by limp and snake88. I am leaning towards a brighter colour scheme to show off the darkly lit interior but that seems counter to what a Chaos Rhino interior should look like. Any comments or advice on what would be a cool interior colour scheme for the Black Legion/Khorne Rhino is most welcome.

Thursday, 26 January 2012

Midtones done, 'zerkers are assembled and ready for highlights, decals and basing

It being the lunar new year holiday season and having some time-off has allowed me to paint faster than I have ever had before. Hopefully, I can get some momentum going to paint even faster and work on yet more miniatures.
Kill, maim, burn and errr loot?
Finally, after some painfully slow progress, I have gotten the zerkers' midtones done up, got them assembled in some awesome (I gotta find some better adjectives) poses and ready for highlights, decals and basing.
Did more 'How-To' photo montages and am getting a hang of taking better photos.
Midtones done - armour has layer of Red Gore, leather pieces have Bestial Brown added, zerker eyes have Snot Green, and in the previous step gold parts had 1:1:1 mix of three metallic paints
A watered down layer of Red Gore was applied to 'brigthen' up the armour. Having diluted paint to work with allowed me to 'drag' the paint pigments towards the area where I wanted the armour to look brighter (see picture below).
Being a novice painter, end-results were not satisfactory but the idea is roughly there. I expect the highlights to look much better when diluted Blood Red is applied in the next, proper highlights stage).

With midtones completed, the model was assembled in preparation for the next stage.
I'm too sexy for my boots, too sexy for ...
A sweet ride for my zerkers
To maintain the momentum I have going, parts to a Rhino that I plan to use for these zerkers have been taken out and cleaned. Washed it using plain dish soap as I was out of white vinegar, a liquid which Alvin of Glued My Fingers fame recommends.


To a noob like me who has never assembled a vehicle before, the parts in itself look awfully daunting but I am up for the challenge. Now, if only I can pimp it to look like a Mitsubishi Evo X.
Related Posts Plugin for WordPress, Blogger...