Pages

Saturday 28 May 2022

Space Battleship Yamato 2199, Cosmo Reverse Ver. [WIP - First/Third Bridges, Missile Launcher, Fins, & Rocket Anchors: Basecoats & Panel Lines]

 Overthinking things is an unfortunate trait that I possess, and it resulted in a prolonged hesitation to start work on the First Bridge of the Space Battleship Yamato 2199 Cosmo Reverse Version. But I am getting ahead of myself. Beforehand, I need to explain the characteristics of the First Bridge that lead to my overthinking. To simulate windows, the First Bridge has a clear part fixed within its sub-assembly. As such the clear parts are located in recessed niches at regular intervals at the front. For the longest time I couldn't decide between using either a masking paint or masking tape to protect the clear parts. So much so that inertia set in, and the project stalled for a prolonged period.


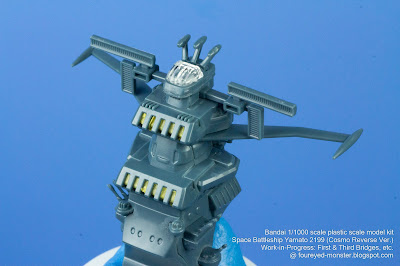
Space Battleship Yamato 2199 (Cosmo Reverse Ver.) work-in-progress: Base-coating and Panel-lining of the First/Third Bridges, Missile Launchers, and Lower Hull Fin

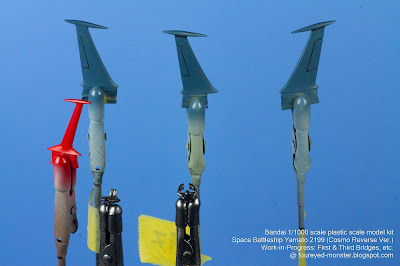
Space Battleship Yamato 2199 (Cosmo Reverse Ver.) work-in-progress: Base-coating and Panel-lining of the Upper and Lower Hull Fins as well as Rocket Anchors

 So what changed? How was my mental block - silly as it was - finally overcome? I would love to say an inspiring eureka moment allowed me to solve this dilemma but I would be lying. It all boiled down to picking a choice in which I felt most confident in pulling off, and that was using masking tapes. And with the decision made, assembly of the First Bridge proceeded without a hitch, followed by the Third Bridge and Missile Launcher Structure. Meanwhile, the Rocket Anchors and Fins were standalone parts that needed no assembly. They only required minimal prep work such as cleaning of nubs and mold lines. The diagram below shows where these components fit into the whole battleship.


Diagrammatic representation of the parts worked on in this session

Foundational Base of the Missile Launcher and First Bridge assembled and prepped for priming

First Bridge with the Captain's Room (clear part at the top of the sub-assembly), and portholes masked

First Bridge sans the Captain's Room (note: top of the sub-assembly is now without the clear part)

Missile launcher structure, which would've been an exhaust funnel in a traditional battleship

Third Bridge which is located at the lower hull of the Space Battleship Yamato

Rear and Lower Hull Fins as well as the Rocket Anchors, all ready to receive their primer coat

 Once the appropriate sections were masked off, it was time to apply the primer coat. As with the earlier hull pieces, I used the Tamiya Fine Surface Primer (Light Gray) to prime the First/Third Bridges, Missile Launcher, Rocket Anchors, and Fins (see below). 


Space Battleship Yamato 2199 (Cosmo Reverse Ver.): Priming the First/Third Bridges, Missile Launchers, and Lower Hull Fin with Tamiya Fine Surface Primer (Light Gray)

Space Battleship Yamato 2199 (Cosmo Reverse Ver.): Priming the Upper and Lower Hull Fins as well as the Rocket Anchors with Tamiya Fine Surface Primer (Light Grey)

 At this stage and after priming, the work done here comprised just base-coating and panel-lining. The former was accomplished using a Mr.Color lacquer paint recipe for two hues named Yamato Gray and Yamato Red respectively while the latter made use of the Mr. Weathering Color (Multi Black). And as you can see from the results below, the masking tape was effective in preventing both primer and paint from getting onto the clear parts that represent bridge windows/portholes.


First Bridge and Foundational Base of the Missile Launcher: Base-coat and panel-lines completed

First Bridge: base-coated and panel-lined, and portholes unmasked (isometric view, front)

First Bridge: base-coated and panel-lined (isometric view, back)

Foundational Base of the Missile Launcher with Fins: base-coated and primed (isometric view, front)

Foundational Base of the Missile Launcher with Fins: base-coated and primed (isometric view, back)

Third Bridge: base-coated and panel-lined (isometric view, front)

Third Bridge: base-coated and panel-lined (isometric view, back)

Missile Launcher: base-coated and panel-lined (also shown here is the small lower hull fin)

Upper/Lower Hull Fins (including fin from photo above) and Rocket Anchors: base-coated and panel-lined

 But before these individual parts and sub-assemblies are fixed onto the hull, there are other sub-assemblies like the Main Guns, Secondary Armaments,and Catapults to be completed first. Once all these are done, there are water decals that need to be placed on the missile launcher, guns, and hull. Only then can the assembly process proceed further. Moreover upon perusing the photos above, I noticed I had forgotten to apply a clear green paint on the First Bridge windows. So that's another to-do-item on the before-further-assembly checklist. Most important though is my unwavering desire to maintain momentum in hobby projects. I'm just thankful my years-long hobby malaise hasn't resurfaced. On that small blessing I'll end this post with a wish for you to stay safe, and be well.


https://www.facebook.com/FourEyedMonster-313145002078520/

https://shireworks.blogspot.com/https://www.facebook.com/shire.works

Saturday 21 May 2022

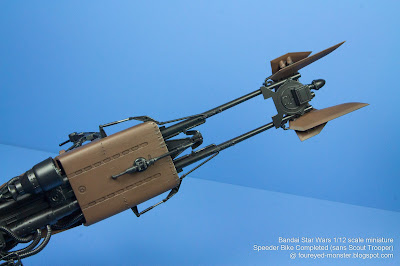
Star Wars 1/12 scale Aratech 74-Z Military Speeder Bike (sans water decals and sans minor paint details)

 If you have yet to watch the Star Wars Speeder Bike final assembly video, then you might want to check out the following link first: https://www.youtube.com/watch?v=m8YaHpaRTOY. What I've uploaded here are far more detailed closeup photos of the Speeder Bike. And as I mentioned in the previous post, the bike is not entirely finished yet. After final assembly I realized I had completely forgotten about the bike's water decals as well as overlooked some minor paint details. It's very close to being finished though, at about 95% complete. So the finish line is in sight.   


Speeder Bike work-in-progress: 95% complete; still needs decals and minor painted details

 Final assembly of the Speeder Bike was split into two pseudo-phases. Phase one involved the attachment of the Steering Vanes/Outriggers onto the Lower Hull followed by the Upper Hull. While the phase one process seemed fairly straightforward, it was in reality quite nerve-wracking. Having to snap-fit large sub-assemblies comprising fragile parts, I was always fearful of breaking something because considerable force is required to ensure the joints come together as seamlessly as possible.    


From top to bottom: Lower Hull, Upper Hull, and Steering Vanes/Outriggers

Star Wars Speeder Bike, after Phase One of the final assembly ...

... comprising the three aforementioned sub-assemblies all attached together.

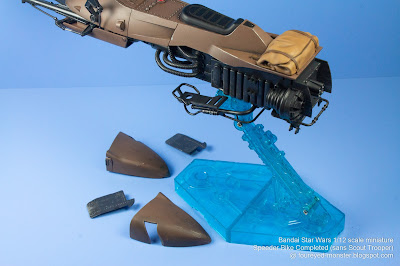
 Meanwhile Phase Two was appreciably easier as it only required the snap-fit of the bike's rear Side Armor/Hull Plates and Air Brakes (see below). There are actually two display options for the Air Brakes i.e. one with the flaps closed over the thrusters, and one with the flaps open. I chose the former as I plan to display the Speeder Bike together with the Scout Trooper and Girl's Rider figurine in a static pose. When you think about it, you can also mix-and-match i.e. have the left flap open and the right one closed if you want to do a vignette of the bike turning right, and vice versa. 


Phase Two of the final assembly focuses on the rear of the Speeder Bike ...

... specifically attachment of the Side Armor/Hull Plates and Air Brakes of which ...

... the former covers up the Thrust Arrays while the latter directs the thrusts generated.

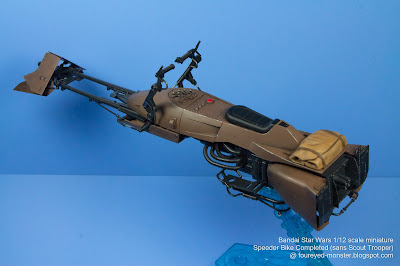
 It was only after I had fully assembled the Speeder Bike did I notice I had forgotten to apply water decals as well as forgotten to paint some minor details on the bike. Only once I have done both will the bike be considered complete. The following is a series of photos of a nearly-complete bike.


A nearly complete Star Wars Speeder Bike, attached to a clear blue display stand

Side profile (viewed from the left) of the Star Wars Speeder Bike

Star Wars Speeder Bike still requires some minor details to be painted ...

... as well as have water decals applied, primarily to the hull.

Side profile (viewed from the right) of the Star Wars Speeder Bike

Scout Trooper (not shown here) will be the final piece that completes this kit

 Of course once the Speeder Bike has had decals applied on it and additional minor details painted, it will be finally ready for a photo shoot with an already completed Scout Trooper. And once that is done, both will be posed with a yet-to-be-finished Girl's Rider figurine. Just to recap if you're wondering what I'm talking about, all three are part of a Join-the-Empire vignette that I am doing.


Bottom view of the Speeder Bike, from the rear and mid-sections ...

... all the way to the Steering Vanes and Outriggers.

Closeup view (front end / bow) of the Star Wars Speeder Bike

Closeup view (mid-section) of the Star Wars Speeder Bike

Closeup view (rear end / stern) of the Star Wars Speeder Bike

 As I type out this last paragraph, I guess it's worth pointing out that I've since went ahead to apply the water decals on the Speeder Bike as well as finish painting the minor details I had overlooked. However, I haven't had time to edit the photos and video I took of the process. So while I do the necessary edits, I may upload some interim posts of another work-in-progress project, specifically the Space Battleship Yamato 2199 (Cosmo Reverse Version). So do look out for that in the future. For now, it's time to end this post. Keep on hobbying, stay safe, and be well.  


https://shireworks.blogspot.com/https://www.facebook.com/shire.works

http://shireworks.blogspot.com/p/custom-painted.html

Friday 13 May 2022

Star Wars 1/12 scale Aratech 74-Z Military Speeder Bike (Final Assembly Video)

 After a brief reintroduction of my latest addition (i.e. the Evangelion Unit-01) to the worktable, it was back to final stages of the Star Wars Speeder Bike project. And these last few stages began with the final assembly of the bike. This isn't the absolute final stage yet because I had inadvertently left out the water decals as well as some minor paint details. Both tasks will be tackled in the coming days. Until then the Speeder Bike is at least fully assembled and 95% complete.


 Below is the video of the Speeder Bike's final assembly process, which also has been uploaded to YouTube. Remember to choose HD resolution in the settings for a better view.


 In addition to the video above, I have also taken a selection of detailed photos of the bike's final assembly. As I couldn't finish editing the photos in time to post them together with the video you see above, I'll only post them together with a more detailed narrative in the next post. Do wait for that post as it has better closeups of the fully-assembled Speeder Bike. And so this short post comes to an end with my perennial wish that you dear reader, stay safe and be well.


FourEyedMonster Miniatures YouTube Channel

http://shireworks.blogspot.com/p/custom-painted.html

Saturday 7 May 2022

Neon Genesis Evangelion EVA-01 Test Type [Work-in-Progress: Prepping EVA Parts for Primer and Paint]

 In all my years of model building and painting, the Bandai Gundam/Evangelion models have offered the highest inertia-coefficient of any equation relating to a model kit's work progress in my project pipeline. That's why it has taken more than two years since the initial unboxing for work to finally start on the Bandai LM-HG Grade Evangelion EVA-01 Test Type plastic model kit. And there is a reason why the aforementioned inertia-coefficient is high as I'll explain below.


Bandai LM-HG Evangelion EVA-01 Test Type work-in-progress: EVA parts prepped for paint

 So what is it with these Bandai Gundam/Evangelion kits that make them such a personal mental block to a project making any headway. If I plan to fully paint the said kits, then the key reason lies solely in my approach. When dealing with either Gundam- or Evagelion-type plastic model kits, I usually paint individual parts or sub-assemblies of related parts before I carry out final assembly.


Prepped EVA-01 parts - all labeled and kept in groups corresponding to body areas


  And because such kits comprise of numerous parts that come in many different sizes, careful planning and organization of said parts are a must. Here is what I usually do:
  1. analyze which items must be painted as individual parts and which can be sub-assembled before painting with the latter making it less time-consuming when painting;
  2. prep each part by removing mold lines and nub marks as well as clean them;
  3. label each individual part or sub-assembly to know which part is what;
  4. analyze which parts/sub-assemblies needs to be held by alligator clip sticks, which can be left partially attached to the sprue, and which must be attached via blue tack onto plastic bases in order to secure them for the painting process;
  5. prime all the individual parts/sub-assemblies, and then paint them;
  6. top coat the individual parts/sub-assemblies, usually after applying decals/stickers;
  7. undertake the final assembly process.

Some EVA parts that'll  be attached to sprues or on plastic caps prior to painting 

 As you can see from the long to-do list in the preceding paragraph, the sheer scope of work involved sometimes make me not want to even start at all. But I eventually get there, mentally, and the work finally begins. For now, I am concentrating on the EVA-01 unit itself so not all the model kit's parts have been prepped for paint. Three main sections of the kit have yet to be worked on namely the Shinji Ikari figurine, the EVA's weapons, as well as the EVA's power plug and umbilical power cable. These accessory parts will be worked on only after the Evangelion unit itself (i.e. EVA-01 in this case) has been completed. Color schemes for the EVA-01, its accessories, and the figurine are different enough that I am not comprising on efficiency if I work on the latter two at a later date.


Sprues that have been stripped of parts that are in turn prepped for paint

Sprues with the Shinji figurine, the EVA-01's weapons and its power connector/cable

 Shown below are parts that are already cut from the sprue, mold lines removed, and surfaces cleaned, and individually labeled where applicable/possible. All parts and sub-assemblies were subsequently grouped together based on areas of the body e.g. left leg, right arm, torso, etc. Eventually the individual parts and sub-assemblies will have to be secured using alligator clip sticks or using blu tack to attach them onto plastic bases. This is done so that the parts/sub-assemblies can be easily manipulated during the painting process without accidentally damaging painted surfaces.


EVA-01's arm/shoulder parts: a closer and more detailed look

EVA-01's leg/foot parts: a closer and more detailed look

EVA-01's cockpit and torso parts: a closer and more detailed look

EVA-01's abdomen/lumbar and head parts: a closer and more detailed look

 With plans to paint the EVA unit in unconventional candy metallic colors, I have test painted some spoons with the colors I'm thinking of using. Shown below are spoons with the candy metallic colors placed next to the molded plastic colors that they will be replacing.


Plastic versus Candy Metallic: comparison of the orange yellow, green, and purple hues

Plastic versus Candy Metallic: comparison of the blue and black hues

 Below is a video of a quick look at the prepped parts as well as a comparison between the original plastic molded colors versus my planned candy metallic paint colors.


 While only prep work has been done on the EVA-01 unit, for me mentally, a huge obstacle has been overcome. Soon I should be able to begin painting the EVA-01 parts and sub-assemblies to kick-start a series of Neon Genesis Evangelion projects that I have planned. But before that I'll be carrying out the final assembly of the Star Wars Speeder Bike (sans decals) so that should make it into the next post if I can finish editing the accompanying video in time. Until then stay safe, and be well.


https://www.facebook.com/FourEyedMonster-313145002078520/