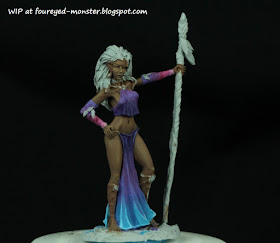
What better way to kick start a new hobby year by doing one of the things I love most i.e. painting smooth transitions between different hues be it through wet blending or layering techniques. Either is a skill I have yet to master but I'm sure having a lot of fun practicing both techniques.
 |
| Wood Elf Goddess, work-in-progress on a second version of this beautiful Dark Sword miniature |
 |
| Version 2 spots a darker skin tone and cooler hues for her dress |
 |
| Highlights at the front lower fringes of her dress is pure sky blue |
To recap, the first version that I painted had a warmer colour scheme (see below). My aim, for the second version, is to give the Wood Elf Goddess a completely different look. So much so that if you were to look at her you would have to do a double take as to whether it's the same miniature.
 |
| Dark Sword Miniatures - Wood Elf Goddess v.1 |
Doing another version of the same miniature doesn't feel boring at all largely because this a lovely sculpture to work with, one of my all time favourites so far. For me to want to work on a miniature I have to be inspired by it. Inspiration takes many forms. Mostly, they either arise from interesting lore/background story (W40K, Star Wars, Star Trek, Walking Dead, etc) or they can just simply be a beautifully sculpted piece as in the case for the Wood Elf Goddess I'm painting now.
 |
| Highlights occupy a larger surface area on the rear of the Wood Elf Goddess's dress |
 |
| Back view of the Wood Elf Goddess, work-in-progress on her dress |
 |
| Hue of the Wood Elf Goddess's hair will be critical in making this colour scheme work |
Colours for the Wood Elf Goddess's dress comprised solely Vallejo Model Color (VMC) acrylic paints such as Violet (047), Purple (044), Blue Violet (046), Sunset Red (041), Pink (040), Old Rose (039), Light Turquoise (068), Deep Sky Blue (066) and Sky Blue (067). And as mentioned earlier, the transitions between hues was achieved using both wet blending and layering painting techniques.
 |
| Vallejo Model Colors use to create the sky blue to turquoise to purple to pink transitions |
Well, 2016 is off to a bright start. Amidst researching the tools, paints and colour schemes for my
Star Wars Millennium Falcon project -
'research' as in looking at cool photos and videos of movie set/modeller model kits as well as playing the Star Wars Battlefront video game ... more on this in my upcoming posts - I'm also working on miniatures like this Wood Elf in my
initial project pipeline. Bandai's superb Star Wars model kits have gotten me excited about delving into the realm of vehicle painting. And it has also gotten me out of a mini burnout occurring in the last month of last year. Two for the price of one if you will. Akin to shooting two rebel scum with one blaster shot. Sweet!


.jpg)
She looks superb and as you said if you hadn't mentionned the first version I would have totally done a double take. The colours you chose for the new version really work with this doubel contrats of warm/cold and bright/dark.
ReplyDeleteI'm not used to wet blending but could you tell why you use one blending technique over another ?
Cheers.
I'm no expert on either techniques so please take my advice with a grain of salt and do more research on your own. But for me, I tend to use layering when I want the bottom layer to show through OR the upper layer to just change the tone of the colour a bit. Wet blending is more for when I want two different hues to blend together seamlessly, more so when they don't layer well and also sometimes when I am lazy and want a quick seamless blending. Layering also gives more control I think. Hope this helps. :)
DeleteIt does, I hadn't thought about that because I generally always choose the easy way and therefore never have to blend colours that can clash. Food for thought here, thanks a lot.
DeleteMust get you to teach me in detail how to do the blending effect in detail XD
ReplyDeleteGreat stuff!!!
Ha ha :) Any advice you need just ask, I will always try my best to help. Thanks DWolve!
DeleteThat is sensational work, the colours, the blending all top drawer!
ReplyDeleteYou do me much honour sir. Thank you! :)
DeleteI like the colors used, and the gradient ! Great
ReplyDeleteCheers
Thank you Vincent. I love this particular gradient of colours too which is why I chose it for this version of the Wood Elf Goddess.
DeleteWonderful! can't wait to see more!
ReplyDeleteGrazie Luca :)
DeleteFantastic job!!
ReplyDeleteMerci Phil!
DeleteWow, you came back at full stregth! This is going to be great!
ReplyDeleteThanks Suber, your confidence is inspiring. I will try to do the beautiful figurine justice if I can.
DeleteVery nice dude. Yeah I have quite a few copies of some models I just love painting different versions of them.
ReplyDeleteThank you Simon. I couldn't agree more. When the figurine is well sculpted there are so many versions of it going through your mind that you just have to paint them.
DeleteThat's going to be a master paint job again! Best way to start into a new year I'd say.
ReplyDeleteThank you very much Moiterei. Doing art (regardless of whether it's good or not) is a great way to start a new year however you look at it.
DeleteI like the dusky skin tone
ReplyDeleteThanks Zab!
DeleteDitto on the skintone. Very nice.
ReplyDeleteRevisiting a previously completed mini can be very rewarding. She looks fantastic.
Many thanks too Finch. Yes she is a fantastic figurine. I have great respect for the sculptor that pulled it off.
Delete