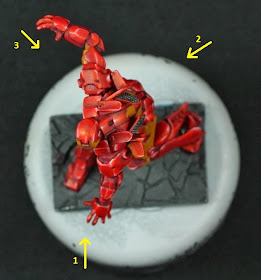
Akin to jumping into the deep-end of the pool, trying out the non-metallic metal (NMM) painting technique for the first time was made much more challenging by the many reflective angles provided by Iron Man's suit of armour. Without a doubt, this has been my toughest challenge yet in miniature painting and I was initially overwhelmed by the task I faced in painting Iron Man using NMM. To make things more manageable, I decided to break each task up into small digestible pieces and tackle them one at a time. I have a ways to go before I master NMM but at least I have made a start.
.jpg) |
| NMM light sources for Knight Models Iron Man |
Firstly, I decided on where my light sources were going to be (see above). In this case, I imagined light coming from three different sources spaced roughly 120 degrees from each other. Secondly, I tried to paint NMM layers on Iron Man's suit of armour by treating each small section as separate geometric shapes and paint them based on how I think light would reflect off a metal surface. Things were made easier by the use of a wet palette which helped in blending paints, a key component of the NMM painting technique. It also allowed me to work for longer stretches during a single painting session as the wet palette prevents the paint from drying up to too fast.
.jpg) |
| Using a wet palette for NMM helped ease blending of colours |
Work on the red armour is by no means finished as I will most likely have to rev-visit it once I completed NMM layers on the gold sections or Iron Man's suit of armour. This is to ensure that light reflections of the gold armour is consistent with how light plays off the red sections of the armour. Nonetheless, I guess the bulk of the NMM work on the red armour is done.
.jpg) |
| Knight Models Iron Man (WIP Red Armour) - facing Light Source 1 |
.jpg) |
| Pure Skull White was used for the brightest highlights to make it look like metal |
.jpg) |
| Back of red armour most likely still needs further touch ups for the NMM to work convincingly |
In the case of Knight Models Iron Man, a lack of patience is one factor that can derail my efforts at painting a presentable NMM effect. The many individual armour panels on Iron Man means light reflects slightly differently from each one. A tendency on my part to paint too fast can mean overlooking small details that will cause the NMM effect to look wrong to the human eye.
.jpg) |
| Knight Models Iron Man (WIP Red Armour) - facing Light Source 2 |
.jpg) |
| Knight Models Iron Man (WIP Red Armour) - facing Light Source 3 |
.jpg) |
| Still at basecoat stage - the arc reactor, hand repulsors, gold armour and base |
.jpg) |
| Knight Models Iron Man (WIP Red Armour) |
Hopefully when I have finished painting NMM on the gold sections, the overall metallic look of Iron Man will be more convincing. Additionally, object source lighting effects of the Arc Reactor on Iron Man's chest and repulsor weapon's on his hands will enhance the NMM effect, assuming I can pull it off. Well that's it for my progress on the Knight Models Iron Man miniature. Many hours of work lie ahead and I will need every ounce of my willpower to not rush things as per my usual (bad) habit.
.jpg)
.jpg)
.jpg)
.jpg)
.jpg)
.jpg)
.jpg)
.jpg)
.jpg)


Great start love it this figurine , i follow you .
ReplyDeleteGreetings
Hi Vincent, Thanks for following my progress on Iron Man. Cheers ^_^
DeleteVery impressive, love the colors and the pose...nice work!
ReplyDeleteLove the post too. Knight Models managed to make it look dynamic. =)
Deletedude, this is awesome, the NMM on the red part is really top notch, lookin forward to see what can you do on the arc reactor, overall even at this moment, this is a great lookin model already!
ReplyDeleteThanks limp! You are way too kind. ^_^ Parts of the red armour still look a bit off to me so I am hoping I can get a better idea on how to touch up once I finish the gold parts of Iron Man's armour.
Delete