Pages

Saturday 23 April 2022

Star Wars Speeder Bike [Work-in-Progress: Painting & Assembly of the Upper Hull Components]

 As I had alluded to in my previous Aratech 74-Z Military Speeder Bike progress update post, assembling fully painted parts and/or sub-assemblies of the bike is turning out to be problematic. This problem was amplified when dealing with upper hull components that comprised a variety of parts and sub-assemblies like handlebars, control switches, seats, tarp, etc. Read on for the horror story ...   


Star Wars Speeder Bike work-in-progress: Upper Hull and its components

 Fragility of parts in combination with the difficulty of fixing fully painted parts into tight-fitting joints resulted in issues ranging from minor ones like chipped paint all the way to the worse case scenario of the model kit breaking into two separate pieces. This particular assembly process was nerve wracking for me, and it all boiled down to me wanting to paint parts/sub-assemblies before putting them together. Doing so tends to cause the inside of joints getting paint on them thus making the fit tighter than normal. Moreover, having to fix painted parts together will always expose them to the danger of their paint layers getting damaged and chipped due to unavoidable rough handling.


Upper Hull components (from left): handlebars, switches, seat, miscellaneous piece, and tarp shelter

Individual Speeder Bike components all laid out next its Upper Hull prior to assembly

 First problem was encountered when I was fixing the tiny control switches into the holes on the upper hull. Simple enough right? Well primer and paint had gotten into the holes thus making the job of putting the switches into them a harder than expected task. So much so that I nearly broke a few of the tiny switches while trying to force them into the holes. In fact, a few of them did bent quite badly and came close to snapping in half. In the end, the task was accomplished without real damage. Apart from that, there was additional paint work on the upper hull in the form of the big red button, the trio of silver buttons, and the series of rivets on the hull between the control switches and seat.


Before attaching any components, I painted red/silver buttons and rivets on the Upper Hull

First components attached were the metallic switches/controls on the dashboard

 Following this, the major fubar occurred. The Speeder Bike broke in half as I tried to fit the seat pegs into the corresponding holes in the upper hull (see below). Since the fit was extremely tight, I couldn't fix the seat into the upper hull by hand. I had to use a rubber mallet instead. After carefully protecting the seat with some kitchen paper towel, I proceeded to hammer at the seat in the hopes of forcing it into the hull. With the upper hull structure more fragile than expected, the bike broke into two. Luckily for me, it was fairly easy to glue the bike back together without comprising its structural integrity as well as shape. Sadly though, the paint on the seat chipped so I had to repaint parts of the seat. 


Rear section of the Speeder Bike Upper Hull prior to attaching any components

Using a hammer to fix the Seat Cushion onto the Upper Hull caused the latter to break

Seat cushion fitted onto the Upper Hull, with the latter requiring glue to be put back together

 After these initial issues, things calmed down a bit and continued on without any further mishaps. While it took quite a bit of doing to fix the tarp onto the rear of the bike without any gaps showing, the force I had to apply luckily didn't result in any breakage. Meanwhile, the small black trapezoid piece located in between the seat and tarp was the easiest of all the upper hull components to assemble. 


Miscellaneous black trapezoid piece fitted behind the seat cushion ...

... followed by a Tarp for Wilderness Shelter right at the back of the bike

 Installing the handlebars and hand grips was surprisingly easy and almost effortless despite my anticipation of this task being the hardest. But despite my initial apprehensions as to the fragility of the handlebars, they were resilient to a fair bit of rough handling and fit quite easily and securely into the provided slots. And with that, all the upper hull components were in their rightful places. 


Nose/bow section of the Speeder Bike prior to adding the Handle Bars/Hand Grips

Nose/bow section of the Speeder Bike prior to adding the Handle Bars/Hand Grips

 Overall, the theme of the upper hull component assembly process was that of expectations and reality. Tasks that were expected to be easy turned out to be hard, which resulted in near misses, chipped paints, and the ultimate nightmare of the kit breaking. On the other hand, tasks that turned out to be easier than anticipated had no real consequence other than being a pleasant surprise. Essentially I was careful when I perhaps didn't have to be, while I was complacent when I should've been more careful. Like life, the hobby doesn't always stay true to expectations.   


Star Wars Speeder Bike Upper Hull with full complement of components installed

Star Wars Speeder Bike Upper Hull Complete (isometric view, from left hand side)

Weathering on the Upper Hull Components was kept to the absolute minimum

Star Wars Speeder Bike Upper Hull Complete (isometric view, from the back)

Seat is just a flat black as it'll be largely hidden from view once the Scout Trooper was seated

Star Wars Speeder Bike Upper Hull Complete (isometric view, from right hand side)

 Handlebars and Tarp for Wilderness Shelter received the most weathering of all the components

Star Wars Speeder Bike Upper Hull Complete (isometric view, from the front)

 With all the upper hull components now securely attached, next in line for the Speeder Bike are the lower hull components. This step of the assembly process shouldn't be as difficult. But I've learned to manage my expectations better after the mishaps that occurred in the upper hull component assembly process. For sure I'll approach the next step with more care and less over-confidence. This should also apply to our approach as the COVID pandemic becomes nearly-but-not-quite-endemic. So as always I wish onto you, dear readers, please stay safe, and be well. 


http://shireworks.blogspot.com/p/custom-painted.html

https://shireworks.blogspot.com/https://www.facebook.com/shire.works

Saturday 16 April 2022

Star Wars Speeder Bike [Work-in-Progress: Assembly of the Steering Vanes onto the Outriggers]

 In the final few assembly/painting phases of the Aratech 74-Z Military Speeder Bike, work will progress from the bike's bow/front to its stern/rear, with the upper-facing sections worked on first before the bottom facing ones. Sounds confusing? Well, hopefully things will be clearer as the next few post updates are uploaded to the blog, beginning with the bow or front end of the Star Wars Speeder Bike i.e. the Steering Vanes attached to the Outriggers.  


Star Wars Speeder Bike work-in-progress: Steering Vanes attached to the Outriggers

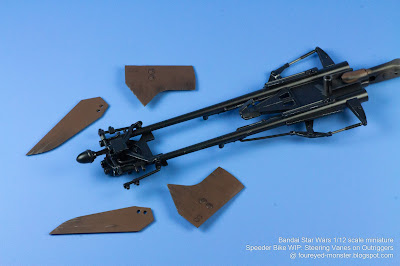
 For the assembly process of the Speeder Bike's Steering Vanes onto the Outriggers, I had initially expected the parts and sub-assemblies to all fit together nicely in a snap-fit sort of way. But things never really turn out the way you expect them to, and it turned out that the fittings were too loose and glue was required. Ordinarily this is would be a straightforward process, but I was gluing together parts that were already painted, and glue is damaging to painted parts. Thankfully I was able to apply the glue in places that were relatively hidden from sight. Couple with a light-handed approach, I managed to put everything together without any significant damage (if any) to the paint.  


Speeder Bike Steering Vanes and Outriggers fully painted parts prior to assembly

Speeder Bike Steering Vanes after being attached to its Outriggers

As for the Outriggers themselves, they will eventually be attached to the main body

 Upon an extremely closeup view of the Steering Vanes of the Speeder Bike, I can't help but feel that I could have overdone the metallic scratches and scuffs a bit. On the bright side it's not too overdone, but perhaps a few less scratches and scuffs may have improved the overall look.


Closeup view of the attached Steering Vanes; isometric view from bike's left side

Closeup view of the attached Steering Vanes; isometric view from bike's front

Closeup view of the attached Steering Vanes; isometric view from bike's right side

 Assembling painted parts for the Speeder Bike is turning out to be much difficult than for my previous outing involving the Space Battleship Yamato hangar bay and its docked space fighters. I believe this is partly dues to the fragility of the parts and sub-assemblies of the Speeder Bike that is being put together. Apart from glue potentially damaging the paint, there was also the danger of paint chipping during the assembly process. The latter arose out of the rather rough handling of parts/sub-assemblies when trying to put together fragile parts in hard to reach places. 


Visibility of the metallic scratches and scuff marks on the Steering Vanes become ...

... much more apparent at certain angles of lighting (compare this photo and the one above)

 When viewed from underneath (see below), it's easy to spot that the Steering Vanes have not been weathered. It was a conscious decision on my part not to weather the underside of the vanes because I felt it's a viewpoint that one rarely notices. However, if I turn out to be wrong then I guess it shouldn't be too hard to apply some mild weathering on the underside of the vanes. 


Steering Vanes and Multi Scanner Array (located at the tip of the Outriggers) viewed from underneath

 Progress on the Speeder Bike should gain enough momentum to see it completed in the coming weeks. The bike forms part of my second Join The Empire vignette project. The other parts are the already finished Scout Trooper and the yet to be completed Girl's Rider figurine. The latter has hit a temporary snag in that I have yet to repair and paint the leather accessories. Moreover there is the ever present mental block I have to overcome whenever I paint figurines. It involves me slowly building up the courage to paint her eyes. Mess up the eyes, and all the work I've done on the figurine up to now will have been wasted. No pressure then. So as I chip away at my fear of painting miniature eyes, the interim will see me finally complete the Speeder Bike. Until then, stay safe, and be well. 


http://shireworks.blogspot.com/p/custom-painted.html

https://shireworks.blogspot.com/https://www.facebook.com/shire.works

Saturday 9 April 2022

Star Wars Speeder Bike [Work-in-Progress: Transparent Blue Base & Prepping for Attachment]

 With inertia on the Space Battleship Yamato project finally overcome, the pendulum now swings back towards work on the Star Wars Speeder Bike, specifically prepping the bike for attachment to a base, and building the base itself. Now there are two ways the Star Wars Speeder Bike can be mounted for display. One is via the kit's display stand which is a vignette depicting the Forest of Endor, and it attaches to the bike via its side. The other is via a display stand sold separately namely the Bandai Action Base 2, which attaches to the bike's bottom. It's the latter that will be discussed here.    


Bandai Action Base 2 Clear Blue kit (front view)

Bandai Action Base 2 Clear Blue kit (back view)

 Work to prepare the Speeder Bike for attachment via its bottom actually begins before any further components are attached to the chassis. This is done so that there is not many fragile parts to get in the way while prep work is underway. While there is another point of attachment to the side that connects to a base included with the kit (i.e. the Forest of Endor vignette), I do not plan to do any prep work for this because for the moment I have no plans to use the base included with the kit.  


Prepping the Speeder Bike for attachment to the Bandai Action Base 2 ...

... involved first removing a small part/section of the bike in order to ... 

... expose the hole into which a nub found on the base will be inserted.

 During prep work, I damaged the part (see photo below) which I had to remove in order to expose the hole into which a nub on the Action Base attaches to. To add to my woes, the area exposed by the part's removal was bare plastic because I had primed and basecoated the area with the said part attached. To fix the stark contrast of bare plastic against the dark grey basecoat, I hand-brushed black primer followed by a dark grey layer onto the exposed plastic. Because it's extremely difficult to hand-brush lacquer paint, I didn't use the exact same basecoat color. Instead I used the acrylic Vallejo Black Grey paint as a substitute. While there is a slight difference in hue, it isn't too noticeable.  


While prepping the part that was removed was slightly damaged

Exposed molded plastic area around the hole was painted over

 While my preference was for an uncolored transparent display stand, I couldn't find it during the rare hobby store visits I've been making in the pandemic era. Instead I bought a clear blue version which actually displays a turquoise tint to it. I choose this version as a compromise because in my eyes it's a mix between the hologram blue in Star Wars movies and the greens of the Forest of Endor


Packaging art for the Bandai Action Base 2 Clear Blue

Instructions on how to assemble the Bandai Action Base 2

Sprue, screws, and nuts of the Bandai Action Base 2 Clear Blue

 On paper, the Bandai Action Base Two I bought was supposed to sport a transparent blue hue. But as mentioned earlier the color looks more turquoise than blue, at least to my eyes. Still I don't expect the turquoise hue to clash too much with the predominantly neutral colors of the Speeder Bike as well as Scout Trooper. And an added bonus is that it should blend into the azure background I plan to use when photographing the bike alone or together with the trooper. 


Bandai Action Base 2 Clear Blue, fully assembled and ...

... displaying a turquoise tint to the naked eye and in photos ...

... rather than the blue being depicted in the packaging art.

Assembly of the Bandai Action Base 2 was carried out ...

... without the need to use adhesives to glue parts together ...

... because most of the parts snap-fitted together quite tightly  ...

... with the occasional use of screws and nuts in three key areas ...

... located at the bottom and top of the display arm ...

... in order to enable stable articulation of the said arm ...

... as well as enable the arm to support the weight of the kit being displayed ...

... with the help of a gear/cog system that supports the arm against the base.

Bandai Action Base 2 Clear Blue [Completed] against an azure background

 In order to provide you with a rough idea hot the display stand looks against backgrounds other than azure, below are the photos of the base against black and white backgrounds.


Bandai Action Base 2 Clear Blue [Completed] against a black background

Bandai Action Base 2 Clear Blue [Completed] against a white background

 So in the end, I believe it was fortuitous to have been indirectly steered towards purchasing the clear blue versus the clear uncolored version. The real test as to whether this is the case will come when I attached the fully assembled Speeder Bike with or without the Scout Trooper onto the Action Base 2 and start taking photos. All I'll need to do is paint the rest of the bike's unfinished components, and assemble them, before I can make use of the base. So there's plenty of work ahead but the finishing line is clearly visible now. With that I'll end this post on an upbeat albeit humorous note. Give a man a fire and he's warm for a day, but set fire to him and he's warm for the rest of his life - Terry Pratchett.


http://shireworks.blogspot.com/p/custom-painted.html

https://shireworks.blogspot.com/https://www.facebook.com/shire.works