After a long drawn-out process, the Bandai 1/72 scale TIE Fighter is finally done. While this is a kit that could've easily been finished in a few days without any painting, it would've been remiss of me to not put in the tender loving care that this model kit deserves. Moreover, the TIE Fighter is my favourite spacefaring vehicle in the Star Wars universe, with the Star Destroyer close behind.
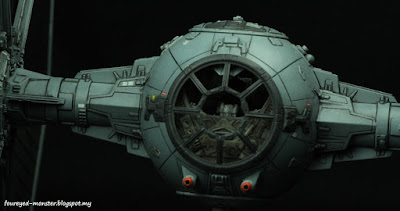 |
| Peekaboo, I see you ... TIE pilot's helmet reflects light coming in through the upper hatch |
I've been thoroughly impressed by this Star Wars model plastic kit. The amount of detail Bandai has molded and the ease in which the parts all come together have made this a fun project while retaining a high possibility of achieving a good end result regardless of the painter's or modeller's skill level.
 |
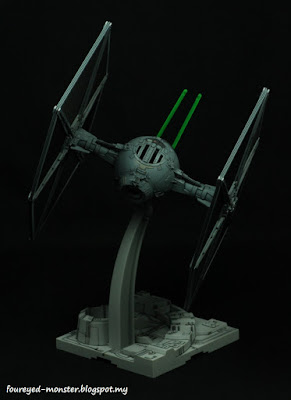
| Bandai 1/72 scale TIE Fighter, painted as The Empire Strikes Back version |
 |
| Matte black is definitely the way to go for the TIE Fighter's solar array panels |
A simple yet effective inclusion to the model kit is the green laser shots. When positioned correctly to catch light at just the right angle, the two clear plastic parts do indeed resemble laser shots. However, they look like the sad, static plastic pieces they are if the light doesn't illuminate them properly.
 |
| When the light catches the tip of the green laser shots ... |
If there is one gripe I have of the model kit is that the decals are extremely small. It takes a lot of patience and a steady hand to get good results with the tiny decals ... something that doesn't come easy to an antsy coffee slugging miniature painter/modeller like myself. But even so, I do have to admit the details on the decals is truly remarkable. So good that it
will make or break your final piece.
 |
| 'Windows' on the upper access hatch allows some light into the cockpit interior |
 |
| Maybe yet another thing I would do differently is to paint a brighter red for the twin ion engines |
Perhaps one thing I should have done differently was to apply dark grey liners on the Death Star base instead of the pure black I used. It's also the one thing that bugs me to no end. So much so that I was tempted to take shots of the TIE Fighter alone without the base such as the one you see immediately below this paragraph. Ah well, lesson learned. Next base won't have such harsh panel lines.
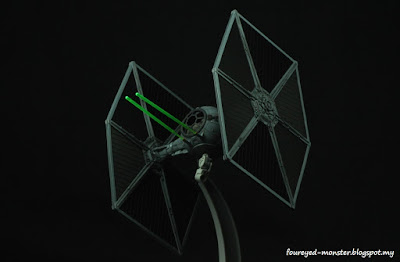 |
| Pew, pew, pew ... die you rebel scum |
For a less distracting view of the TIE Fighter, I took some pictures of it without the green laser shots.
I love this TIE Fighter kit so much that I plan to do another version i.e. the light grey one from
A New Hope.
That project is in hiatus as I still can't get hold of a
specific light grey colour I need. In a worse case scenario, I might be tempted to just use the
primer as my base colour (that's the lightest gray I have in a spray can
at the moment) and seal it with a clear coat. This isn't an ideal
solution though.
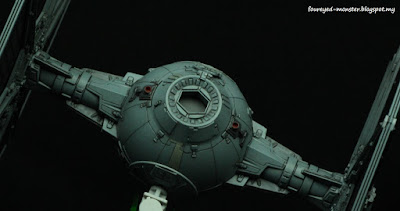 |
| A view not seen usually by rebel scum pilots, many whose last words are ... Arrghhh, I'm hit! |
In the meantime, I guess there is always another Bandai Star
Wars model kit I can work on, or I could start painting figurines
again. If I can find the time I want to do both. But then I also want to draw and meet some self-imposed writing deadlines. So much to do but so little time. Damn you mortality!


")
")
")
")
")
")


.jpg)

Such stunning work. Owning this kit myself, I hope to do it even a quarter of the justice you have!
ReplyDeleteThank you Greg, that's high praise indeed though I don't think I deserve it. Bandai's model is so well made and detailed that it made me look good, in parts anyway ... LoL ^_^
DeleteWell I have to say that I have thoroughly enjoyed watching your progress with this model and what a result - a triumph Sir.
ReplyDeleteThank you Michael. :) I loved sharing my experience working on the TIE Fighter and hope that it in some way can be a bfoundation for other modellers to build upon and improve.
DeleteWow FEM! That TIE definitely looks ace!
ReplyDeleteThanks Moiterei ... much appreciated :)
DeleteAbsolutely great! Now I cannot stop humming the Imperial March...
ReplyDeleteThank you very much Suber. For me, when I see the TIE fighter I always hear it's unique engine roar.
DeleteA real masterpiece!
ReplyDeleteGrazie Mille Luca!
Deletebest project to date!
ReplyDeleteThank you very much Zab!
DeleteFantastic, and I don't say that lightly. :)
ReplyDeleteI know you mentioned dissatisfaction with the lining on the base, but I have to say from this reader's perspective it looks superb. :)
Another great project sir. Maximum kudos. :)
Awww man ... thanks :)
DeleteAs for the base, I think I'm going to try a dark grey wash the next time and see if it's better. If not then I guess I had beginner's luck and got it right the first time. Thanks again for such kind words!
Terrific work, Kuan. You really got the most out of this kit.
ReplyDeleteIf there is an issue with the base it isn't reflected in the photos.
Thank you Finch. :) Thank you too for the vote of confidence on the base. It rubbed me the wrong way for some reason so I think I'm going to try for a lighter wash the next time. If it doesn't work then I guess I got it right the first time.
DeleteThat looks stunning dude well done fella!
ReplyDeleteMany thanks Simon! ^_^
DeleteHi there! Your TIE Fighter looks absolutely stunning!
ReplyDeleteWhat colors did you use for this model?
I plan on building and painting a TIE Fighter of my own, and want the color to look exactly like yours.
Hello ... Tamiya's TS-32 Haze Grey (a spray paint can) is the best match for the TIE Fighters seen in Empire Strikes Back.
Delete